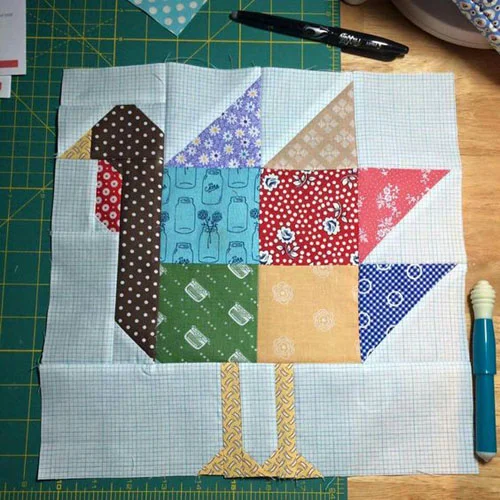
Looking for a fun and festive quilt project for the holiday season? A Gobble Turkey Blocks Quilt is the perfect addition to your Thanksgiving decor. This detailed tutorial will guide you step by step on how to create this charming quilt pattern. Whether you’re a beginner or an experienced quilter, you’ll find the process both enjoyable and rewarding. Let’s dive into the tutorial!
Materials Needed for Gobble Turkey Blocks Quilt
Before starting your Gobble Turkey Blocks Quilt, it’s essential to gather all the necessary materials. Having everything prepared in advance makes the quilting process smoother and more efficient.
- Fabric: You’ll need a variety of fabrics for the turkey block, including shades of brown, orange, red, yellow, and a background color (such as cream or white). Fat quarters or fabric scraps work well for this project.
- Cutting tools: A rotary cutter, self-healing cutting mat, and a quilting ruler are essential for precise fabric cuts. These tools will ensure your quilt blocks are uniform.
- Sewing supplies: A sewing machine, thread matching your fabric colors, pins, and an iron are necessary. Don’t forget a seam ripper in case of mistakes!
Having these materials ready before you begin ensures that you can focus entirely on assembling the quilt without interruptions.
Cutting the Fabric for Turkey Blocks
Accurate fabric cutting is crucial when creating quilt patterns. In this section, we’ll outline the required fabric cuts for each block.
- Body of the turkey: Cut 6” x 6” squares from your brown fabric. You’ll need one square per turkey block.
- Feathers: Use multiple colors for the feathers. Cut strips measuring 2” x 4” from each color. You’ll need five strips per block.
- Background fabric: Cut 6” x 6” squares for the background. These pieces will frame your turkey block and help it stand out.
Be sure to measure carefully and double-check your cuts to avoid wasting fabric. Precision is key in quilt-making!
Assembling the Gobble Turkey Blocks
Now that your fabric pieces are cut, it’s time to start assembling the turkey blocks. This process involves piecing the feathers, body, and background together.
- Creating the feathers: Arrange your 2” x 4” strips in a fan shape to form the turkey’s feathers. Sew them together using a ¼” seam allowance.
- Adding the body: Once the feathers are sewn, attach the 6” x 6” brown square for the turkey’s body. Press the seams flat for a polished look.
- Framing with background fabric: Sew the 6” x 6” background pieces around the assembled turkey block. This step frames the block and gives it a clean, cohesive appearance.
Repeat these steps for each block you plan to include in your quilt. The number of blocks will depend on your desired quilt size.

Stitching the Blocks Together
After completing your individual turkey blocks, it’s time to stitch them together to form the quilt top. This stage requires careful alignment to ensure a balanced final design.
- Layout: Arrange your completed turkey blocks on a large surface to visualize the final quilt pattern. Adjust as needed to balance colors and patterns.
- Row assembly: Sew the blocks together in rows using a ¼” seam allowance. Press the seams open or to one side to reduce bulk.
- Connecting rows: Join the rows together, matching seams carefully for a neat finish. Use pins to keep everything aligned during sewing.
Taking your time during this step ensures that your quilt top looks professional and well-constructed.
Adding Borders and Sashing
Borders and sashing add dimension and structure to your quilt. They frame the turkey blocks and give the quilt a finished appearance.
- Sashing strips: Cut sashing strips measuring 2” wide from your background fabric. Sew these strips between each block and row.
- Outer borders: For the outer border, cut strips measuring 4” wide from a coordinating fabric. Attach these strips around the entire quilt top.
- Pressing: Once all borders and sashing are attached, press the entire quilt top to remove any wrinkles.
Borders and sashing can be customized in width and color to match your design preferences.
Quilting and Finishing Touches
The final steps in making your Gobble Turkey Blocks Quilt involve quilting the layers together and adding binding.
- Layering: Create a quilt sandwich by layering the backing fabric, batting, and quilt top. Smooth out any wrinkles and pin the layers together.
- Quilting: Choose a quilting design that complements the turkey blocks. You can opt for simple straight-line quilting or a more intricate free-motion pattern.
- Binding: Cut binding strips 2½” wide and sew them around the edges of the quilt. Fold the binding over and hand-stitch it to the back for a clean finish.
Quilting adds texture and durability to your project, while binding ensures that the edges are protected.
Displaying Your Gobble Turkey Blocks Quilt
Congratulations! You’ve completed your Gobble Turkey Blocks Quilt. Now it’s time to display it proudly in your home.
- Table runner or wall hanging: Depending on the size of your quilt, you can use it as a festive table runner or a decorative wall hanging.
- Gift idea: A handmade quilt makes a thoughtful and personalized gift, especially for Thanksgiving.
- Holiday decor: Drape your quilt over a couch or chair to instantly add a cozy, holiday-themed touch to your living space.
No matter how you choose to use it, your Gobble Turkey Blocks Quilt is sure to bring warmth and cheer to your home.
Conclusion
Creating a Gobble Turkey Blocks Quilt is a fun and creative way to celebrate the Thanksgiving season. By following this step-by-step tutorial, you’ll have a beautiful, handmade quilt that showcases your quilting skills. Use this opportunity to experiment with different quilt patterns and color combinations. Happy quilting!
