
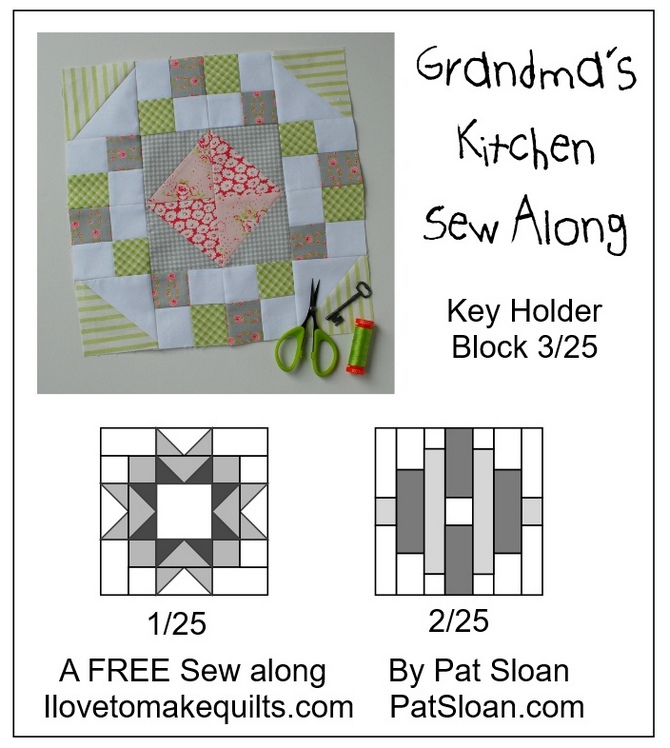
There’s something truly special about making a quilt block that feels like a warm hug from the past, and Grandma’s Kitchen Block 3 by Pat Sloan is exactly that kind of project. This block celebrates the warmth, tradition, and simple beauty of homemade quilting. Whether you’re a seasoned quilter or just starting your first project, this design offers a beautiful blend of nostalgia and creativity. It’s perfect for beginners but still engaging for more advanced quilters who enjoy working with a timeless quilt pattern.
This block is part of Pat Sloan’s beloved “Grandma’s Kitchen” series, which draws inspiration from memories of baking, shared meals, and laughter in the heart of the home. Block 3 continues the tradition with a fresh design that looks wonderful in any color scheme. Its straightforward piecing method makes it an approachable project for those looking to grow their quilting skills without feeling overwhelmed.
In this tutorial, we’ll walk through everything you need to make your own Grandma’s Kitchen Block 3 — from gathering materials and cutting fabric to assembling and adding your personal touch. You’ll also get ideas for customizing your block so it reflects your own family memories and style.
Materials You’ll Need
Before you start, it’s essential to gather all the materials so your sewing process flows smoothly. One of the joys of working on a quilt project like this is choosing fabrics that tell your story. For this block, you’ll need a mix of prints and solids that work harmoniously together. Pat Sloan’s version often uses cheerful, kitchen-inspired fabrics, but you can pick anything that makes you smile.
Materials list:
- Fabric A: ¼ yard of a light or background fabric (e.g., white, cream, or light print)
- Fabric B: ¼ yard of a medium print or solid
- Fabric C: ¼ yard of a darker contrasting fabric
- Rotary cutter and self-healing cutting mat
- Quilter’s ruler (for accurate cuts)
- Sewing machine with a ¼-inch foot (or you can hand-sew if you prefer)
- Matching thread
- Iron and ironing board
- Pins or fabric clips
Make sure your fabrics are pre-washed and pressed before cutting. This helps prevent shrinkage later and ensures a crisp, accurate assembly. Since this is a single block, it’s also a great way to use up fabric scraps — a perfect practice for quilters who enjoy sustainable crafting.
Cutting Your Fabric Pieces
Precision is key when working on any quilt pattern, and cutting accurately will make your assembly so much easier. For Grandma’s Kitchen Block 3, you’ll cut a combination of squares and rectangles that come together in a neat, classic design.
Cutting instructions:
- From Fabric A: Cut four 3½” x 3½” squares and two 2″ x 5″ rectangles
- From Fabric B: Cut four 2″ x 3½” rectangles and two 3½” x 5″ rectangles
- From Fabric C: Cut one 5″ x 5″ center square and four 2″ x 2″ corner squares
Lay out your pieces on a flat surface before you start sewing. This layout step helps you visualize the final block and ensures you’ve cut everything correctly. It also prevents mixing up fabrics, especially if you’re using multiple prints.
Once your pieces are ready, you’re set to begin piecing them together — the most rewarding part of the process.
Step-by-Step Assembly Instructions
Now that everything is cut, let’s piece it all together. This block uses traditional piecing techniques, which makes it a wonderful practice project for beginners while still being satisfying for experienced quilters.
Step 1: Assemble the corner units. Take the 2″ x 3½” rectangles from Fabric B and sew them to the 3½” x 3½” squares from Fabric A along one side. Press seams toward Fabric B for a crisp look.
Step 2: Create the center unit. Place the 5″ square from Fabric C in the center. Sew a 3½” x 5″ rectangle from Fabric B to the top and bottom. Press seams toward the center square.
Step 3: Join all units together. Arrange your corner units around the center piece with the small 2″ x 2″ squares in each outer corner. Sew the units into rows, pressing seams to one side. Then sew the rows together, matching seams carefully for a precise finish.
When complete, give your block a final press, making sure all seams are flat and neat. You’ll now have a perfectly pieced Grandma’s Kitchen Block 3, ready to join other blocks or stand alone as a mini quilt.
Tips for Success
Even though this quilt block is beginner-friendly, a few small tips can make your sewing even smoother. First, always use a consistent ¼-inch seam allowance. In quilting, even a small deviation can affect how your pieces align. If you’re new to quilting, consider using a seam guide or a ¼-inch presser foot to help keep your seams accurate.
Second, press your seams as you go. Pressing — not ironing — keeps your pieces from stretching while still giving you crisp seams that make the block look polished. Press toward the darker fabric whenever possible to avoid shadowing through lighter fabrics.
Lastly, take your time when matching seams between rows. Use pins or clips to hold pieces in place before sewing. This small step makes a big difference in the final look of your quilt pattern, ensuring everything lines up beautifully.
Customization Ideas
One of the joys of quilting is making each project uniquely your own. Grandma’s Kitchen Block 3 is incredibly versatile and can be customized to match your personality, home décor, or even a special theme. You could choose fabrics that reflect the colors of your grandmother’s actual kitchen, whether that’s warm yellows, calming blues, or vintage floral prints.
If you love a modern twist, consider using bold solids or geometric prints to give the block a fresh, contemporary feel. This could transform a traditional quilt pattern into a statement piece. Another idea is to use fabric from sentimental sources, such as old aprons, tablecloths, or even clothing, turning the block into a memory quilt that tells a personal story.
For a more seasonal approach, swap colors and prints according to the time of year. Bright reds and greens for Christmas, pastels for spring, or rich autumn tones for fall will each give this block a whole new personality.
Making a Full Quilt from This Block
Although Grandma’s Kitchen Block 3 is beautiful on its own, it can also be repeated to create a full quilt. Imagine an entire quilt top made up of this block in different fabric combinations — the result is a rich, cohesive design that’s both eye-catching and heartfelt.
To make a throw-size quilt, you might create 20 blocks and arrange them in a 4×5 layout. Add sashing between blocks to let each one shine, or sew them directly together for a more continuous look. Borders in a coordinating fabric can frame the quilt beautifully, giving it a finished touch.
The beauty of using a single block for an entire quilt is the rhythm and flow of sewing it repeatedly. You’ll become more confident with each one, and the repetition will make your piecing quicker and more precise.
Finishing Touches
Once your block — or quilt — is assembled, you’ll need to add batting and a backing fabric to complete it. Choose a batting weight that suits your purpose; lightweight batting works well for wall hangings or summer quilts, while thicker batting adds warmth for bed quilts.
Quilting the layers together can be done simply with straight-line stitching, or you can explore free-motion quilting for added texture and artistry. For beginners, stitching “in the ditch” along the seams is a safe and attractive option.
Finally, add a binding around the edges to encase the layers neatly. Binding can be a coordinating fabric for a seamless look or a contrasting color for a bold frame.
Share Your Creation
Quilting is a craft meant to be shared. Once you’ve finished your Grandma’s Kitchen Block 3, don’t keep it to yourself — show it off! Take photos and share them with your quilting community, post them on social media, or gift the block as part of a collaborative quilt project.
Pat Sloan’s quilt patterns inspire a sense of connection among quilters worldwide, and your unique take on this block is part of that beautiful story. By sharing, you not only celebrate your own creativity but also inspire others to pick up their fabric and give quilting a try.
So, gather your fabrics, thread up your machine, and start stitching your own Grandma’s Kitchen Block 3 today. The memories you’ll make along the way are just as valuable as the quilt itself — and who knows, this block may become a cherished family heirloom in the years to come.