
The Granny Square Bucket Hat is a beautiful blend of vintage charm and modern style, making it one of the most loved accessories in the world of Crochet. This project combines the timeless granny stitch with the trendy bucket hat shape, resulting in a wearable and eye-catching piece that suits all ages. Whether you are crafting for yourself, gifting, or creating items to sell, this Crochet Pattern offers endless creative possibilities.
One of the biggest advantages of this project is how beginner-friendly it is. Even if you are still gaining confidence with basic stitches, this tutorial will guide you step by step in a calm and encouraging way. The repetitive nature of the granny stitch helps improve rhythm, tension, and stitch recognition, making it perfect for learning while creating something practical.
In this tutorial, you will learn everything you need to complete your own Granny Square Bucket Hat from start to finish. We will cover materials, stitch explanations, shaping techniques, and finishing touches, along with plenty of ideas to personalize your hat. Grab your hook, choose your favorite yarn, and enjoy the relaxing journey of Crochet.
Materials and Tools You Will Need
Before starting your Granny Square Bucket Hat, it is important to gather all materials so your Crochet experience stays smooth and enjoyable. Choosing the right yarn and hook size will make a big difference in the final look and comfort of your hat. This Crochet Pattern works well with simple, accessible supplies that are easy to find.
You will need medium-weight yarn (worsted or aran) for this project. Cotton yarn is ideal for warm weather because it is breathable and holds structure well, while acrylic or blends provide softness and affordability. A crochet hook between 4.5 mm and 5.5 mm usually works best, depending on your tension and yarn choice.
Additional tools include scissors, a yarn needle for weaving in ends, stitch markers, and a measuring tape. These small tools help ensure accuracy, especially when checking hat circumference and height. Having everything prepared before you begin allows you to fully enjoy the creative process of Crochet without interruptions.
Understanding the Granny Stitch Structure
The heart of this Crochet Pattern is the classic granny stitch, which is made using clusters of double crochet stitches separated by chain spaces. This stitch creates a textured yet airy fabric that is both flexible and visually appealing. In the bucket hat design, the granny stitch adds charm while keeping the hat lightweight and comfortable.
Unlike traditional granny squares that are worked in square shapes, this hat uses a continuous round technique inspired by the granny motif. Increases are carefully placed to form a flat circle at the crown, which gradually transitions into straight sides. This method allows the hat to naturally shape itself without complicated calculations.
Understanding how increases affect the shape is key to success. Too many increases will cause ruffling, while too few may create a bowl-like shape. This tutorial will guide you through each round with clear instructions, helping beginners feel confident as they follow the Crochet Pattern step by step.
Step-by-Step: Creating the Crown
To begin your Granny Square Bucket Hat, start with a magic ring or adjustable loop. This creates a neat and secure center for the crown. Into the ring, work your first round of granny clusters, joining with a slip stitch to form a circle. This foundation sets the tone for the entire Crochet project.
In the following rounds, you will increase evenly by adding additional granny clusters between existing ones. Each round should grow wider while staying flat. Pay close attention to stitch counts and spacing, as consistency ensures the crown lays smoothly without curling or rippling.
Continue increasing until the crown reaches the desired diameter, usually around 6.5 to 7 inches for an adult hat. Measuring at this stage is essential. Taking time here ensures the final fit is comfortable and proportional, which is one of the most satisfying parts of following a Crochet Pattern correctly.
Step-by-Step: Building the Sides
Once the crown reaches the correct size, you will stop increasing and begin working even rounds. This simple change naturally creates the vertical sides of the bucket hat. The granny stitch pattern remains the same, making this stage relaxing and repetitive, perfect for mindful Crochet.
As you work the sides, you will notice the hat starting to take shape. This is an exciting moment, especially for beginners, as the project quickly transforms into a recognizable wearable item. Maintain consistent tension to keep the sides straight and uniform.
Continue crocheting even rounds until the hat reaches your desired depth. Most bucket hats measure between 7 and 8 inches from the top of the crown to the bottom edge. Adjusting the number of rounds allows you to customize the height easily within this Crochet Pattern.
Step-by-Step: Shaping the Brim
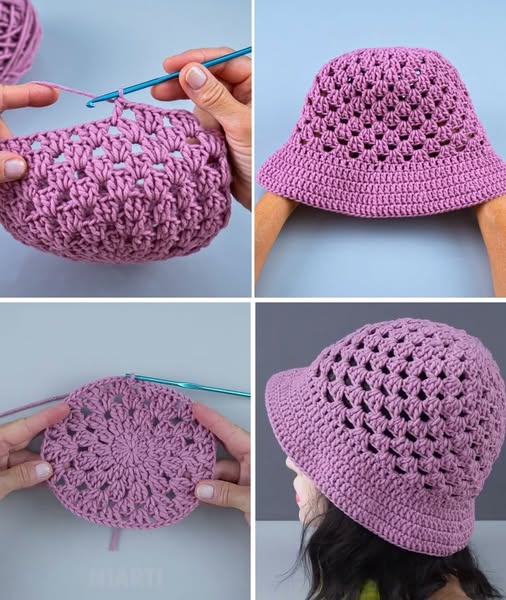
The brim gives the bucket hat its signature look and practical sun protection. To create it, you will begin increasing slightly in the next round by adding extra stitches at regular intervals. These gentle increases allow the fabric to flare outward without becoming wavy.
Continue working additional rounds with controlled increases until the brim reaches the width you like. Some prefer a subtle brim, while others enjoy a wider, more dramatic shape. This flexibility is one of the reasons this Crochet Pattern is so popular among crafters.
Finish the brim with one or two rounds of single crochet for a clean and sturdy edge. This final detail adds structure and polish, helping the hat hold its shape during wear. Taking time to finish neatly makes a big difference in the overall appearance of your Crochet project.
Customization and Personalization Ideas
One of the joys of Crochet is the ability to customize each project, and the Granny Square Bucket Hat is no exception. You can experiment with solid colors for a minimalist look or use multiple colors to highlight the granny stitch pattern. Color changes at each round can create stunning visual effects.
Texture is another way to personalize your hat. Try using textured yarns, subtle color gradients, or even incorporating different stitches for the brim. Adding a decorative edging, such as picot stitches or crab stitch, can elevate the design while staying true to the Crochet Pattern.
You can also adjust the size to fit children or create matching sets for family and friends. Changing hook size or yarn weight allows endless variations. These small modifications help turn a simple Crochet project into a unique, handmade accessory.
Tips for Beginners and Finishing Touches
If you are new to Crochet, remember that patience is key. Take your time with each round, count stitches carefully, and do not hesitate to unravel and redo sections if needed. Every mistake is a learning opportunity that improves your skills.
Weaving in ends securely is an important finishing step. Use a yarn needle to hide ends along stitch paths to prevent unraveling. Light blocking can also help even out stitches and enhance the shape of your Granny Square Bucket Hat.
Once your hat is complete, try it on and enjoy the satisfaction of wearing something you made by hand. This Crochet Pattern is not just about the finished piece but about enjoying the creative journey from start to finish.
Share Your Finished Granny Square Bucket Hat
Completing your Granny Square Bucket Hat is an achievement worth celebrating. Handmade Crochet projects carry personality, creativity, and care in every stitch. Wearing or gifting your hat is a beautiful way to showcase your skills and passion.
Consider sharing photos of your finished hat on social media, in Crochet groups, or on your blog. Seeing different color choices and interpretations inspires others and builds a supportive crafting community. Your version of this Crochet Pattern might encourage someone else to pick up a hook for the first time.
If you enjoyed this tutorial, feel free to share it with fellow crafters and friends who love Crochet. Each shared project helps keep handmade traditions alive and reminds us how powerful creativity can be—one stitch at a time.
PATTERN HERE
Crochet – Tutorial
FULL PATTERN ACCESS
You will be redirected to another site