
Quilting is an art form that allows creativity to flow through fabric and stitches. The Green Sea Dragon Quilt is a mesmerizing design inspired by ocean waves and the mythical beauty of sea dragons. This unique project combines intricate quilt patterns with a bold color palette, creating a stunning visual effect.
Whether you are an experienced quilter or a beginner looking for a challenge, this tutorial will guide you through each step. By following the instructions, you’ll create a breathtaking quilt that showcases movement, depth, and the vibrant hues of the ocean.
In this blog post, we will cover fabric choices, precise cutting instructions, piecing techniques, and expert tips to bring your quilt to life. Let’s dive into the world of marine-inspired quilting!
Choosing Fabrics for Your Green Sea Dragon Quilt
Selecting the right fabrics is crucial for capturing the mystical essence of the Green Sea Dragon Quilt. A combination of blues, greens, and aquamarine tones will mimic the ocean’s depth and mystery.
Consider using batik fabrics with water-like textures or metallic accents to add a shimmering effect. A variety of light and dark shades will help create contrast and bring the quilt design to life.
For the dragon’s body, opt for emerald greens, teals, and hints of black or silver. These colors will highlight the dragon’s dynamic movement while maintaining harmony with the ocean background.
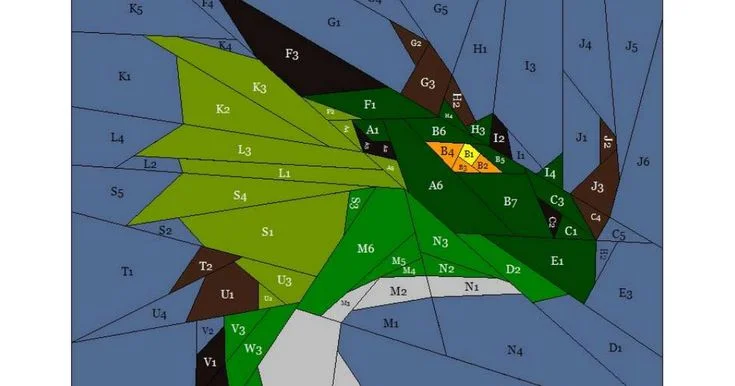
Quilt Pattern and Cutting Instructions
A well-planned quilt pattern is the foundation of a successful project. Below are the cutting measurements needed for your Green Sea Dragon Quilt:
- Background (Ocean Waves): Various shades of blue and aquamarine – cut (30) 6.5” x 6.5” squares.
- Dragon’s Body (Scales & Tail): Emerald green, teal, and black – cut (20) 4.5” x 4.5” squares and (10) 2.5” x 2.5” squares.
- Dragon’s Head & Features: Dark green, silver, and black – cut (5) 5” x 5” squares.
- Binding: Choose a deep navy or emerald fabric – cut (5) 2.5” x WOF (Width of Fabric) strips.
- Backing: Solid or patterned oceanic fabric – cut to the finished quilt size.
Precise cutting ensures that the pieces align perfectly when assembled. Use a rotary cutter and a quilting ruler to maintain accuracy.
Piecing the Green Sea Dragon Quilt
The piecing process begins with assembling the ocean wave background. Lay out your 6.5” squares in a random yet balanced pattern to create a natural water effect.
Next, piece together the dragon’s body using a combination of half-square triangles and solid squares. Position the scales in a flowing arrangement to mimic the movement of a swimming dragon.
The dragon’s head and features require careful placement of darker tones to add depth and expression. Small details like eyes and fins can be appliquéd for a more defined look.
Sewing and Assembling the Quilt
Start sewing the background pieces together in rows. Press seams open to reduce bulk and maintain a smooth surface.
Once the background is complete, attach the dragon’s body section by section. Pin pieces carefully to avoid misalignment and maintain sharp edges.
After assembling the top layer, baste the quilt with batting and backing fabric. Use safety pins or basting spray to hold layers in place before quilting.
Quilting Techniques and Stitching Details
Choosing the right quilting technique enhances the overall appearance of the Green Sea Dragon Quilt. Free-motion quilting can create wave-like patterns in the background, giving the illusion of moving water.
For the dragon’s body, consider using scale-like quilting stitches or echo quilting around the edges to add dimension. Metallic or variegated threads can highlight the dragon’s shimmering effect.
If using a domestic sewing machine, practice your quilting design on scrap fabric first. A walking foot or darning foot can help with precision and even stitching.
Binding and Finishing Touches
The final step in this quilt pattern is attaching the binding. Fold and press the 2.5” binding strips before attaching them to the quilt’s edges using a ¼” seam allowance.
For a polished look, hand-stitch the binding on the back of the quilt using an invisible stitch. This ensures a neat finish while securing all layers together.
After completing the binding, give the quilt a final press and inspect for any loose threads or unstitched areas. Your Green Sea Dragon Quilt is now ready to be displayed or gifted!
Conclusion: A Masterpiece Inspired by the Ocean
The Green Sea Dragon Quilt is a project that combines artistry with precision. With its striking colors, dynamic movement, and intricate quilting details, this quilt is a true masterpiece.
By following this tutorial, you have learned the essential steps, from fabric selection to final stitching. Whether for personal use or as a treasured gift, this quilt will bring a sense of oceanic wonder into any space.
Embrace the challenge, enjoy the process, and let your creativity soar as you craft your very own Green Sea Dragon Quilt!