
Creating your own quilted accessories is a fantastic way to express creativity while also crafting something practical. One of the most charming and beginner-friendly projects is the Half Moon Toiletry Bag. With its compact size, curved silhouette, and endless fabric possibilities, it’s an ideal project for both first-time sewists and seasoned quilters. In this step-by-step tutorial, you’ll learn how to make a half moon toiletry bag using a quilt pattern that is both functional and fun.
Materials You’ll Need
Before you begin, gather all your materials and tools. Having everything on hand will make the process smoother and more enjoyable.
- Outer Fabric (1 fat quarter) – Choose cotton, canvas, or quilting cotton
- Lining Fabric (1 fat quarter) – Lightweight cotton works best
- Batting – Low-loft quilt batting or fusible fleece
- Zipper – 10-inch nylon or metal zipper
- Bias Tape (optional) – For finishing seams or adding decoration
- Thread – Coordinating or contrasting
- Scissors or Rotary Cutter
- Sewing Machine with zipper foot
- Pins or Clips
- Fabric Marker
Optional: quilt ruler and cutting mat for precision. If you’re using scraps from other quilt projects, this is a great way to repurpose them!
Cutting and Preparing the Fabric
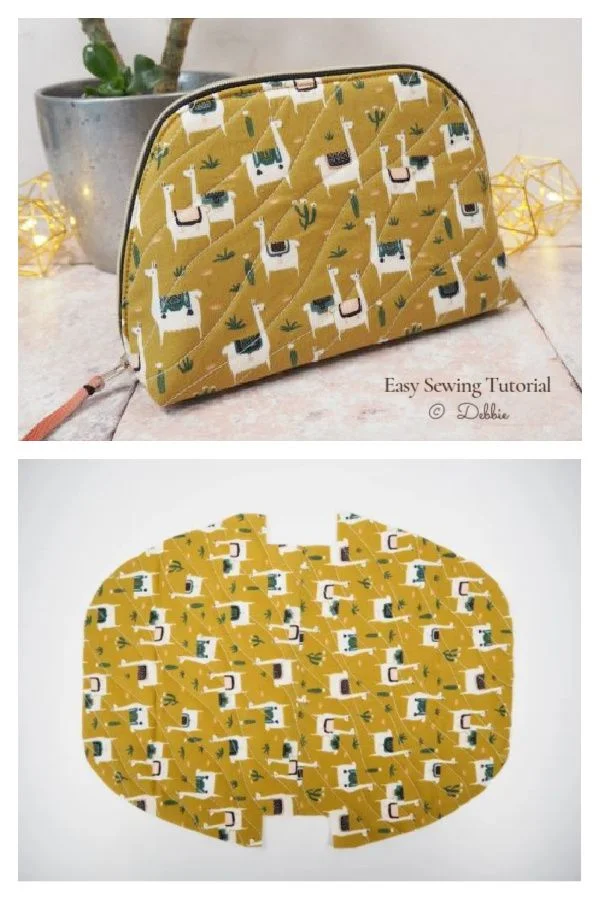
Start by cutting your fabric pieces based on the quilt pattern provided. You can download a half moon template or draw one using a plate or bowl as a guide. The shape should resemble a semicircle about 10 inches wide and 6 inches high.
Cut two pieces of outer fabric, two lining pieces, and two batting pieces using the half moon template. For a quilted look, sandwich the batting between the outer fabric and lining. Use your fabric marker to draw quilt patterns like diagonal lines, diamonds, or waves across the outer pieces.
Now it’s time to quilt! Stitch along the lines you marked. This quilting step not only adds visual interest but also provides structure to your toiletry bag. Quilting can be simple or complex—don’t be afraid to experiment.
Sewing the Zipper
Lay one quilted outer piece face up. Place the zipper along the straight edge with the teeth facing down, then layer one lining piece on top, right side down. Clip or pin in place. Sew along the zipper edge with a zipper foot.
Repeat this process for the second side: lay the other quilted outer piece face up, place the zipper (now with one side attached) on top, then add the second lining piece. Sew again. Open both sides and press the fabric away from the zipper. Topstitch along each edge to keep the fabric from catching in the zipper.
This step might seem tricky at first, but with a little patience, you’ll achieve a clean, professional finish. A quality zipper installation can elevate any quilted bag project.
Constructing the Bag
With the zipper partially open (very important!), match the quilted outer pieces right sides together and do the same with the lining. Clip all the way around.
Sew around the curved edge of both the outer and lining layers, leaving a 3-inch gap in the lining for turning. If your corners or curves feel bulky, trim or notch the seam allowance for a smoother finish.
Turn the bag right side out through the gap in the lining. Push out all the curves gently. Sew the gap in the lining closed using a ladder stitch or machine topstitch. Push the lining inside the bag and give everything a good press. Now you have a fully formed half moon toiletry bag!
Ideas for Personalization
One of the most fun aspects of working with a quilt pattern is how customizable it is. Start by selecting fabric combinations that reflect your personality. Try mixing solid fabrics with floral prints, or opt for bold geometric designs to make a statement.
Consider adding patchwork quilt blocks to the outer fabric before quilting. A mini log cabin, flying geese, or even a foundation paper-pieced motif can add extra flair. Just make sure the blocks fit within your half moon shape.
You can also personalize the inside. Add small elastic loops, mesh pockets, or label tags. These additions make the bag more functional while also showing off your sewing skills.
Tips for Beginners
If you’re new to quilting, don’t stress about perfection. The goal is to enjoy the process and gain confidence with each stitch. Start with a simple quilt pattern, such as straight lines, and work your way toward more intricate designs.
Take your time with the zipper—it’s a skill worth mastering. Practice on scrap fabric first if needed. And don’t skip pressing your seams; it really does make a difference in how your finished quilt project looks.
Most importantly, use this bag project as a learning experience. Even if your seams aren’t perfectly aligned, the result will still be useful and full of handmade charm.
Using Your Half Moon Toiletry Bag
This quilted toiletry bag is perfect for travel, storing makeup, or even organizing small sewing supplies. The half moon shape makes it compact yet spacious, and the quilted design adds a lovely handmade touch.
It also makes a thoughtful gift. Fill it with bath salts, essential oils, or travel-size toiletries and gift it for birthdays, holidays, or special occasions. You can even make a set in different sizes or colors!
The versatility of this bag, paired with the joy of quilting, makes it a must-add to your sewing list. It’s quick to make, budget-friendly, and totally satisfying.
Share Your Creations!
We’d love to see how your quilted Half Moon Toiletry Bag turned out! Did you use scraps from another quilt project? Did you try a fun new quilt pattern for the exterior? Share your bag on social media with the hashtag #HalfMoonQuiltBag or post it in your favorite quilting group or sewing forum.
By sharing your creations, you can inspire others to try their hand at quilted accessories. It’s a wonderful way to celebrate your progress, exchange ideas, and become part of the quilting community.
So go ahead—download the free pattern, choose your favorite fabrics, and start stitching today. Your next favorite travel bag is only a few seams away!
If you’d like a printable PDF of the Half Moon Toiletry Bag Free Pattern, or want to learn more about beginner-friendly quilt patterns, don’t forget to subscribe to our newsletter and explore more tutorials on our blog. Happy quilting!