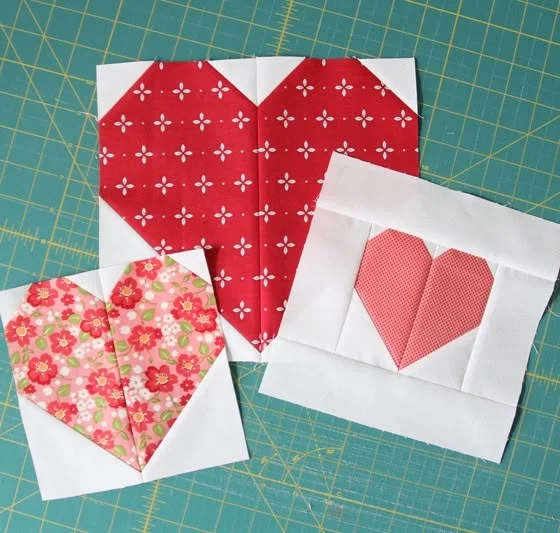
Creating a Heart Quilt Block Pattern is a wonderful way to add warmth, charm, and personality to your next Quilt project. Whether you are sewing a romantic Valentine’s piece, a baby blanket, or simply experimenting with new shapes, this Quilting pattern is both meaningful and beginner-friendly. The heart block is timeless, versatile, and perfect for showcasing your favorite fabrics.
If you are just starting your quilting journey, this tutorial will guide you step by step with clear instructions and helpful tips. Even if you already have experience, you will enjoy how quickly this block comes together. Best of all, you can easily customize it to match any color palette or occasion.
In this tutorial, you will find a complete materials list, cutting instructions, detailed assembly steps, and creative personalization ideas. By the end, you will have a finished Heart Quilt Block ready to turn into a pillow, wall hanging, table runner, or full Quilt top.
Why Choose a Heart Quilt Block Pattern
The Heart Quilt Block Pattern is one of the most beloved designs in the world of Quilting. It symbolizes love, care, and creativity, making it perfect for heartfelt gifts. Because of its simple geometric construction, it is also a fantastic Quilting pattern for beginners who want to practice precise cutting and accurate seams.
Another reason to choose this Quilt block is its versatility. You can make it modern with bold solids, traditional with floral prints, or playful with bright scraps. No matter your style, the heart shape remains recognizable and charming. This makes it ideal for seasonal projects, especially Valentine’s Day, weddings, or baby showers.
Additionally, this Quilting pattern helps build essential skills. You will practice half-square triangles, straight seams, and block assembly. These techniques are foundational in Quilting, so mastering them through a simple and enjoyable block like this one will boost your confidence for future Quilt projects.
Materials You Will Need
Before you begin your Heart Quilt Block Pattern, gather all your supplies. Having everything ready will make the process smooth and enjoyable. You do not need advanced tools, which makes this Quilt project perfect for beginners.
Here is your materials list:
- 2 coordinating cotton fabrics (one for the heart, one for the background)
- Rotary cutter
- Cutting mat
- Quilting ruler
- Sewing machine
- Thread (matching or neutral)
- Pins or clips
- Iron and ironing board
- Fabric marking pencil (optional)
For a 12-inch finished Heart Quilt Block, you will need:
- Heart fabric: 4 squares measuring 4.5″ x 4.5″ and 2 squares measuring 5″ x 5″
- Background fabric: 4 rectangles measuring 4.5″ x 8.5″ and 2 squares measuring 5″ x 5″
Make sure to use 100% cotton quilting fabric for best results. Cotton is easy to sew, presses well, and gives your Quilt a professional finish. Wash and iron your fabric beforehand if you prefer pre-shrunk materials.
Cutting and Preparing Your Fabric
Accurate cutting is one of the most important parts of any Quilting pattern. Begin by laying your fabric flat on a cutting mat. Use your quilting ruler and rotary cutter to measure and cut each piece carefully. Double-check your measurements before cutting to avoid mistakes.
Next, take the two 5″ x 5″ squares of heart fabric and the two 5″ x 5″ background squares. These will be used to create half-square triangles (HSTs), which help form the top curves of the heart. Draw a diagonal line from one corner to the opposite corner on the back of each background square.
Place one heart square and one background square right sides together. Pin them to prevent shifting. This preparation step ensures your Quilt block pieces align perfectly when sewn.
Step-by-Step Assembly of the Heart Quilt Block
Now it is time to sew your Heart Quilt Block Pattern together. Follow these steps carefully for a neat and precise result.
Step 1: Create Half-Square Triangles
Sew a seam 1/4 inch on both sides of the drawn diagonal line. Once sewn, cut along the diagonal line to create two triangle units. Press the seams toward the darker fabric. Trim each unit to 4.5″ x 4.5″. Repeat with the second pair. You will now have four half-square triangles for your Quilt block.
Step 2: Arrange the Pieces
Lay out your block in three rows. The top row should have two half-square triangles on the outside and two 4.5″ heart squares in the center. The middle row should consist of four 4.5″ heart squares. The bottom row should have one heart square in the center and two background rectangles on each side. Take a moment to adjust the orientation of the triangles so they form the top curves of the heart shape.
Step 3: Sew the Rows
Sew the pieces in each row together using a 1/4 inch seam allowance. Press the seams in alternating directions to reduce bulk. Then sew the three rows together, matching the seams carefully. Press the final block flat. Your unfinished block should measure approximately 12.5″ x 12.5″, resulting in a 12″ finished Quilt block.
Pressing and Squaring Your Block
Pressing is just as important as sewing in Quilting. After assembling your Heart Quilt Block Pattern, place it on your ironing board and press gently. Avoid sliding the iron, as this can stretch the fabric. Instead, press up and down to maintain the block’s shape.
Once pressed, place the block on your cutting mat and use your quilting ruler to square it up. Trim any uneven edges carefully. Squaring ensures that your Quilt blocks will align properly when sewn together into a larger Quilt top.
Take your time during this step. A well-pressed and squared block makes the final Quilting process much smoother. Precision at this stage leads to a more polished and professional-looking Quilt.
Creative Personalization Ideas
One of the joys of working with a Heart Quilt Block Pattern is how easy it is to personalize. You can experiment with colors, prints, and layouts to make your Quilt truly unique. Try using red and pink fabrics for a classic romantic look, or choose pastel tones for a baby-themed Quilting pattern.
Another creative idea is to use scraps for a patchwork-style heart. Instead of one solid fabric for the heart, piece together smaller squares to create a scrappy design. This adds texture and visual interest while helping you use leftover fabric from other Quilt projects.
You can also vary the block size. Make smaller hearts for a table runner or combine multiple heart blocks into a large Quilt. Consider adding sashing between blocks or incorporating different Quilting patterns in the background to enhance the overall design.
Turning Your Block into a Finished Quilt
After completing your Heart Quilt Block Pattern, you can decide how to use it. If you are making a full Quilt, create multiple blocks and arrange them in rows. Play with layout options before sewing them together to find a design you love.
Once your Quilt top is complete, layer it with batting and backing fabric. Baste the layers together using pins or spray adhesive. Then quilt as desired, either with straight lines, free-motion stitching, or a simple grid. The quilting stitches will enhance the heart design and secure the layers.
Finally, trim the edges and add binding around the Quilt. Hand-stitch or machine-stitch the binding in place. With this final step, your beautiful heart-themed Quilt is complete and ready to be gifted or displayed.
Final Thoughts and Share Your Project
Creating a Heart Quilt Block Pattern is a rewarding and enjoyable experience. This beginner-friendly Quilting pattern helps you build essential skills while producing a meaningful and beautiful design. Whether you are sewing for yourself or someone special, this block carries warmth and creativity in every stitch.
Remember that Quilting is a journey. Each Quilt you make teaches you something new. Do not worry about small imperfections; they are part of handmade charm. The more you practice, the more confident and precise you will become.
Now it is your turn. Gather your fabrics, start sewing, and bring your Heart Quilt Block to life. When you finish, share your Quilt project with friends, family, or your online community. Inspire others with your creativity and celebrate the joy of Quilting together!