
Creating a Hidden Wells Quilt Block is a fantastic way to explore unique quilt patterns that give the illusion of movement and depth. This technique is beginner-friendly yet produces stunning results that look complex. In this tutorial, we will walk through the step-by-step process of making a Hidden Wells Quilt Block, including fabric measurements, cutting instructions, and assembly tips.
What is a Hidden Wells Quilt Block?
The Hidden Wells Quilt Block is a pattern that uses strip-piecing techniques to create an intricate, woven appearance. The illusion of depth and interlocking fabric strips make it a favorite among quilters.
This quilt block is formed by sewing fabric strips together, cutting them into squares, and then rotating them in a specific pattern. The magic of this technique is that a simple arrangement transforms into a striking visual effect.
Quilters love this pattern because it is highly adaptable. You can experiment with different quilt patterns, fabric colors, and strip widths to create a customized look that suits your personal style.
Materials and Fabric Selection
To create a Hidden Wells Quilt Block, you will need a selection of fabrics in contrasting colors, a rotary cutter, a cutting mat, and a ruler. The contrast between fabrics enhances the pattern’s visual appeal.
Choose four or five coordinating fabrics with light and dark shades. This contrast will help define the intricate shapes within the quilt block, making the pattern more dynamic.
Pre-wash and iron your fabrics before cutting. This ensures accuracy when sewing and prevents shrinkage after the quilt is completed.
Cutting the Fabric Strips
For a standard Hidden Wells Quilt Block, cut the following fabric strips:
- Four strips measuring 2.5 inches by 18 inches from each of four different fabrics.
- A total of 16 fabric strips, ensuring an equal number from each fabric.
Arrange the strips in a visually appealing order before sewing. The order of these strips will determine the final look of your quilt block.
Using a rotary cutter and ruler, ensure that your fabric strips are cut precisely. Even slight variations in width can impact the final quilt pattern, so accuracy is essential.
Sewing the Fabric Strips Together
Sew the fabric strips together in sets of four, using a ¼-inch seam allowance. Press the seams open or to one side to reduce bulk and keep your fabric smooth.
Make sure to sew with consistent seam allowances to ensure that all strips align properly. Uneven seams can cause distortion in the final quilt block.
Once all four strips are sewn together, press the fabric flat. You should now have four strip sets, each measuring approximately 9 inches by 18 inches.
Cutting the Strip Sets into Squares
Using a ruler and rotary cutter, cut each strip set into squares measuring 9 inches by 9 inches. You should have four squares in total.
Each square should maintain the same strip order. This consistency is crucial for creating the Hidden Wells effect when you arrange the squares later.
Check that all your squares are equal in size before moving on to the next step. Any uneven edges can be trimmed for precision.
Arranging and Rotating the Blocks
Lay out the four squares in a 2×2 grid, ensuring the fabric strips are aligned. Rotate two opposite blocks 45 degrees so that the strips create a woven pattern.
The magic of the Hidden Wells pattern happens at this stage. The rotated blocks will give the illusion of depth, making the quilt look complex despite its simple construction.
Experiment with different rotations before sewing. Taking a picture of potential layouts can help you decide which arrangement you prefer.
Sewing the Blocks Together
Once satisfied with the arrangement, sew the squares together in rows using a ¼-inch seam allowance. Press the seams open or to one side after sewing each row.
After sewing the rows, join them together to complete the block. Keep an eye on fabric alignment to ensure a clean and precise finish.
Press the completed quilt block thoroughly. A well-pressed block will make it easier to join with other quilt blocks when assembling the final quilt top.
Finishing Touches and Quilting
Once you’ve made multiple Hidden Wells Quilt Blocks, arrange them to form a larger quilt top. The interplay of colors and woven effect will become even more pronounced with multiple blocks.
Consider adding a border or sashing between the blocks to frame the design. This can enhance the quilt’s overall look and make each block stand out.
Finish by layering, quilting, and binding your quilt. Choose a quilting technique that complements the movement within the pattern, such as diagonal or swirl quilting.
Conclusion
The Hidden Wells Quilt Block is a mesmerizing pattern that transforms simple strips of fabric into a visually dynamic design. Whether you are a beginner or an experienced quilter, this technique offers endless possibilities for creativity.
By following this tutorial and experimenting with fabric choices, you can create a stunning quilt that showcases depth and movement. Try out different quilt patterns and color combinations to make each project uniquely yours.
Hidden Wells Quilt Block – Free Pattern Tutorial
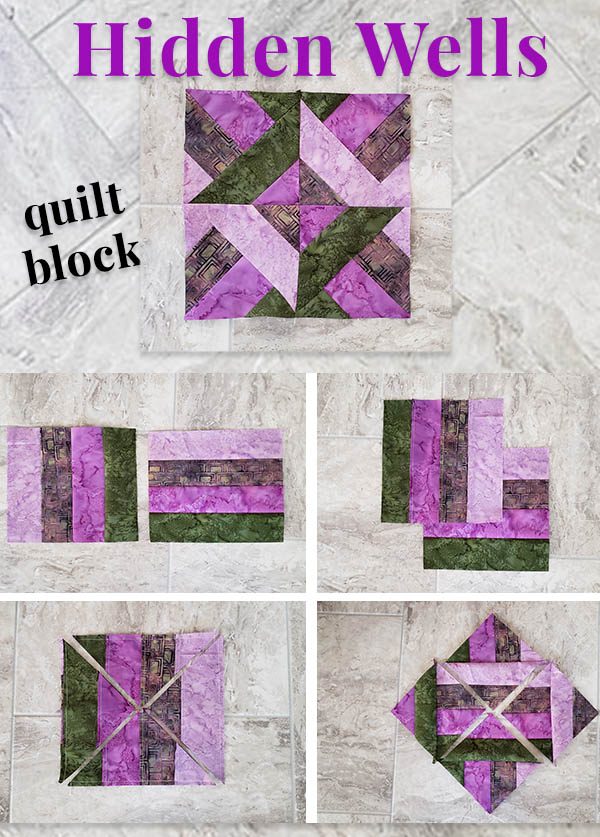
The Hidden Wells quilt block is a striking and intricate design that looks complex but is surprisingly easy to create. It involves strip piecing, cutting, and rotating to form a visually stunning effect. Below is a step-by-step guide to making a 12-inch finished Hidden Wells quilt block.
Materials Needed
- 4 different fabrics (A, B, C, D) – 1/4 yard each
- Rotary cutter, ruler, and cutting mat
- Sewing machine
- Iron and ironing board
Cutting Instructions
- Cut Fabric Strips:
- Cut two 2.5” x 18” strips from each of the four fabrics (A, B, C, D).
- Assemble the Strip Sets:
- Arrange the strips in the following order: A – B – C – D.
- Sew them together lengthwise using a 1/4” seam allowance.
- Press seams open or to one side.
- Create a second strip set with the same order.
- Cross-Cutting:
- Subcut the sewn strip set into 2.5” segments.
- You should get six segments from each strip set.
Block Assembly
- Creating the Grid:
- Take four of the cross-cut segments.
- Rotate and rearrange them to form a square layout with a diagonal symmetry.
- The arrangement should create a woven, “hidden wells” effect.
- Sewing the Quadrants:
- Sew the first two segments together.
- Repeat for the remaining two segments.
- Press seams open.
- Sew the two halves together to complete the block.
- Press the final seam open or to one side.
Final Measurements
- The unfinished block should measure 12.5” x 12.5”.
- Once sewn into a quilt, the finished size will be 12” x 12”.
Tips for Success
- Use fabrics with high contrast for the best effect.
- Ensure accurate 1/4” seams for precise alignment.
- Press seams carefully to avoid bulk in the final block.
This Hidden Wells Quilt Block is perfect for beginners and experienced quilters alike. Happy quilting!