Easter is just around the corner, and what better way to celebrate than by creating a charming Hippity Hoppity Easter Bunny Pillow? This quilted pillow pattern is perfect for adding a festive touch to your home while showcasing your quilting skills. In this tutorial, we will guide you step by step through the process, ensuring a fun and rewarding quilting experience.
Materials Needed for Your Easter Bunny Pillow
Before diving into the quilting process, gathering the right materials is crucial. You will need a variety of fabrics, including pastel-colored cotton for a soft and festive look. Opt for high-quality quilting fabrics to ensure durability and ease of stitching.
Additionally, you will need batting, thread, scissors, a rotary cutter, and a quilting ruler. Having these tools on hand will streamline the cutting and sewing process. Lastly, don’t forget the sewing machine and an iron to achieve crisp seams and a polished finish.
Selecting the right materials is the foundation of any successful quilt project. Choosing pre-washed and ironed fabric pieces will prevent unwanted shrinkage and ensure a smooth quilting experience.
Cutting the Fabric Pieces
Precise cutting is essential for achieving a well-balanced quilted pillow. Using a rotary cutter and ruler, cut the following fabric pieces:
- Bunny applique fabric: 8” x 10”
- Background fabric: 12” x 12”
- Border strips: Two 2” x 12” strips and two 2” x 16” strips
- Backing fabric: 16” x 16”
- Batting: 16” x 16”
Once all fabric pieces are cut, arrange them according to the quilt pattern layout. This step ensures all pieces fit together seamlessly before stitching begins. Proper cutting techniques will make the assembly process smooth and effortless.
Appliquéing the Bunny Design
The Easter bunny is the highlight of this quilted pillow, so take your time positioning the appliqué piece. Use fusible webbing to secure the bunny shape onto the background fabric before stitching.
Once in place, sew around the bunny’s edges using a zigzag stitch or blanket stitch. This will secure the fabric while adding decorative detail. If desired, use contrasting thread for a playful, eye-catching effect.
To enhance the design, consider adding embroidered details like whiskers, eyes, or a small bow. These finishing touches personalize your quilted pillow and make it uniquely festive.
Assembling the Pillow Front
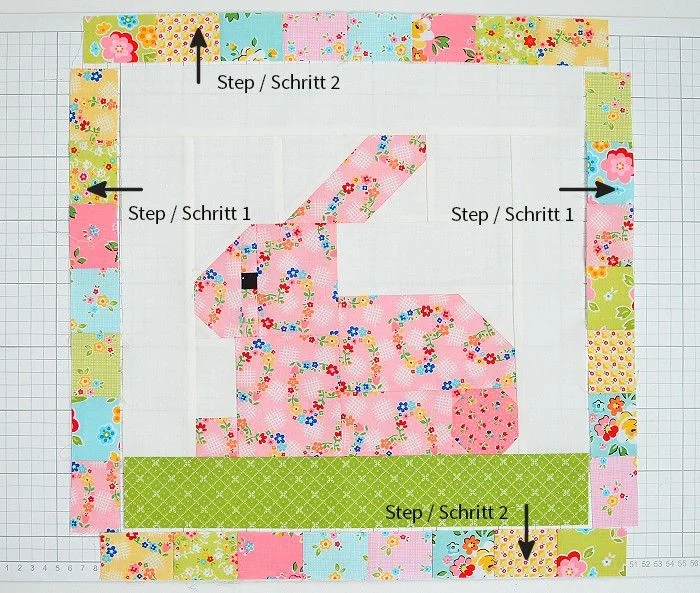
Now that the bunny appliqué is complete, it’s time to attach the border strips. First, sew the shorter border strips (2” x 12”) to the top and bottom of the background fabric. Press the seams open to keep the quilt top flat.
Next, attach the longer border strips (2” x 16”) to the sides. Ensure all seams align properly to create a neat, symmetrical quilt top. Pressing each seam after sewing improves accuracy and enhances the overall look.
Once the quilt top is fully assembled, layer it with batting and the backing fabric. Secure the layers together using quilting pins before moving on to the stitching phase.
Quilting the Pillow Top
Quilting adds texture and dimension to your Easter Bunny Pillow. Start by stitching along the seams of the border strips, following a simple stitch-in-the-ditch technique.
For added visual interest, consider free-motion quilting or echo stitching around the bunny appliqué. This enhances the design while securing the fabric layers together. If you prefer a more minimalist look, straight-line quilting works beautifully as well.
After quilting is complete, trim any excess batting and backing fabric. Your pillow top should now be neatly secured and ready for the final assembly.
Sewing the Pillow Back and Finishing Touches

To create a removable pillow cover, use an envelope-style or zippered backing. Cut two pieces of fabric, each measuring 16” x 10”, for the envelope closure.
Hem one long edge of each backing piece to prevent fraying. Overlap these pieces on the back of the quilted pillow top and secure them with pins. Sew around the entire perimeter with a ¼-inch seam allowance.
Once sewn, trim any excess fabric and turn the pillow cover right side out. Insert your pillow form, and your Hippity Hoppity Easter Bunny Pillow is complete!
Conclusion
Creating a Hippity Hoppity Easter Bunny Pillow is a delightful way to embrace the spirit of Easter while honing your quilting skills. By following this step-by-step tutorial, you’ll achieve a beautifully crafted pillow that adds charm to any space.
With careful fabric selection, precise cutting, and creative quilting techniques, your Easter Bunny Pillow will become a cherished seasonal decoration. Share your finished quilt patterns with friends and family or gift them to loved ones for a heartwarming touch.
Get started on your Easter quilting project today, and let your creativity shine with this festive quilt pattern!
