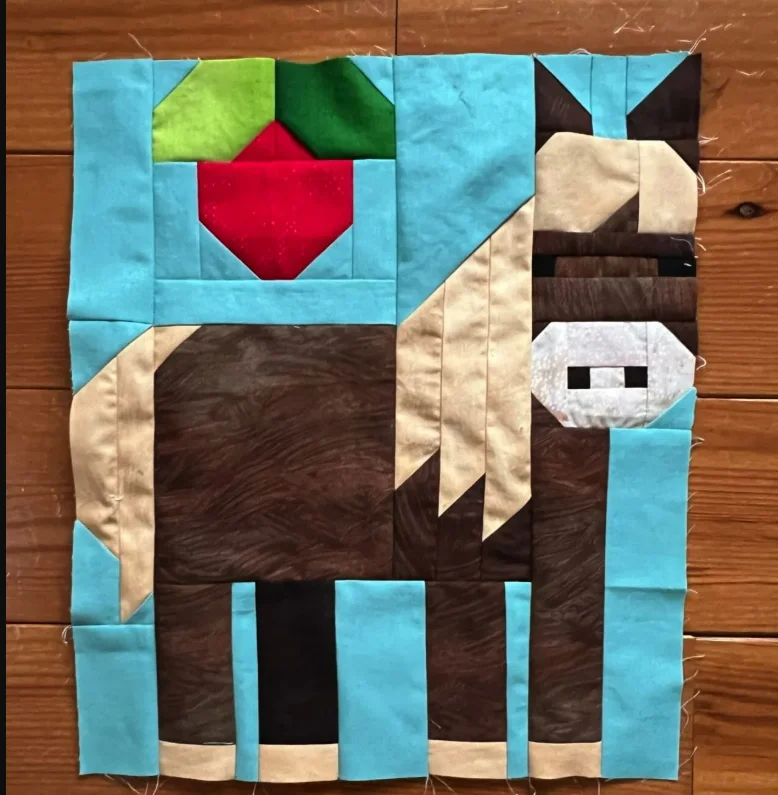
Creating a Horse Block Quilt is a rewarding and creative way to celebrate your love for quilting and equestrian themes. Whether you’re an experienced quilter or a beginner, this step-by-step tutorial will guide you through the process of making a stunning quilt block featuring a horse design. With careful attention to quilt patterns and fabric selection, you can craft a unique piece that showcases your skills.
Choosing the Right Fabric and Tools
Selecting the best fabric is essential for a visually appealing quilt. You will need various cotton fabrics in colors that highlight the horse’s shape, such as browns, blacks, and neutral tones for contrast. High-quality quilting cotton ensures durability and easy stitching.
The essential tools for this project include a rotary cutter, cutting mat, quilting ruler, and sewing machine. These tools help maintain precision and consistency in cutting and assembling the quilt patterns. Additionally, an iron and ironing board are necessary to press seams and achieve a polished finish.
Choosing complementary background fabric is just as important as the horse design itself. Light-colored backgrounds create contrast, making the horse motif stand out, while darker tones offer a dramatic effect.
Cutting the Fabric – Measurements and Pieces
For a well-balanced Horse Block Quilt, accuracy in cutting fabric pieces is key. Below is a list of necessary fabric cuts:
- Horse body: 6” x 8” (brown or black fabric)
- Mane and tail: 4” x 6” (dark brown or black fabric)
- Background: Multiple pieces (white or beige fabric), including:
- (2) 4” x 4” squares
- (4) 2” x 6” strips
- (2) 2” x 8” strips
- (1) 8” x 12” rectangle
Using a rotary cutter and quilting ruler, carefully measure and cut each fabric piece. Precision in cutting helps prevent distortions in the finished quilt block. Keeping the fabric grain aligned ensures a smoother assembly process.
Labeling the pieces can be helpful, especially if you’re working with multiple colors and shapes. Lay out the fabric pieces according to the pattern to visualize the final design before sewing.

Piecing the Horse Block Together
Begin by assembling the smaller sections of the horse, such as the mane and tail. Sew the corresponding pieces together using a 1/4-inch seam allowance, pressing seams open for a flatter quilt block.
Next, attach the horse’s body section to the mane and tail. This step requires careful alignment to maintain the overall shape and proportions of the horse design. Pin the pieces in place before sewing to prevent shifting.
Once the horse figure is complete, integrate the background fabric pieces. Sewing these elements around the horse helps frame the block and maintain symmetry. Ensure all seams are pressed properly to achieve a smooth surface for the next steps.
Adding Details and Embellishments
To enhance the visual appeal of your quilt patterns, consider adding embroidered details for the horse’s eyes, nostrils, and outline. Small hand-stitched accents bring the design to life, giving it depth and personality.
Appliqué techniques can also be used for extra details like a bridle or saddle. If using fusible appliqué, ensure all edges are securely bonded and stitched to prevent fraying over time.
For a more artistic touch, experiment with different thread colors when quilting around the horse motif. Decorative stitches can outline the shape, adding texture and dimension to your quilt block.
Assembling the Quilt Top
Once all horse blocks are completed, arrange them into a cohesive layout. Consider alternating colors or incorporating complementary quilt blocks to create a balanced design.
Sew the blocks together row by row, using a consistent 1/4-inch seam allowance. Press seams carefully to reduce bulk and maintain a neat appearance.
Adding sashing between blocks can enhance the overall design by providing separation and highlighting each horse motif. Choose sashing fabric that complements the horse block colors to unify the quilt’s aesthetic.
Quilting and Finishing Touches
Layering the quilt top with batting and backing fabric is the next step. Ensure all layers are smooth and free of wrinkles before securing them with quilting pins or basting stitches.
Quilting stitches should complement the horse design. You can choose straight-line quilting for a modern look or free-motion quilting for a more intricate effect. Outlining the horse blocks with quilting stitches enhances the definition of the design.
Finish by binding the edges with a coordinating fabric strip. Double-fold binding ensures durability, giving the quilt a polished and professional look. Hand-sew or machine-stitch the binding for a secure finish.
Conclusion
Creating a Horse Block Quilt is a fulfilling project that combines traditional quilting techniques with a love for equestrian themes. With careful planning, precise cutting, and creative embellishments, you can craft a beautiful quilt block that showcases your quilting expertise.
This tutorial provides a structured approach to making your own quilt patterns, ensuring an enjoyable and rewarding experience. Whether making a single block for a wall hanging or a full quilt, this horse-themed design will make a striking addition to any quilt collection.
Start your Horse Block Quilt today and bring your love for horses into your next quilting masterpiece!
