
Why Make an Apron from Old Jeans?
If you’ve ever found yourself staring at an old pair of jeans wondering what to do with them, we’ve got the perfect DIY project: turn them into a sturdy, stylish apron! Denim is a durable material, ideal for protecting your clothes during messy crafts, cooking, or even quilting sessions. It’s also an eco-friendly way to give your old jeans a second life.
Creating an apron from denim doesn’t require advanced sewing skills. If you’re a beginner quilter or someone who loves simple upcycling projects, this is a perfect way to practice basic stitches while creating something useful. You can even incorporate a quilt pattern into your design for extra charm and creativity.
Plus, this project is ideal if you’re looking to combine quilting techniques with practical crafting. You’ll be using some elements common in quilt construction — such as patchwork pockets or decorative stitching — giving your apron a personalized, handmade feel.
Materials You’ll Need
Before you get started, gather the following materials to make your DIY denim apron. Most of these items are basic sewing supplies you probably already have at home.
- 1 pair of old jeans (adult size works best)
- Scissors or rotary cutter
- Sewing machine or needle and thread
- Fabric pins or clips
- Measuring tape or ruler
- Chalk or fabric marker
- Cotton or printed fabric scraps (optional – for quilted pockets)
- Bias tape or fabric strips for apron ties
- Iron and ironing board
- Quilt batting (optional, for padded quilting accents)
Using fabric scraps from previous quilt projects can make this apron even more meaningful. Don’t be afraid to get creative and mix textures and prints — just like you would in a quilt pattern.
Step-by-Step Guide to Making a Denim Apron
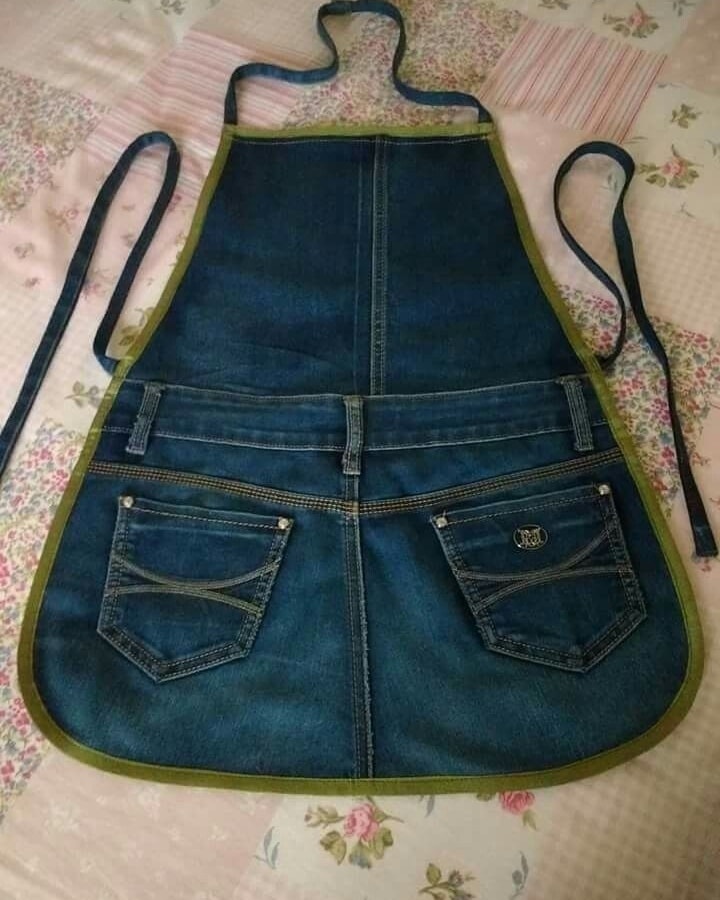
Step 1: Cut the Jeans
Lay your jeans flat and cut one leg off along the outer seam. Open the leg and lay it flat — this will be the main body of your apron. Use your chalk or fabric marker to draw the basic apron shape: curved at the top with a wide bottom. A standard size might be about 12” wide at the top and 24” long, but adjust as needed.
Step 2: Shape and Hem
Cut along the outline and fold the fabric in half vertically to ensure symmetry. Hem all edges by folding them over twice and sewing with a straight stitch. This step is essential to give your apron a clean, finished look and to prevent fraying.
Step 3: Add the Straps
Use bias tape or cut long strips from the remaining denim to create your neck and waist straps. For comfort, straps should be about 20” each for the waist and 18” for the neck. Sew them securely into the corners of your apron. You can reinforce the stitching with a small quilt-style “X” pattern at the base of each strap.
Adding Quilted Pockets and Accents
This is where your creativity as a quilter can shine! Use fabric scraps from previous projects or choose a mini quilt block pattern you love to create decorative and functional pockets.
You can create a simple square pocket using the Log Cabin quilt pattern or a small Flying Geese block. Use quilt batting between your fabric layers to give a padded texture. Sew the pocket onto your apron using a straight or decorative stitch.
You can even create a quilt-style border for the apron by sewing patchwork pieces along the bottom edge. It’s a great way to tie in your quilt aesthetic while reinforcing the structure of the apron. Whether you prefer traditional quilt patterns or something more modern, this step adds both style and personality.
Personalization Ideas for Your Apron
Once your apron is assembled, it’s time to make it your own! The sky’s the limit when it comes to customizing your denim apron with quilt-inspired touches.
- Embroidery: Add your initials, a floral design, or a favorite word like “bake” or “quilt” with embroidery thread.
- Appliqué: Use small shapes cut from fabric (like hearts, stars, or sewing tools) and stitch them on with a zigzag stitch.
- Paint or Fabric Markers: Use stencils and fabric-safe paint to add your name or creative drawings.
- Quilt Block Patch: Insert a favorite quilt block right into the body of the apron for a statement piece.
Think of your apron as a blank canvas — a wearable quilt project where every addition reflects your creativity.
Tips for Beginners
If this is your first time sewing or quilting, don’t worry! Denim is forgiving, and this project is very beginner-friendly. Here are some extra tips:
- Use denim needles if working with a sewing machine — they’re designed to handle thicker fabric.
- Don’t rush. Pin your pieces before sewing to keep everything in place.
- Practice your quilt stitches on scraps first before applying them to the final piece.
- Consider using contrasting thread colors for topstitching to highlight the handmade feel, just like in visible quilt patterns.
Remember, quilting is about the journey as much as the finished result. This project is a fun way to experiment with quilting in a practical format.
Final Touches and Care Instructions
Once your apron is finished, press all seams with an iron to set your stitches and give it a crisp look. Try it on and adjust straps if necessary. Wash your apron on cold and air dry to preserve the fabric and stitching, especially if you’ve included quilted elements or patchwork.
If you’ve used batting for pockets or accents, consider spot-cleaning rather than machine washing to maintain the shape and structure. Like a favorite quilt, this apron will soften over time and become uniquely yours.
You can even create a matching set by using the same quilt patterns on pot holders, table runners, or oven mitts. That way, your kitchen or craft space gets a coordinated, cozy look.
Share Your Denim Apron Quilt Project!
Have you finished your apron? We’d love to see it! Share a photo of your upcycled denim apron online using hashtags like #DenimApronDIY, #QuiltInspiredApron, or #QuiltPatternCrafts.
Tag fellow quilters, crafters, and creators — and don’t forget to mention what quilt pattern or technique you used! This project is a great conversation starter in quilting groups, blogs, and creative communities.
Whether you’re making it for yourself, a loved one, or even to sell at a craft fair, this apron is more than just practical — it’s a reflection of your style, skills, and creativity. Let your love for quilting extend beyond the quilt top and into every corner of your life.