
Crochet is more than a craft—it’s a language of creativity and warmth. If you’re looking to add a playful and heartwarming touch to your crochet projects, a supercute paw print is the perfect design. Whether you’re embellishing a baby blanket, a pet-themed bag, or just making sweet appliqués, learning how to crochet a paw print is a fun and satisfying endeavor.
In this tutorial, you’ll discover a step-by-step crochet pattern, a clear materials list, and useful tips to guide you from your first loop to the final stitch. Let’s dive into the world of cute paws and cozy threads!
Materials You’ll Need
Before starting, make sure you have everything you need. Here’s a quick list of materials for this project:
- Worsted weight yarn in two colors (e.g., light brown for the pads and dark brown for the base)
- 4.0 mm (G/6) crochet hook
- Yarn needle for weaving in ends
- Scissors
- Stitch marker (optional, but helpful)
Having the right tools and materials on hand ensures a smoother crocheting experience and a beautiful final result.
Choose soft yarns if the paw prints will be part of a wearable or baby item. For sturdier decorations like keychains or wall art, cotton yarn provides better structure.
Why Crochet a Paw Print?
Add a Personal Touch to Your Projects
Crocheting a paw print lets you customize your projects for pet lovers or animal-themed gifts. It can turn an ordinary piece into something personal and meaningful.
Adding a paw print to a hat, scarf, or tote bag makes it instantly more adorable. It’s a fantastic way to show your love for furry friends and create handmade treasures that stand out.
Whether it’s for your child, your pet, or your best friend, a paw print is a universal symbol of cuteness and comfort.
Practice Your Crochet Skills
This project is great for practicing shaping techniques like working in the round, forming circles, and layering flat motifs.
You’ll improve your control of stitch tension and symmetry while also experimenting with color changes or embroidery techniques if you wish to decorate the paw pad further.
Even if you’re still learning, this crochet pattern is manageable and helps reinforce the foundational skills every crocheter should master.
Fast and Fun to Make
Crochet paw prints are small, quick projects you can complete in under an hour. They make excellent last-minute gifts or stash-busting projects using leftover yarn.
Because they’re compact, they also travel well—you can crochet on the go while watching TV or waiting in line.
The simplicity and charm of this pattern make it the perfect mini project for beginners and seasoned crocheters alike.
Step-by-Step: How To Crochet A Supercute Paw Print
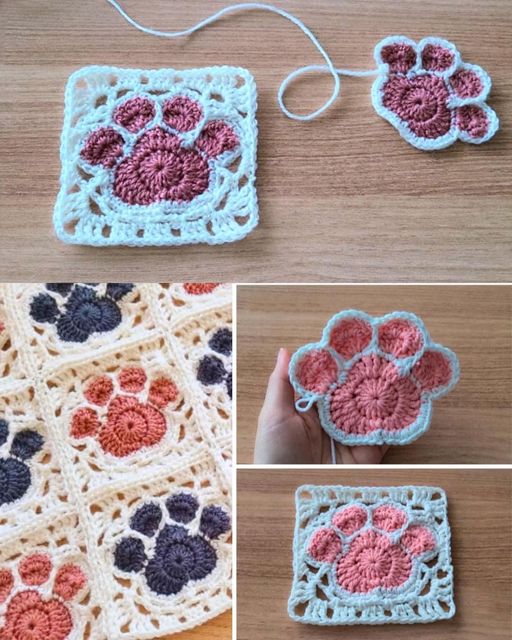
Let’s get started with the crochet pattern. This paw print is made up of one large pad (a circle) and four smaller toe beans (smaller circles). You’ll make them individually and sew them together.
Step 1: Crochet the Large Pad
- Magic Ring
Begin with a magic ring using your base yarn color.
Chain 1, then work 10 single crochets (sc) into the ring.
Pull the ring closed and join with a slip stitch. (10 sc) - Round 2
Chain 1, 2 sc in each stitch around. Join. (20 sc) - Round 3
Chain 1, (2 sc in next st, 1 sc in next st) repeat around. Join and fasten off. (30 sc)
This forms the large base pad of your paw. Make sure the circle lays flat; if it curves, you may be crocheting too tightly.
Step 2: Crochet the Toe Beans (Make 4)
- Magic Ring
Using the same or contrasting yarn, make a magic ring. Chain 1, work 6 sc into the ring, and pull tight. Join with a slip stitch. (6 sc) - Round 2
Chain 1, 2 sc in each stitch around. Join and fasten off. (12 sc)
Repeat this process three more times for a total of four identical small circles.
The toe pads should be symmetrical. You can block them lightly if needed to maintain shape.
Step 3: Assemble Your Paw Print
Lay the large pad on a flat surface. Arrange the four toe beans evenly above the large pad, forming a paw shape.
Use your yarn needle and matching yarn to stitch the toe beans to the large pad securely. You can also hot glue them if the paw print is for decorative use only.
Make sure everything is well aligned before stitching—pin in place or use stitch markers if needed.
Creative Ways to Use Paw Prints
Decorate Blankets and Pillows
Sew paw prints onto the corners of crocheted blankets for kids or pets. Use multiple paw prints in different yarn colors for a playful touch.
They also make cute pillow appliqués—stitch a few prints diagonally across a solid color crochet pillow for a fun, thematic look.
These embellishments are great for personalized gifts and nursery decor.
Make Paw Print Keychains or Pins
With a touch of felt backing and a keyring, your crochet paw print becomes a sweet keychain or pin.
They’re great for selling at craft fairs, gifting to friends, or adding to pet-themed gift baskets.
To stiffen the design, apply a bit of craft glue or mod podge to the back and let it dry flat.
Add to Pet Accessories
Stitch a paw print onto a dog sweater, a pet bed, or a cat blanket to give it extra flair. It shows off your love and adds personality to your pet’s gear.
You can even make a garland of mini paw prints for pet parties or rescue shelters.
These personal touches make handmade accessories feel extra special and thoughtful.
Tips for Customizing Your Crochet Paw Print
Play With Colors
Don’t limit yourself to natural pet colors like browns or blacks. Use pastels, bright neons, or even variegated yarn to give each paw print a unique personality.
You could match them to your pet’s fur or go completely whimsical—think rainbow paws!
Color play is a great way to use up scrap yarn and experiment without pressure.
Embellish With Embroidery
Add details like claws, initials, or hearts with a yarn needle and embroidery thread.
This is especially effective for gift items or personalized pet blankets. Small stitches can make a big visual impact.
Hand-stitching embellishments brings a charming, homemade feel to your project.
Vary the Sizes
Make jumbo or mini paw prints by adjusting the number of rounds or the hook size. Jumbo prints can be coasters or placemats, while tiny ones make adorable earrings or buttons.
Try doubling your yarn strand and using a larger hook for a plushier look.
Playing with size opens up a world of decorative and functional possibilities.
Conclusion: Keep Exploring the Joy of Crochet Patterns
Congratulations! You’ve now learned how to crochet a supercute paw print from start to finish. With just a few stitches and a little creativity, you can make your projects more playful, personal, and paw-sitively adorable .
PATTERN HERE
Crochet – Tutorial
FULL PATTERN ACCESS
You will be redirected to another site
Remember, crochet is all about experimentation and expression. Don’t be afraid to try new colors, tweak the sizes, or incorporate your paw prints into different projects. The more you explore, the more confident you’ll become in your craft.
If you enjoyed this tutorial, check out more of our crochet pattern guides for creative ideas, step-by-step instructions, and plenty of inspiration. Happy crocheting!