
Creating a Cathedral Window Quilt is a rewarding experience for any quilting enthusiast.
This beautiful and intricate quilt pattern stands out with its unique window-like design, adding a touch of elegance to any room.
In this comprehensive tutorial, we will guide you through the process of making a Cathedral Window Quilt, from selecting the fabric to the final stitch.
Using targeted keywords like “quilt” and “quilt patterns,” this article will help you create a stunning quilt while optimizing for search engines.
Selecting the right fabric is crucial for your Cathedral Window Quilt.
Since this quilt pattern is intricate and detailed, high-quality cotton fabric is recommended.
Choose a solid color for the background and contrasting prints for the window panes to make the design pop.
You’ll need a few essential tools to get started: a rotary cutter, a cutting mat, a ruler, and sharp sewing needles.
A sewing machine can speed up the process, but this pattern can also be done by hand if you prefer a more traditional approach.
Make sure to have matching and contrasting threads to complement your fabric choices.
Proper preparation is key to a successful quilting project.
Pre-wash and iron your fabric to avoid any shrinkage or color bleeding. Lay out all your materials in a well-lit workspace to ensure you have everything you need before you begin.
Cutting the Fabric
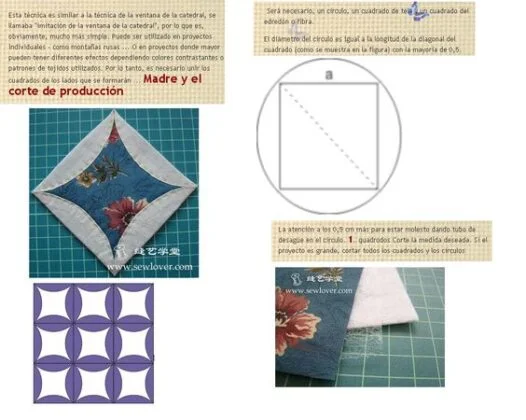
Begin by cutting your background fabric into squares. For this tutorial, we will use 9-inch squares, which will result in 4-inch finished window blocks. Cut as many squares as needed for your desired quilt size.
Next, cut your window pane fabric into smaller squares.
For our 9-inch background squares, you’ll need 2-inch window pane squares. These will be folded and placed in the center of the background squares to create the window effect.
Precision is crucial when cutting your fabric.
Use your rotary cutter and ruler to ensure straight, even lines. Consistency in size will make assembling the quilt much easier and give your finished project a professional look.
Folding and Pressing
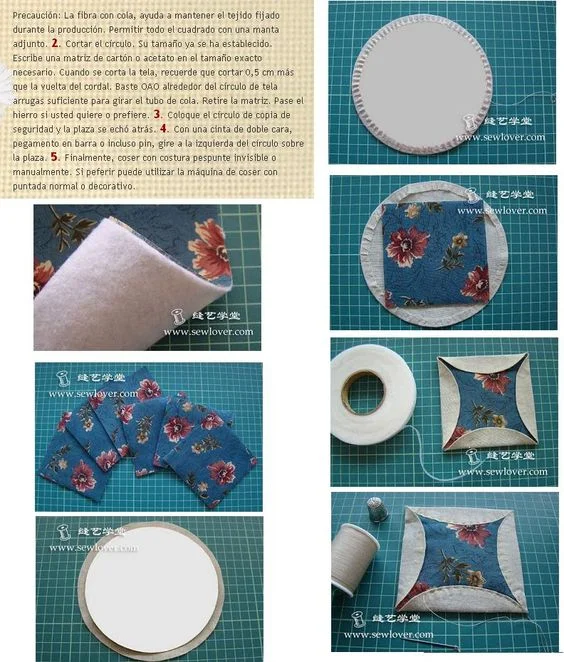
Take each 9-inch background square and fold it in half diagonally, wrong sides together.
Press the fold with a hot iron to create a sharp crease. Then, open the square and fold it in half diagonally in the opposite direction, pressing again.
Open the square and fold the edges into the center, aligning them with the creases you’ve just made.
This will form a smaller square with the raw edges tucked inside. Press the edges well to maintain the shape.
Repeat this process for all your background squares. Proper pressing ensures that your blocks will fit together smoothly and that the quilt will have crisp, clean lines.
Assembling the Blocks
Lay out your folded background squares in the desired pattern. Pin or clip the squares together at the corners to keep them in place.
You can arrange them in a traditional grid or get creative with your layout.
Using a whip stitch or a sewing machine, join the squares together at the corners.
Be careful to keep your stitches even and secure. Once all the squares are connected, you’ll have a grid of folded fabric squares with a pocket in the center of each.
Now, place your 2-inch window pane squares into the center of each folded square. Pin them in place, making sure they are centered and lying flat.
Creating the Window Panes
Fold the edges of the background fabric over the window pane squares, creating a frame around each small square.
Pin the edges in place to secure them before sewing. This step can be a bit fiddly, but taking your time will ensure a neat finish.
Sew the folded edges down using a small, close zigzag stitch or a hand slip stitch.
This will create the signature window pane effect of the Cathedral Window Quilt pattern.
Make sure to catch both the folded edge and the underlying window pane fabric in your stitches.
Repeat this process for each window pane square.
Once all the panes are sewn in place, you’ll start to see the beautiful cathedral window design taking shape.
Adding Borders and Finishing
After completing the main body of your quilt, you may want to add a border to frame your work.
Cut strips of your background fabric to the desired width and length for your border.
Attach the strips to the edges of the quilt using a quarter-inch seam allowance.
Press the border seams open and flat.
This will help to keep the quilt edges smooth and even.
You can add multiple borders in different fabrics to enhance the design and size of your quilt.
Finish your quilt by layering it with batting and backing fabric.
Quilt the layers together by hand or machine, and bind the edges to complete your Cathedral Window Quilt. This final step adds durability and a polished look to your quilt.
Tips for Success
Patience is key when making a Cathedral Window Quilt.
The process is time-consuming and requires careful attention to detail, but the results are well worth the effort. Take your time with each step to ensure accuracy.
Experiment with different fabric combinations to create a unique look.
The contrast between the background and window pane fabrics is what makes this quilt pattern stand out.
Don’t be afraid to use bold colors and prints.
Regularly check your work for consistency.
Small mistakes can add up, so it’s important to correct any issues as you go along.
This will save you time and frustration in the long run and ensure a beautiful finished quilt.
Conclusion
Creating a Cathedral Window Quilt is a labor of love that results in a stunning piece of art.
By following this step-by-step tutorial, you can master this beautiful quilt pattern and create a cherished heirloom.
Remember to choose your fabric carefully, cut and fold with precision, and take your time with the assembly and finishing touches.
Quilting is a rewarding hobby that allows you to express your creativity and craft something truly unique.
Whether you’re a seasoned quilter or a beginner looking for a new challenge, the Cathedral Window Quilt pattern is a wonderful project to undertake.
Enjoy the process and take pride in your finished quilt, knowing you’ve created something beautiful and enduring.