
There’s something truly magical about crafting your own Christmas decorations, especially when they carry a handmade, heartfelt touch. A Christmas angel made from fabric or as part of a quilt is a beautiful way to infuse your holiday decor with warmth, tradition, and creativity. Whether you’re looking to sew a standalone angel or incorporate one into a quilt block, this tutorial will walk you through the process with easy-to-follow steps and ideas for personalization.
Creating your own Christmas angel is not only rewarding, but it’s also a great introduction to quilting techniques. Using a simple quilt pattern, you can bring this festive figure to life with fabric scraps, thread, and a little imagination. Let’s dive into this joyful holiday project and make something truly special.
Materials You’ll Need
Before you begin, gather all the materials to ensure a smooth and enjoyable crafting session. Most of the items can be found at your local fabric store, or you might already have them in your quilting stash. Here’s what you’ll need:
- Fabric scraps in white, gold, cream, and pastel colors (for the angel’s gown, wings, and details)
- Light brown or beige fabric for the face and hands
- Quilt batting (thin or medium loft)
- Backing fabric
- Thread in matching or contrasting colors
- Scissors or rotary cutter
- Sewing pins and needle
- Sewing machine (optional but helpful)
- Iron and ironing board
- Printable or drawn angel quilt pattern template
If you’re integrating the angel into a larger quilt, you’ll also need coordinating fabrics for the surrounding blocks, sashing, and borders. Don’t forget to use quality cotton fabric for best quilting results.
Cutting and Preparing Your Fabric
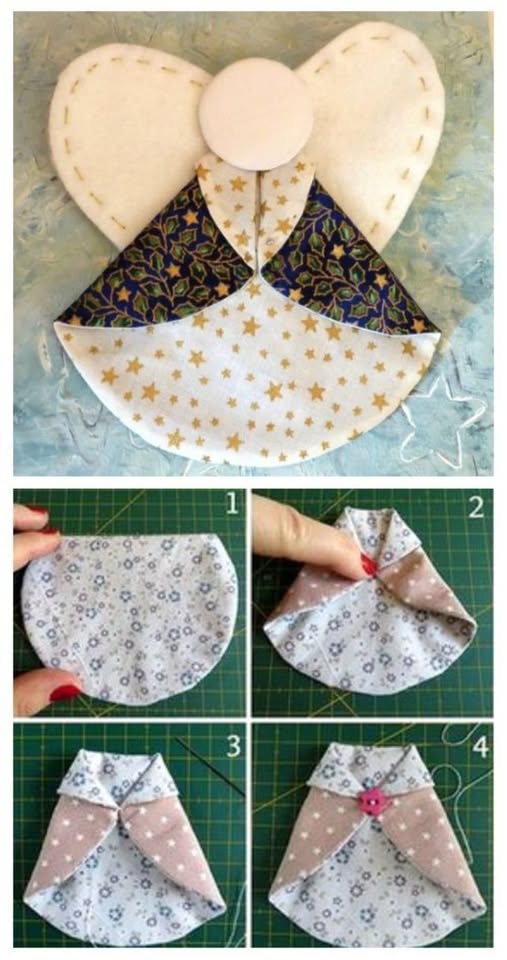
Begin by printing or sketching out your angel quilt pattern. You can find free printable templates online, or draw your own angel design keeping the shapes simple—think of wings, a gown, head, and halo. Once your pattern is ready, use it to cut your fabric pieces accordingly.
Use a rotary cutter for clean, straight lines and fabric scissors for more intricate shapes like the angel’s wings and gown. Iron each piece to remove wrinkles and help them lay flat. Ironing also helps set creases if you’re folding parts for detail, such as sleeves or wing flaps.
If you’re making multiple angels as part of a quilt, this is a good time to create a batch of fabric pieces and organize them into groups. That way, your quilt blocks will stay consistent in shape and size throughout the quilt pattern.
Sewing the Angel Body
Start by assembling the main body of the angel—this includes the gown, head, and arms. Lay out the fabric pieces on your work surface in the order they’ll be sewn. Begin sewing the pieces together, starting with the central section (usually the gown and head). Use a ¼-inch seam allowance, which is standard in quilting.
Once the body is sewn, press the seams with an iron. This helps keep everything flat and neat. Then, sew the arms onto the body piece. You can curve the arms inward for a praying position or have them spread outward in a welcoming gesture.
If you’re hand-sewing, take your time with small, even stitches. For machine sewing, use a straight stitch and slow speed to manage curves or intricate shapes. Keep checking your quilt pattern for alignment and proportions.
Adding the Wings and Halo
Now comes the most recognizable part of the Christmas angel: the wings and halo. Cut two wing shapes from your selected fabric, often a shiny or textured material like metallic cotton or even satin. Attach them to the back of the angel body, slightly overlapping the edges.
To give the wings more structure, you can sandwich a piece of quilt batting between the layers or outline them with decorative stitching. This adds a quilted effect and makes them stand out as part of the quilt pattern.
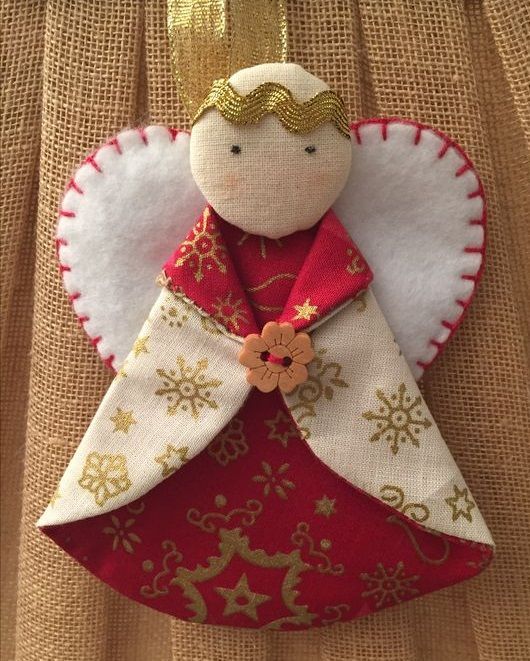
For the halo, use a small fabric circle or a ring made from gold ribbon or thread. Stitch it above the head securely. You could also hand-embroider the halo or use metallic thread for a glowing effect.
Quilting and Layering
Now it’s time to assemble your angel quilt block. Place your quilt top (the angel) over a piece of batting and backing fabric. Pin or baste the layers together, ensuring everything lies flat. You’re now ready to quilt the block.
Stitch around the angel’s outline and wings to give dimension. Add free-motion quilting or echo quilting if you want more texture. This is where your quilt really starts to come to life—the stitches add depth and draw attention to your beautiful Christmas angel design.
If this angel is part of a full quilt, make sure the block is the same size as the others in your quilt pattern. Trim the edges, square up the block, and get ready to join it with your other holiday-themed quilt blocks.
Personalization Ideas
The beauty of handmade quilting projects lies in how customizable they are. Here are some fun ways to personalize your Christmas angel and make it uniquely yours:
- Face Details: Add eyes, nose, and a mouth with embroidery floss or fabric pens. Keep it simple and sweet.
- Accessories: Stitch a small star, heart, or candle into the angel’s hands for extra symbolism.
- Hair: Use yarn, felt, or appliqué to give your angel golden locks or curly brown hair.
- Clothing Embellishments: Add lace trim, tiny buttons, or decorative stitching to the gown for elegance.
- Holiday Themes: Incorporate red and green fabrics for a more festive vibe, or icy blues and silvers for a winter angel.
Each angel you create can represent a different person or sentiment—peace, joy, remembrance, or blessing. The quilt becomes a visual storybook filled with meaning.
Finishing Touches and Display
After quilting your angel block, you can choose to bind it and use it as a standalone wall hanging, or sew it together with other blocks for a full Christmas quilt. Add sashing, borders, and cornerstones to frame your design beautifully.
Finish your quilt with a traditional or decorative binding. Use a coordinating fabric that complements your angel’s colors. Don’t forget to label the back of your quilt with your name, date, and any special message you want to include.
Whether you hang your quilt in your home or give it as a gift, it’s sure to bring warmth and joy to anyone who sees it. Handmade quilt patterns like this one are a timeless way to celebrate the spirit of the season.
Share Your Angel with the World
Now that you’ve completed your Christmas angel, why not share your creation? Post a picture on social media or quilting forums and use hashtags like #ChristmasQuilt, #AngelQuiltPattern, or #HolidayQuilting. Inspire others by showing how your quilt pattern came to life with creativity and love.
If you enjoyed making this project, consider turning it into a yearly tradition. Each holiday season, craft a new angel with a different quilt pattern or theme, and build a collection of meaningful handmade decorations.
Let your Christmas angel shine bright and remind everyone of the joy of handmade crafts, the warmth of quilting, and the beauty of giving from the heart.