
Looking for a practical and creative quilting project? A fabric toilet paper holder is a simple yet stylish solution for adding charm and organization to your bathroom. Whether you’re a beginner or an experienced sewist, this tutorial will guide you through making your own quilted toilet paper holder using your favorite fabrics and a basic quilt pattern. You’ll also find room for personal touches to make it uniquely yours!
Why Make a Quilted Toilet Paper Holder?
Making your own toilet paper holder from fabric is more than just a DIY project—it’s a functional décor piece. Store extra rolls in style and elevate your bathroom with a handmade accessory that reflects your personal taste. Plus, it’s a fantastic way to practice simple quilt techniques on a small scale.
Quilt lovers will especially enjoy turning leftover fabric scraps into something useful. Since the project is relatively small, it’s perfect for trying out a new quilt pattern without committing to a full-sized quilt. Whether hung on the wall, the side of a cabinet, or even on the back of the toilet, this holder is both decorative and practical.
Best of all, this project is quick and budget-friendly. With a few basic materials, you can finish it in under an hour and even make extras as gifts. If you’re looking for a weekend craft that’s low stress but high reward, this is the one for you.
Materials You’ll Need
Before diving into the steps, gather the following supplies:
- 3 fabric fat quarters (for front, back, and lining – you can mix patterns)
- 1/4 yard of quilt batting or scrap batting
- 1/4 inch wide elastic band (optional for added hold)
- Bias tape or ribbon for hanging loops
- Thread (matching or contrasting)
- Sewing pins or clips
- Rotary cutter and mat or scissors
- Sewing machine
- Iron and ironing board
- Basic quilting tools (ruler, marking pen)
Optional but recommended:
- Pre-printed quilt pattern or a simple patchwork design
- Decorative buttons or appliqué for personalization
Cutting and Preparing the Fabric
Start by cutting your fabrics and batting. For a holder that stores three toilet paper rolls vertically, you’ll need to cut the following:
- Outer fabric: 1 piece measuring 6” x 30”
- Lining fabric: 1 piece measuring 6” x 30”
- Batting: 1 piece measuring 6” x 30”
- Three fabric pockets: each 6” x 12”
- Three pieces of batting for the pockets: each 6” x 12”
- Bias tape: three pieces of 4” and one piece of 10” for loops
Once your pieces are cut, sandwich the batting between each outer and lining piece for the main holder and the pockets. Use quilting pins to keep everything aligned. This is also a good time to draw or mark a quilt pattern onto the fabric, such as diagonal lines or simple squares.
Iron each piece flat to eliminate wrinkles and help the fabric layers bond together before stitching. If using a printed quilt pattern, follow the marking guides for accuracy.
Quilting the Base and Pockets
With your fabric layers pinned or basted, it’s time to start quilting. Stitch the quilt pattern you drew earlier using your sewing machine’s straight stitch. Diagonal cross-hatch or echo quilting are excellent beginner-friendly designs.
Start by quilting the main panel, going from one end to the other to maintain straight lines. Then quilt each of the three pockets individually. Quilting these pieces adds structure and durability, especially important for something that will hang and hold weight.
Once all pieces are quilted, trim any uneven edges to ensure everything is neatly aligned. You’ll see your quilt work coming to life even in this small project—just like a full-size quilt, but faster and easier!
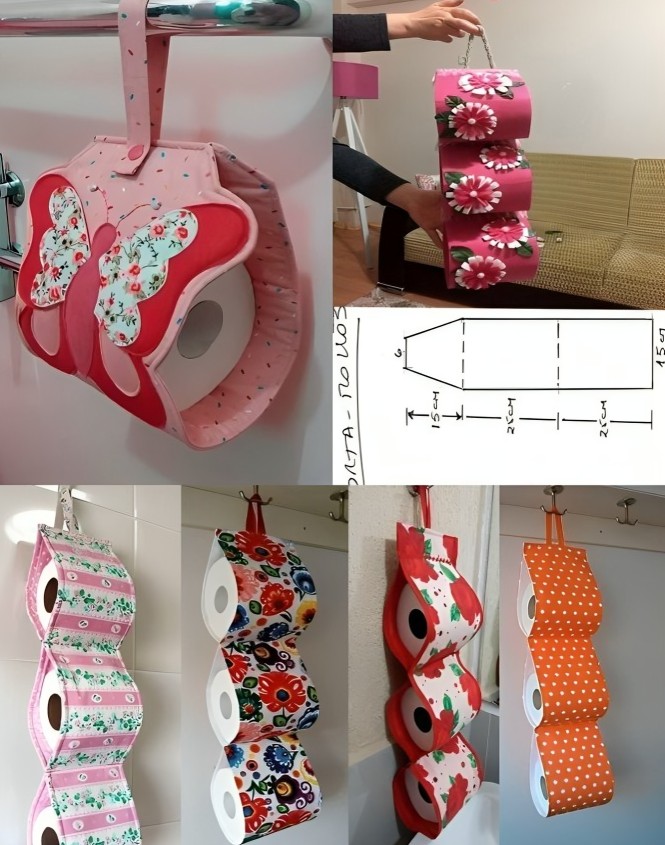
Assembling the Pockets
Take each quilted pocket and fold down the top edge by ½ inch. Press with an iron and stitch across to finish the edge. This creates a clean opening for each roll.
Now, lay the quilted base panel flat, right side facing up. Space the pockets evenly: one near the top, one in the middle, and one at the bottom. Align each pocket’s sides with the base panel’s edges and pin in place.
Stitch the bottom edge of each pocket down first. Then, sew the sides, making sure to backstitch at the start and end for durability. To enhance the shape, you can add a vertical seam in the middle of each pocket to help guide the roll into place, or insert a thin strip of elastic along the top seam of each pocket for grip.
Adding Hanging Loops and Binding
Now it’s time to finish your quilted toilet paper holder with style. Take your longer piece of bias tape or ribbon and form a hanging loop. Center it at the top back of the base panel and stitch securely.
If you want extra versatility, you can add two smaller loops at the bottom sides to attach it horizontally or hang additional items. These could be secured with buttons or Velcro for an adjustable fit.
To give the whole project a clean finish, add binding around the edges. Use bias tape or create your own binding from matching fabric. Fold the binding over the raw edges and stitch all around the panel, encasing the layers securely. This step not only finishes the look but adds extra reinforcement to the piece.
Personalization Ideas
The beauty of a handmade quilted item is how customizable it can be. Use fabric that matches your bathroom’s theme—floral prints, coastal tones, or even seasonal designs like snowflakes for winter or flowers for spring.
You can also experiment with different quilt patterns. Try a log cabin block for the base or crazy quilt patches on the pockets. Add decorative stitching or embroidery with fun quotes like “Stay Clean” or “Roll With It.”
If making several for gifts, consider using monogrammed fabric or adding personalized tags. Quilted toilet paper holders are great for housewarmings, holidays, and even RVs or camper bathrooms.
Final Thoughts and Sharing Your Creation
And just like that, you’ve made a functional and adorable quilted toilet paper holder! This small but mighty project is a fantastic way to practice quilting skills, try out new patterns, and create a beautiful home accessory.
We hope this tutorial has inspired you to get creative and try new quilt patterns in everyday objects. Whether for your own bathroom or as a handmade gift, this project combines utility and charm.
If you make your own, we’d love to see it! Share your photos and experiences in quilting groups, on Instagram, or with fellow crafters. Use the hashtag #QuiltedToiletHolder so the community can celebrate your creativity. Happy quilting!