
Summer is the perfect time to show off your handmade accessories, and nothing says stylish and functional like a crochet sun hat. Whether you’re spending your days on the beach, at the park, or just enjoying sunny walks, a sun hat made from your own hands is a delightful blend of fashion and craftsmanship. In this detailed crochet tutorial, we’ll walk you through exactly how to make one — even if you’re just starting out.
Using simple crochet patterns, this sun hat can be customized to your favorite color, size, and style. From the materials you’ll need to the step-by-step instructions, everything in this guide is designed to help you succeed and enjoy the process. So, grab your hook and let’s get started with this fun and practical project!
Why Make Your Own Crochet Sun Hat?
Creating a crochet sun hat is more than just following a pattern — it’s a chance to add a personal, handmade touch to your summer wardrobe. When you make your own, you get full control over the style, color, and fit, which you won’t always find in store-bought hats.
Additionally, crochet is a relaxing and rewarding hobby that promotes mindfulness. As you stitch, you’re not only crafting something beautiful but also reducing stress and improving focus. The sun hat, with its simple construction and fast results, is perfect for all skill levels.
And best of all, crochet sun hats make excellent gifts! Whether you’re preparing for a summer vacation or just looking for a fun way to use your yarn stash, this project checks all the boxes for fashion, function, and fun.
Materials You’ll Need
To create your own sun hat, you don’t need a huge list of materials — just a few basics from any craft store or your own collection of supplies. Here’s what you’ll need to gather before starting your project:
- Yarn: 100% cotton or raffia-style yarn (lightweight, breathable)
- Crochet hook: Typically 3.5mm to 4.5mm depending on yarn weight
- Stitch markers to keep track of rounds
- Yarn needle for weaving in ends
- Scissors
Cotton yarn is ideal for warm-weather projects like this one. It holds its shape well, breathes better than synthetic fibers, and feels comfortable on your skin. Choosing the right yarn ensures the final hat is soft, durable, and stylish.
Basic Crochet Stitches and Techniques
The sun hat design we’ll cover in this crochet tutorial uses basic stitches, so even if you’re new to the craft, you’ll be able to follow along. Here are the stitches and techniques involved:
- Magic ring
- Single crochet (sc)
- Double crochet (dc)
- Slip stitch (sl st)
- Increase (inc)
These fundamental stitches appear in most beginner-friendly crochet patterns, and you’ll use them throughout the crown, body, and brim of the hat. If you’re unfamiliar with any, there are plenty of short video demos online that can help you learn quickly.
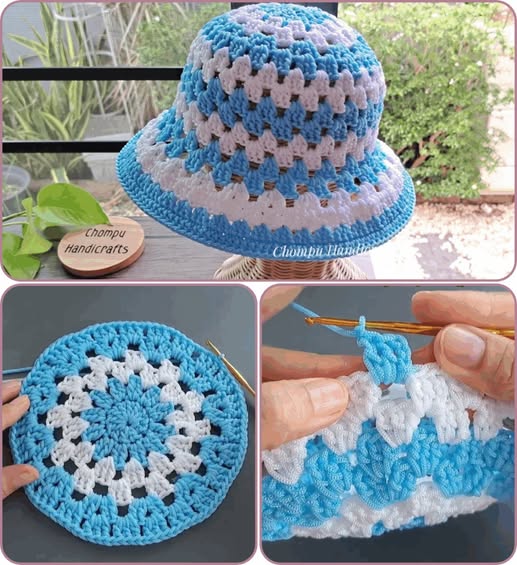
Step-by-Step: Crochet Sun Hat Crown
Let’s begin the sun hat by working on the crown, which is crocheted in the round starting from the top. This part determines how the hat will sit on your head, so keeping your stitches consistent is key.
Round 1: Start with a magic ring and work 10 dc into the ring. Join with sl st to the first dc.
Round 2: Ch 2, 2 dc in each stitch around. Join with sl st. (20)
Round 3: Ch 2, 1 dc in next stitch, 2 dc in next repeat around. (30)
Continue increasing evenly in each round until the circle is wide enough to cover the top of your head — typically 6–6.5 inches in diameter for adults. The increases help shape the rounded crown and ensure a comfortable fit.
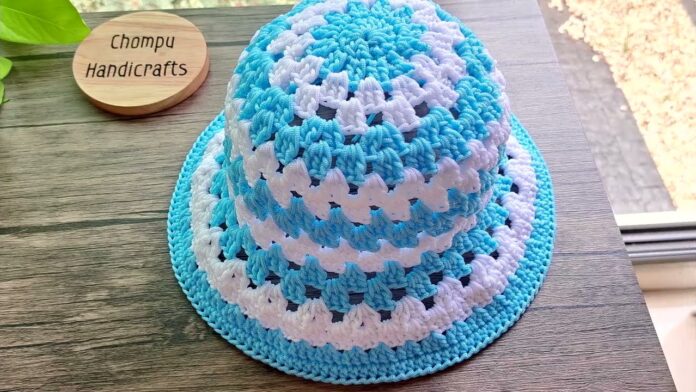
Creating the Body of the Hat
Once your crown is complete, you’ll stop increasing and work the same number of stitches in each round to build the body of the hat — the section that fits over your head.
Rounds 1–10: Ch 2, dc in each stitch around. Join with sl st. Repeat for 10 rounds or until desired depth.
Optional: Add a few rounds of sc if you want a firmer band around the edge of the body.
If you’re customizing the fit, try the hat on after a few rounds to check if you need to adjust the length. This part is ideal for trying color changes or adding decorative stripes to personalize your crochet sun hat.
Don’t forget to use your stitch marker to keep track of the beginning of each round. Keeping your stitches consistent is the key to achieving a clean, even finish.
Making the Sun Hat Brim
The brim is what transforms your crochet hat into a true sun hat — wide, stylish, and perfect for shading your face. The brim also requires increases to flare out nicely.
Round 1: Ch 2, 1 dc in next 2 stitches, 2 dc in next stitch repeat around. Join.
Round 2–5: Continue to increase evenly every few stitches. For example: 3 dc, 2 dc in next for Round 2, and so on.
Adjust the number of increase stitches depending on how wide and floppy you want your brim. A stiffer yarn like raffia will create a more structured look, while softer cotton gives a casual, floppy result.
For a firmer brim, you can finish with 2 rows of single crochet and even insert craft wire or fishing line along the last row. This helps keep the brim’s shape over time.
Customizing Your Crochet Sun Hat
Once the base of the hat is complete, it’s time to add your personal touch! Crochet flowers, buttons, ribbons, or even a colorful band can transform your hat into a unique fashion statement.
You can follow other crochet patterns to add accessories like detachable bows, pom-poms, or even mini appliqués. Matching these embellishments to your summer wardrobe adds style and fun to your outfit.
Want more function? Add a chin strap by crocheting a chain on each side and tying it beneath the chin. This is especially helpful for windy days or for kids wearing the hat outdoors.
Care Tips for Crochet Sun Hats
Once your hat is done, proper care ensures it stays looking great all summer. Always check your yarn label for washing instructions, but here are general guidelines:
- Hand wash in cold water with mild detergent
- Lay flat to dry to preserve shape
- Avoid wringing or twisting, especially if your yarn stretches easily
If your brim becomes wavy or limp over time, you can lightly steam it back into shape using a garment steamer or iron with a pressing cloth. Proper care extends the life of all your crochet projects.
Share Your Creation with the Crochet Community
Finished your crochet sun hat? Congratulations! Now it’s time to show off your hard work. Post pictures on Instagram using hashtags like #crochet and #crochetpatterns to connect with fellow makers and inspire others.
There are also many online communities, such as Reddit’s r/crochet and Facebook crochet groups, where you can share your finished projects, ask for advice, and discover new crochet patterns.
You might even inspire someone else to start crocheting their own summer accessories. Crafting is always more fun when shared with a supportive, creative community!
Final Thoughts
Learning how to make a crochet sun hat is an enjoyable and rewarding experience, offering both style and function. With just a bit of yarn and time, you can create a summer accessory that’s truly your own.
PATTERN HERE
Crochet – Tutorial
FULL PATTERN ACCESS
You will be redirected to another site
From gathering your materials to customizing your hat’s final look, every step is an opportunity to express creativity. Whether you’re following this guide exactly or adapting it to your taste, you’re engaging in a craft that’s both artistic and practical.
Ready to get started? Grab your yarn and hook, and enjoy the sunshine in your very own handmade crochet sun hat!