
Creating a hooded scarf is one of the most rewarding and cozy projects you can add to your handmade wardrobe. This versatile accessory combines the comfort of a scarf with the warmth of a hood, making it perfect for chilly mornings, winter walks, or simply adding a stylish layered look to your outfit. Whether you enjoy sewing, quilting, or experimenting with new Quilting pattern ideas, this project is easy enough for beginners and customizable for experienced makers. In this tutorial, you’ll learn step-by-step how to make a hooded scarf from start to finish.
What makes this project especially fun is how flexible it is. You can choose quilting cotton, fleece, flannel, or a combination of fabrics to achieve your desired texture and warmth. Quilters who love working with simple Quilt blocks can even incorporate their favorite patchwork pieces into the scarf for a truly unique finish. By the end of this guide, you’ll not only have a beautiful handmade hooded scarf but also plenty of inspiration for adding your own creative twist.
Let’s dive in and explore all the tools, techniques, and tips you’ll need to bring this hooded scarf pattern to life. Grab your fabrics, prepare your sewing machine, and get ready to create something warm, stylish, and wonderfully handmade.
Materials You Will Need
Before beginning the sewing process, it’s important to gather all the necessary supplies. Choosing the right materials ensures your hooded scarf is warm, soft, and durable. If you enjoy the feel of quilts, consider using quilted fabric or even piecing together a simple Quilting pattern for the outer layer. This adds both texture and visual charm to the final piece.
Here is what you’ll need:
- 1½ to 2 yards of fabric (cotton, flannel, fleece, or pre-quilted fabric)
- Lining fabric (optional but recommended for extra warmth)
- Sewing machine
- Matching thread
- Scissors or rotary cutter
- Pins or clips
- Measuring tape
- Iron
- Basic sewing notions
If you want your hooded scarf to feel extra soft, fleece is a wonderful choice. Quilters may prefer quilting cotton paired with a thin batting to give the scarf a quilt-like body. If using batting, keep in mind that it may add thickness, so adjust your seam allowances accordingly. Once everything is gathered and ready, you’re all set to begin cutting and assembling your new cozy accessory.
Preparing and Cutting the Fabric
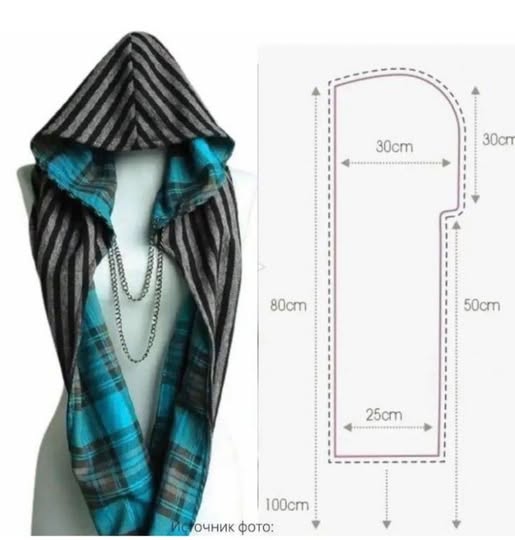
Start by laying your fabric flat on a clean workspace. Smooth out any wrinkles with your iron to ensure accurate measurements. The size of your scarf and hood can be adjusted depending on your preference, but a standard scarf width is between 8–12 inches, while the length usually ranges from 60–70 inches. Feel free to modify these dimensions depending on the look you want.
For the hood, you will cut two identical hood-shaped pieces. These pieces can be drafted by tracing around a hoodie you already own, or you can follow a simple hood shape: a rectangle with a curved top. Once you have your hood template, place it on your fabric and cut around it. If you’re incorporating quilt blocks or a small Quilt panel on the scarf, make sure your patchwork section is securely pieced before cutting to size.

After cutting the scarf body and hood pieces, repeat the process with your lining fabric if you choose to add one. Keeping all pieces neatly organized will make the sewing steps much smoother. Now you’re ready to start sewing your beautiful hooded scarf together.
Sewing the Hood
To begin, take the two hood pieces and place them right sides together. Pin or clip along the curved back edge, which forms the back of the hood. Sew along this curved edge using a ½-inch seam allowance. If your fabric frays easily, consider adding a zigzag stitch or serging the raw edges for reinforcement.
Once sewn, open the hood and press the seam to one side with your iron. If you’re adding a lining, repeat the same process with the lining pieces. Then place the outer hood and lining hood right sides together, pin around the front opening, and sew. Turn the hood right side out and press for a neat finish. This creates a smooth, comfortable edge around your face.
If you’re using quilted fabric or pieced quilt blocks for your hood, make sure the seams are pressed well so the hood lays flat. Quilters will appreciate how simple quilting techniques naturally enhance the hood’s shape and warmth. After this step, your hood section is complete and ready to attach to the scarf body.
Constructing the Scarf
With the hood ready, it’s time to shift your focus to constructing the long scarf portion. Start by folding the scarf fabric in half lengthwise, right sides together. Pin or clip along the long raw edge and one of the short ends. Sew using a ½-inch seam allowance, leaving one short end open so you can turn the scarf right side out later.
After sewing, turn the scarf inside out through the open end. A long object like a wooden spoon handle can help push the fabric through more easily. Once the scarf is right side out, use your iron to press it flat, paying attention to the edges for a crisp finish. If you opted for quilted or patchwork fabric, this is the moment you’ll see your quilting pattern shine beautifully along the scarf length.
To close the open end, tuck the raw edges inside by ½ inch and press. Sew a simple top stitch along the opening to secure it. At this stage, you’ll have a smooth, finished scarf that’s ready to be paired with the hood you completed earlier.
Attaching the Hood to the Scarf
Position the center back of the hood at the midpoint of the scarf. This ensures the hood sits evenly when worn. Pin or clip the bottom edge of the hood to the top long edge of the scarf, right sides together. The scarf will naturally extend on both sides, giving the final piece its wearable shape.
Sew along the pinned edge using a straight stitch. To reinforce this high-stress area, sew a second line of stitching or use a zigzag stitch along the seam. Turn the hood up and press the seam allowance toward the scarf. If you’d like, you can top stitch along this seam to give it a polished, professional look and help the hood lay flat when worn.
At this point, your hooded scarf is fully assembled. Try it on to check the fit and drape. The cozy combination of the scarf and hood creates a warm and stylish accessory perfect for chilly days. Whether you’re a sewing beginner or a quilting enthusiast, the simplicity of this construction makes it a satisfying project.
Personalization and Creative Ideas
One of the best parts of making your own hooded scarf is the opportunity to personalize it. Love quilting? Add a Quilt-style patchwork panel to the ends of your scarf. You could use leftover fabric scraps from previous quilting pattern projects to create a coordinated, handmade look. This also makes the accessory deeply meaningful and environmentally friendly.
If you prefer a more decorative finish, consider adding pockets to the ends of the scarf. These can be made from matching or contrasting fabric and are perfect for keeping your hands warm or storing small items. You can also add decorative stitching, embroidery details, appliqués, or even quilting lines along the scarf body for added texture and charm.
For a playful touch, try adding faux fur trim around the hood opening or delicate tassels at the scarf ends. These small embellishments elevate your design and make your hooded scarf look like a boutique accessory. The possibilities are endless—let your creativity lead the way as you customize your handmade piece.
Final Thoughts and Invitation to Share
Making a hooded scarf is a wonderfully rewarding project that blends warmth, style, and creativity. Whether you lean toward sewing, patchworking, or quilting, this simple pattern gives you room to experiment with materials, color combinations, and your favorite Quilting pattern techniques. Best of all, it’s a beginner-friendly project—perfect for those looking to expand their handmade accessory collection or create heartfelt gifts.
Once you finish your hooded scarf, take a moment to admire your craftsmanship. You’ve transformed simple fabric into a functional and fashionable accessory made with your own hands. If you added quilt blocks, personalized features, or creative embellishments, you’ve truly made something one-of-a-kind.
I’d love to see how your hooded scarf turns out! Share your finished project with your quilting or crafting group, post it on social media, or send it to friends who appreciate handmade creations. Your creativity could inspire others to try their own version of this cozy, charming hooded scarf pattern.