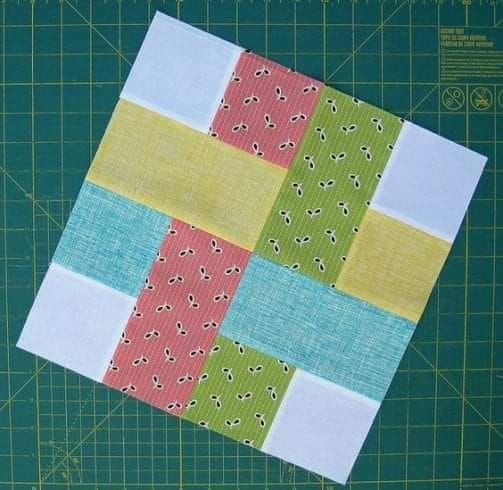
Quilting is more than just stitching fabric together—it’s about creating something warm, personal, and meaningful. One of the most exciting parts of the process is experimenting with different quilting patterns, and today we’ll explore a fun and versatile design: the Woven & Snowball Block Quilt created by Geeky Sewist of SewHappyGeek. This project combines two classic block styles—the woven effect and the snowball block—to form a dynamic and eye-catching quilt.
Whether you’re a beginner or have been quilting for years, this pattern is approachable, customizable, and a great way to learn new techniques. It strikes a balance between straightforward construction and striking results, making it an ideal project for anyone who wants to create a quilt that looks impressive but isn’t overly complicated.
In this tutorial, we’ll go through all the steps: from gathering materials and cutting fabric to assembling the blocks and sewing them into a quilt top. By the end, you’ll not only have a finished quilt but also the confidence to keep exploring new quilting patterns on your own.
Materials You’ll Need
Before diving into cutting and stitching, let’s make sure you have everything ready. For a quilt project like this, preparation is key. The Woven & Snowball Block requires precision in fabric cutting, so having good tools makes all the difference. At a minimum, you’ll need fabric, a rotary cutter, a self-healing cutting mat, quilting rulers, thread, pins, and your sewing machine. Don’t forget the essentials: an iron and ironing board to keep your seams crisp and flat.
When it comes to fabric, you’ll want a selection of coordinating prints or solids. The woven effect really shines when you use contrasting colors that create depth and texture. For the snowball block, consider lighter tones that make the quilt feel bright and airy. A good balance between dark, medium, and light fabrics will make your quilt visually interesting.
Finally, prepare batting and backing fabric for when your quilt top is complete. Cotton batting works beautifully for beginners because it’s easy to quilt through. For backing, pick something soft yet sturdy—it doesn’t need to match perfectly, but choosing a complementary fabric makes the whole quilt feel cohesive.
Step One: Cutting the Fabric
Cutting is where your quilt begins to take shape. For the woven portion of this pattern, you’ll be working with strips of fabric that create the illusion of texture and movement. Using your quilting ruler and rotary cutter, cut equal-width strips in contrasting colors. For beginners, strips between 2.5″ and 3″ wide are a manageable size that still produces a striking effect.
The snowball block requires squares and corner pieces. Cut larger squares for the block bases—often around 6.5″ to 8.5″ depending on the size of quilt you’d like—and smaller squares (about 2.5″) to sew onto the corners. When sewn, these smaller pieces create the distinctive “snowball” effect that softens the quilt’s geometry.
Accuracy is key here. Double-check your measurements before making each cut, and take your time. Even a small difference can throw off the alignment of your quilt later. If you’re new to quilting, practice cutting a few sample strips and squares before committing to your main fabric.
Step Two: Sewing the Woven Blocks
Once your strips are ready, it’s time to create the woven effect. Lay out your fabric strips in alternating colors to mimic the look of weaving. This arrangement is what gives the block its signature style, so play with placement until you find a combination that appeals to you. Pin the strips together before sewing to keep everything aligned.
Sew the strips together along their long edges with a quarter-inch seam allowance. Press the seams open or to one side, depending on your preference. A hot iron is your best friend here; it will help the pieces sit flat and line up properly when you assemble the full block.
After sewing, trim your strip sets to create squares of consistent size. These squares will become your woven blocks, ready to pair with the snowball blocks. At this stage, you’ll really begin to see the quilt’s pattern emerge, and it’s exciting to watch the design take shape piece by piece.
Step Three: Sewing the Snowball Blocks
Next comes the snowball block. Take your larger square of fabric and place a smaller square in one corner, right sides together. Draw a diagonal line across the small square, then sew along the line. Trim away the excess fabric, leaving about a quarter-inch seam allowance, and press the corner open.
Repeat this process for all four corners of the larger square. When finished, you’ll have a block with softly angled corners, creating the rounded effect that gives the snowball block its name. It’s a simple method, but it transforms a plain square into something visually special.
Make several snowball blocks in different fabrics to pair with your woven blocks. Together, they balance each other beautifully: the woven blocks provide structure, while the snowballs bring softness. This interplay is what makes the Woven & Snowball Block Quilt such a delightful quilting pattern.
Step Four: Assembling the Quilt Top
With your woven and snowball blocks complete, the fun of layout begins. Arrange your blocks on a design wall, the floor, or a large table so you can see the full pattern. Alternate between woven and snowball blocks, creating a checkerboard-like effect. Move blocks around until you find a layout you love.
When sewing the rows, start with one block at a time, using a consistent quarter-inch seam allowance. Press your seams as you go to keep everything neat. Once your rows are assembled, join them together to form the quilt top. It can feel a bit daunting to sew such large pieces, but steady progress will get you there.
As you sew, keep an eye on how the woven strips line up and how the snowball corners meet. Small imperfections are normal and part of the charm of handmade quilts, so don’t stress too much. The most important part is that you’re creating something uniquely yours.
Ideas for Customization
One of the best things about quilting is how easily you can personalize any pattern. The Woven & Snowball Block Quilt lends itself beautifully to customization. Try using a rainbow of fabrics for a vibrant, playful look, or stick with muted neutrals for a calming, modern design. The woven blocks, in particular, look stunning when made with bold prints that mimic texture.
You can also play with block size. Larger blocks mean fewer seams and a quicker project, while smaller blocks create more intricate detail. For baby quilts, smaller snowballs add a delicate touch. For bed-size quilts, bigger woven strips can make the process faster and more beginner-friendly.
Don’t forget about quilting techniques for the finishing stage. Straight-line quilting emphasizes the woven effect, while free-motion quilting can add swirls and curves that soften the geometric shapes. Experiment with thread color, too—contrasting thread adds drama, while matching thread creates subtlety.
Finishing Touches
After completing the quilt top, layer it with batting and backing to create your quilt sandwich. Baste the layers with safety pins or spray adhesive to hold everything in place. Quilting the layers together can be as simple or as intricate as you like. Beginners may want to try straight-line quilting with a walking foot, while more advanced quilters can explore free-motion designs.
Once quilted, trim away any excess batting and backing fabric. Prepare your binding strips, either by cutting them from leftover fabric or selecting a coordinating print. Binding is what finishes the quilt edges and gives it a polished look, so take your time with this step. Hand-stitching the final edge can be relaxing and rewarding, though machine binding is faster.
At last, your quilt is complete! It’s ready to be used, gifted, or displayed. The Woven & Snowball Block Quilt combines two timeless quilting patterns into one design, making it both a learning experience and a treasure to keep.
Share Your Quilt Journey
Quilting is a craft that’s best enjoyed in community. If you try the Woven & Snowball Block Quilt inspired by Geeky Sewist of SewHappyGeek, don’t keep it to yourself—share your progress and finished quilt with friends, family, or online quilting groups. Posting pictures and stories helps inspire others and connects you with a community of makers who understand the joy of quilting.
Every quilt tells a story, and yours is no different. Whether you’re making this quilt as a gift, a keepsake, or just a fun learning project, your experience matters. Celebrate every step, from the first fabric cut to the final stitch.