
Quilting is one of those timeless crafts that never goes out of style, and the Inklingo Ribbon Flower Quilts Pattern is a wonderful project to bring both tradition and creativity together. Whether you’re just starting your quilting journey or you’re an experienced maker looking for something playful and bright, this pattern is a fantastic choice. Ribbon flowers add a delicate and eye-catching detail that works beautifully in quilts, wall hangings, table runners, or even as decorative pillow covers.
In this tutorial, you’ll learn everything you need to start your own Ribbon Flower Quilt using the Inklingo method. We’ll cover the tools and materials you’ll need, step-by-step instructions, and even some ideas for customizing your quilt so it reflects your personal style. By the end, you’ll be ready to create a charming quilt that feels as joyful to make as it does to display.
So grab your favorite fabrics, set aside a little creative time, and let’s dive into the world of quilting patterns with this stunning Ribbon Flower design.
What Makes the Inklingo Ribbon Flower Quilt Special?
The Inklingo Ribbon Flower pattern stands out because it combines the beauty of curved piecing with the convenience of printed templates. Unlike traditional quilting methods where you may need to cut fabric using paper templates or guess measurements, Inklingo lets you print the shapes directly onto fabric with your home printer. This means more accuracy, less waste, and quicker results—perfect for both beginners and seasoned quilters.
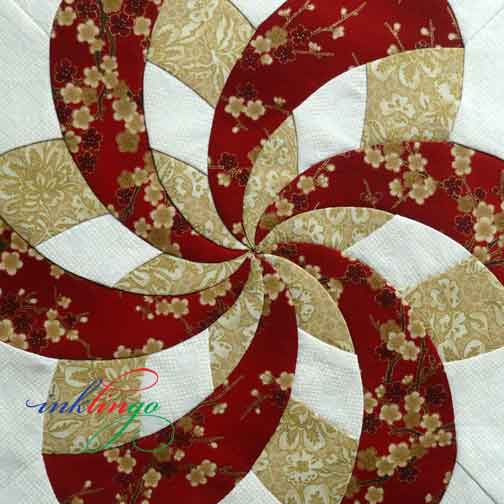
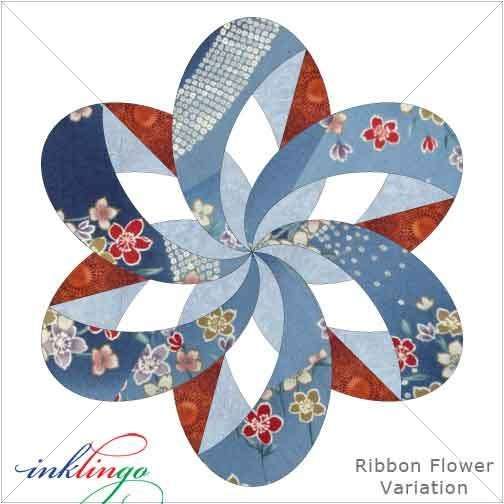
Ribbon flower designs are timeless because they bring softness and motion to any quilt. The petal-like shapes radiate outward, creating a design that feels both balanced and lively. When pieced together, these flowers can become the centerpiece of your quilt or work as part of a repeating block design. It’s flexible enough to suit small projects or large bed-sized quilts.
Another special aspect is the meditative nature of sewing curved shapes. While it may seem intimidating at first, the Inklingo system makes the process approachable. The curves fit together smoothly, and the printed stitching lines help guide your seams with precision. In the end, you’ll have a quilt that looks intricate but was surprisingly manageable to create.
Materials and Tools You’ll Need
Before you begin your Ribbon Flower Quilt, it’s essential to gather your materials. Having everything ready will make your sewing time smooth and enjoyable. Luckily, this project doesn’t require anything too complicated—just the basics plus your chosen fabrics.
Essential materials:
- Fabric in at least three different colors or prints (floral, solid, or geometric work beautifully).
- High-quality cotton thread in a neutral shade.
- Printer-friendly fabric sheets or freezer paper for Inklingo printing.
- Inkjet printer.
Tools you’ll use:
- Rotary cutter and self-healing cutting mat.
- Fabric scissors for small adjustments.
- Iron and ironing board for pressing seams.
- Sewing machine (optional, as the Inklingo method also supports hand piecing).
- Pins or clips to hold curves in place while sewing.
Take some time to select fabrics that inspire you. Many quilters like to use bright, cheerful colors for the ribbon flowers, paired with a soft background fabric like cream or pale gray. The contrast between the petals and the background will make your quilt pop beautifully.
Step 1: Preparing Your Fabric with Inklingo
The first step in the Inklingo Ribbon Flower Quilts Pattern is printing your templates. With Inklingo, you’ll use special fabric sheets that can be run through your inkjet printer. Once you’ve downloaded and chosen the Ribbon Flower collection, select the shapes you need and print them directly onto your fabric.
This step saves an enormous amount of time compared to cutting cardboard templates. Each shape will already have seam allowances and stitching lines printed, ensuring that your blocks turn out neat and consistent. Make sure you iron your fabric onto freezer paper before feeding it through your printer—this stabilizes it and prevents jams.
After printing, cut out each shape using scissors or a rotary cutter. Be precise here, as the neatness of your shapes will directly affect how well your quilt comes together. Once everything is cut, you’ll have a stack of petals, centers, and background pieces ready to sew.
Step 2: Piecing the Ribbon Flowers
Now comes the fun part—sewing the ribbon flowers together. Each flower is made up of petal-shaped pieces arranged around a center. Start by laying out your petals in a circular arrangement so you can see the overall design before stitching. This helps ensure the colors flow the way you want.
To sew the petals, take two at a time and align them along the curved edges. Pin or clip them carefully, matching the Inklingo stitching lines. Sew slowly, either by hand or with your sewing machine, following the curve. It may take a little practice, but once you get the hang of it, the pieces will come together beautifully.
Continue adding petals until you complete the flower shape. Finally, attach the center circle piece to finish it off. Press the seams gently with your iron, being careful not to stretch the fabric. The result will be a crisp, radiant ribbon flower block that’s ready to join with others.
Step 3: Assembling Your Quilt Top
Once you’ve made several Ribbon Flower blocks, it’s time to assemble your quilt top. The beauty of this pattern is that it can be adapted to many layouts. You can make a quilt filled entirely with ribbon flowers, or alternate them with plain squares for a lighter look.
Arrange your blocks on a flat surface or design wall to test different layouts. Some quilters prefer a uniform, grid-like design, while others enjoy scattering flowers across the quilt in a freer style. Play with color placement to see what feels most balanced and pleasing.
When you’re happy with your arrangement, sew the blocks together row by row. Press the seams as you go to keep everything flat. By the end, you’ll have a complete quilt top that shows off the beauty of your Ribbon Flower blocks.
Step 4: Quilting and Finishing Touches
With your quilt top assembled, the next step is to layer it with batting and backing fabric. This “quilt sandwich” is essential for creating a finished quilt with texture and warmth. Smooth out each layer carefully, then baste them together with pins or temporary adhesive spray.
When it comes to quilting, you have plenty of options. Simple straight-line quilting works wonderfully, as it won’t compete with the flower shapes. Alternatively, free-motion quilting with loops, swirls, or petals can enhance the floral theme and add extra depth. If you’re new to quilting, don’t worry about perfection—part of the charm of handmade quilts is their uniqueness.
Finish by trimming the edges and sewing on binding to give your quilt a neat border. A contrasting binding fabric can frame your design beautifully, or you can match it to the background for a seamless look. At this stage, your Inklingo Ribbon Flower Quilt will truly come to life.
Customizing Your Ribbon Flower Quilt
One of the joys of quilting is making each project your own, and the Ribbon Flower pattern offers endless opportunities for customization. The choice of fabric, layout, and size can completely change the feel of the finished quilt.
For a bright and cheerful quilt, choose vibrant fabrics for the petals and a crisp white background. For something more subdued, try pastel petals on a soft gray or beige background. You can even make scrappy flowers using leftover fabric from other projects, giving your quilt a charming patchwork look.
If you’re feeling adventurous, try combining Ribbon Flower blocks with other quilting patterns, such as stars or pinwheels, to create a unique sampler quilt. Adding embroidery details or decorative stitching in the flower centers can also elevate your quilt and give it a one-of-a-kind touch.
Share Your Quilting Journey
Now that you’ve learned how to make an Inklingo Ribbon Flower Quilts Pattern, it’s time to start stitching your own masterpiece. This project is a wonderful way to practice curved piecing, explore fabric combinations, and create something that truly reflects your style. Whether you make a small wall hanging, a cozy lap quilt, or a full-size bed quilt, your Ribbon Flowers will bring joy and beauty to any space.
Remember, quilting is about more than just the finished product—it’s about the process. Each stitch is a chance to relax, create, and connect with a tradition that spans generations. Don’t be afraid to experiment, make mistakes, and learn as you go.
When your quilt is complete, share it with friends, family, or your online quilting community. Post photos on social media, join quilting groups, or even gift your quilt to someone special. By sharing your work, you inspire others to start their own quilting journeys, and that’s one of the most rewarding parts of being a maker.