
Quilting has always been a craft that blends creativity, tradition, and patience into one rewarding art form. Among the many quilting patterns out there, the Jack in the Box quilt block stands out as a playful yet structured design. This block is full of character, making it a perfect project for both beginners and seasoned quilters who want to try something new. With its crisp lines and geometric flair, it creates a striking effect in larger quilts, while still being simple enough for someone who is just starting their quilting journey.
In this tutorial, we’ll walk step by step through how to create a Jack in the Box quilt block. From gathering materials to pressing the final seams, you’ll get a clear understanding of the process. We’ll also talk about how to customize your block with color choices, patterns, and layout variations to make it uniquely yours. By the end, you’ll have the confidence to add this versatile design to your quilting projects, whether it’s a wall hanging, table runner, or a full quilt.
The Jack in the Box block is timeless, but it’s also incredibly adaptable. Once you learn the basic construction, you can play with fabric choices and scale to create endless variations. This is part of the fun of quilting—experimenting with colors, prints, and layouts to create something that reflects your personality. So, let’s get started on this exciting quilting pattern and bring a little “pop” to your next project!
Materials and Tools You’ll Need
Before diving into the cutting and stitching, it’s important to gather the right materials. For quilting, precision and preparation make the process much smoother. Having everything ready at your side will allow you to focus on enjoying the experience rather than scrambling for tools. Luckily, the Jack in the Box quilt block doesn’t require anything complicated—just some standard quilting supplies and your favorite fabrics.
Here’s what you’ll need:
- Fabric in three to four contrasting colors or prints
- Rotary cutter, cutting mat, and quilting ruler
- Sewing machine (with a ¼-inch presser foot if possible)
- Thread in a neutral color
- Iron and ironing board for pressing seams
- Pins or clips to hold fabric pieces together
Choosing fabrics is one of the most exciting parts of quilting. For beginners, high-contrast fabrics make the design stand out clearly, so try pairing solids with bold prints or light tones with dark tones. If you want a more subtle look, consider using fabrics from the same color family but in varying shades. This will create depth while keeping the overall block cohesive. The right fabric combination can turn a simple quilting pattern into something truly eye-catching.
Cutting the Fabric Pieces
The Jack in the Box block is made up of squares, rectangles, and triangles. The key to getting crisp lines is accurate cutting. Using a rotary cutter and quilting ruler ensures clean, even edges, which will make your piecing process much easier later on. Even if you’re a beginner, practicing careful cutting will give you professional-looking results.
For a 12-inch finished block, here’s a suggested cutting guide:
- (1) 6 ½-inch square for the center
- (2) 3 ½ x 6 ½-inch rectangles for the sides
- (2) 3 ½-inch squares for corners
- (4) 3 ½-inch squares for making half-square triangles (HSTs)
Once all your pieces are cut, lay them out on your work surface in the shape of the final block. This “preview” step is helpful because it allows you to visualize the block before sewing it together. You can double-check that your colors are balanced and that no two similar fabrics are sitting directly beside each other. It’s like putting together a puzzle—the satisfaction comes when the pieces fit perfectly into the bigger picture.
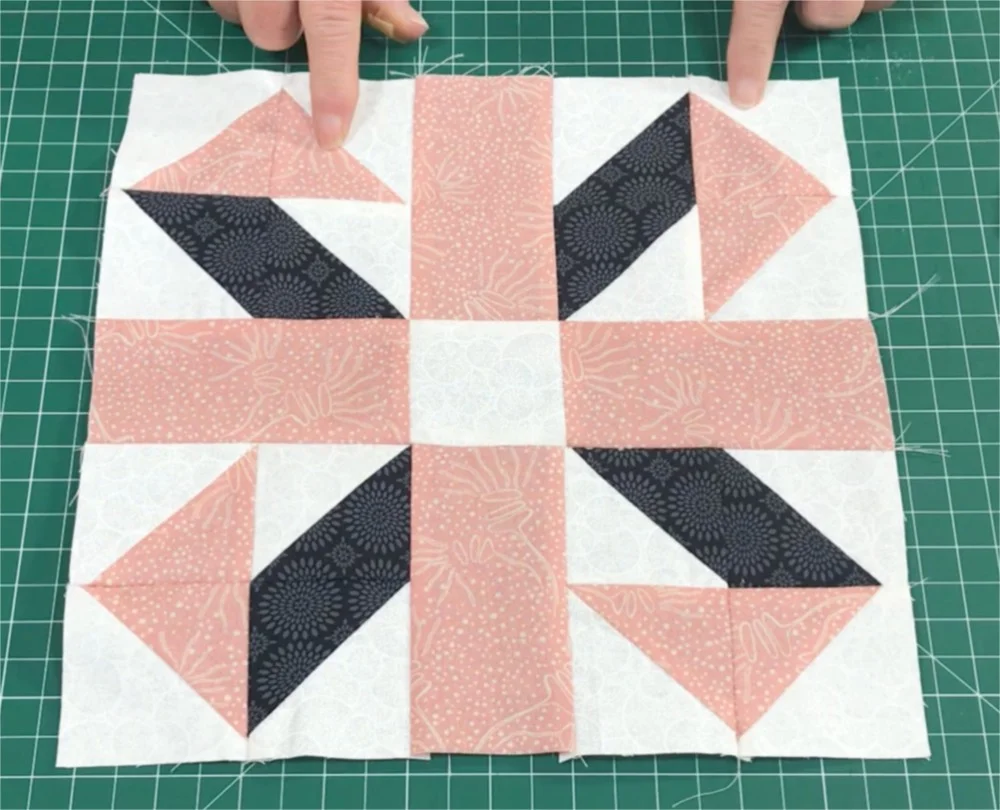
Step-by-Step Assembly
Now comes the fun part: assembling the Jack in the Box quilt block. Remember to use a consistent ¼-inch seam allowance throughout to ensure your block stays square and lines up neatly. Take your time, and don’t be afraid to pause to press seams as you go. Pressing might seem like a small detail, but it makes a big difference in how flat and polished your block looks in the end.
Step 1: Begin by sewing your half-square triangles (HSTs). Pair two contrasting 3 ½-inch squares, place them right sides together, and draw a diagonal line across the lighter fabric. Stitch ¼-inch on both sides of the line, then cut along the line to create two HSTs. Press them open. Repeat until you have four.
Step 2: Next, arrange your block again with the HSTs, center square, rectangles, and corner squares. Start sewing the pieces row by row. Attach the corner squares and HSTs to the rectangles, then connect those rows to the center square.
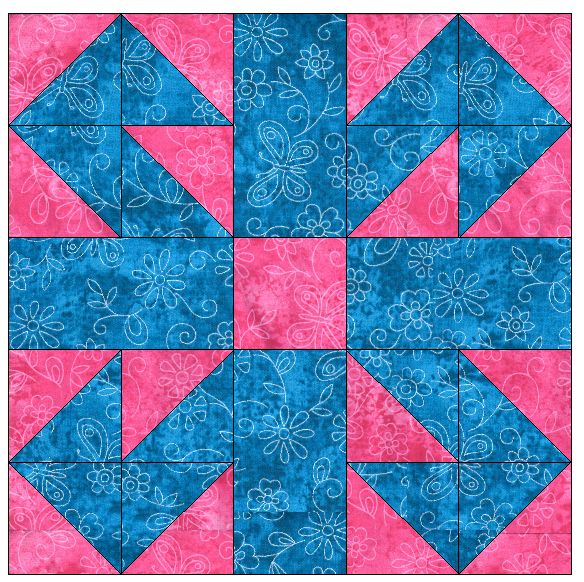
Step 3: Once all rows are assembled, join them together to complete the block. Give the entire block one last press, and admire your finished Jack in the Box quilt block! At this stage, you’ll notice the bold lines and geometric movement the pattern creates.
Tips for Success
When working with any quilting pattern, especially as a beginner, a few tips can help ensure your block comes out beautifully. Accuracy is important, but don’t stress over tiny imperfections—quilting is about progress and creativity, not perfection. Each block you sew will teach you something new.
One key tip is to always measure twice before cutting. Fabric can be unforgiving, so taking an extra moment to double-check your measurements will save you from running short later. Additionally, pressing seams toward darker fabrics helps prevent them from showing through lighter fabrics, giving your block a clean look.
Finally, don’t rush the process. Quilting can be meditative, and the Jack in the Box block is a wonderful project to practice patience. Whether you finish a block in an afternoon or take your time over several days, the joy is in the making. Remember, every stitch brings you closer to a beautiful quilt.
Ideas for Customization
One of the best things about the Jack in the Box quilt block is its versatility. You can create a completely different look just by swapping out colors or rearranging fabrics. This flexibility makes it a perfect pattern to experiment with and adapt to different projects.
For a bold, modern quilt, consider using solid fabrics in high-contrast colors like black, white, and red. If you prefer a softer, more traditional look, use floral prints, pastels, or reproduction fabrics. You could even try a scrappy version, using leftover fabric pieces from previous projects. This gives the block a charming, eclectic feel.
Beyond color, you can also play with scale. Make smaller blocks for intricate table runners or larger blocks for a quick quilt top. You could even alternate Jack in the Box blocks with simpler designs like plain squares or nine-patch blocks for added variety. The possibilities are endless, which is what makes quilting such a rewarding craft.
Putting It All Together
Once you’ve mastered making individual Jack in the Box blocks, you can start combining them into larger quilt projects. Sewing multiple blocks together gives the pattern a dynamic, interconnected effect that looks more complex than it actually is. This makes it a great choice for a quilt top that impresses without being overly complicated.
You could create a quilt entirely from Jack in the Box blocks for a bold statement piece, or mix them with other quilting patterns for a more playful design. Adding sashing or borders around each block can help highlight the design, while cornerstones or contrasting fabrics can add even more interest.
Don’t forget about finishing touches like quilting and binding. Whether you choose straight-line quilting for a modern look or free-motion quilting for added texture, the stitching can enhance your block even further. Binding in a contrasting color is a great way to frame your quilt and make the Jack in the Box blocks pop.
Share Your Quilting Journey
The Jack in the Box quilt block is an approachable, beginner-friendly design that opens the door to creativity. By following the steps in this tutorial, you’ll not only learn how to make a classic quilt block but also gain valuable skills that will carry over into future quilting projects. Every block you sew builds your confidence and helps you grow as a quilter.
I encourage you to experiment with colors, fabrics, and layouts to make the Jack in the Box block uniquely your own. Share your creations with fellow quilters, whether in quilting groups, on social media, or with friends and family. You never know who you might inspire with your work!
Quilting is about connection—connecting fabric, connecting tradition, and connecting with others. So, once you finish your Jack in the Box quilt block, don’t keep it to yourself. Share your project, celebrate your progress, and keep exploring the wonderful world of quilting. Happy stitching!