
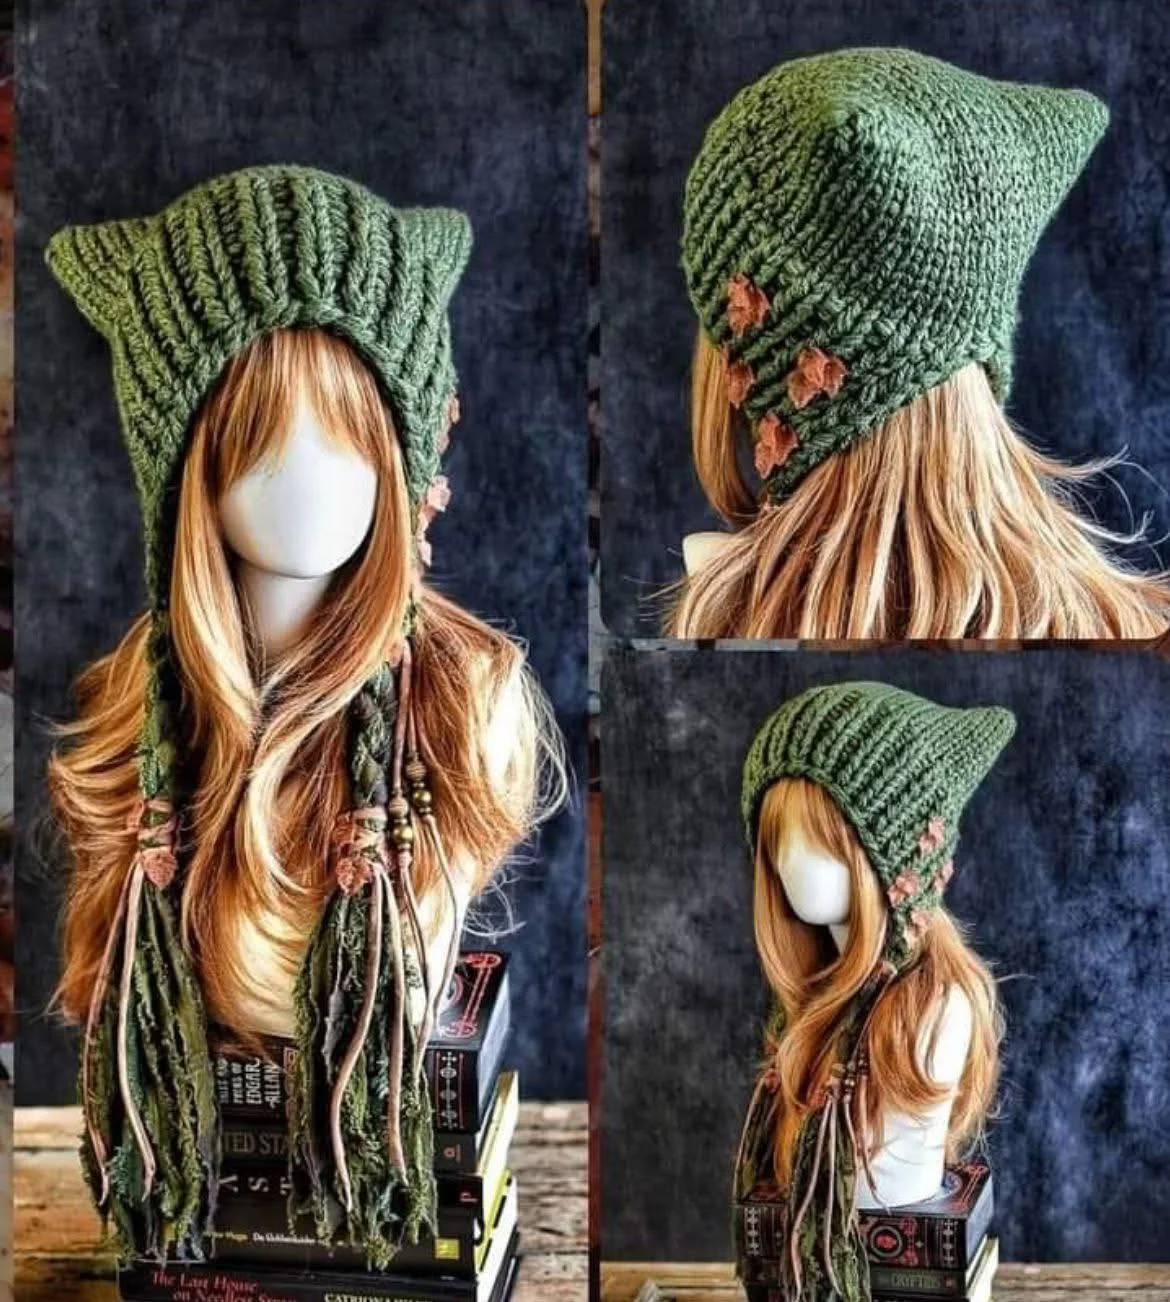
Creating adorable accessories is one of the most joyful parts of the Crochet world, and the Kitty Hat is a perfect example of a beginner-friendly project that delivers a beautiful, fun result.
Whether you’re making it for a child, a teen, or yourself, this cute hat featuring charming cat ears brings warmth, personality, and handmade love into every stitch.
With this tutorial, you’ll learn how to follow a simple Crochet pattern to create a hat that looks professional without complex shaping or advanced techniques.
Many beginners believe hats are difficult to make, but the Kitty Hat proves the opposite.
The structure is straightforward, the steps are gentle, and the entire project can be completed in a relaxed afternoon.
Even if you’re still building confidence with yarn tension or stitch consistency, this hat is forgiving and flexible.
Each section of this guide is designed to support your learning, so you can Crochet with ease and joy.
This tutorial includes everything you need to succeed: a detailed material list, explanations of essential stitches, a full step-by-step guide, and creative ways to customize your Kitty Hat
. By the end, you’ll feel empowered to personalize your hat and even make a few more as gifts for friends and family.
So grab your yarn, settle into a cozy space, and let’s begin this delightful Crochet adventure.
Materials You Will Need
Before diving into the Crochet pattern, take a moment to prepare all the materials required for the Kitty Hat.
Having everything organized ahead of time helps the tutorial flow smoothly and makes the crafting experience more enjoyable.
Fortunately, this project uses inexpensive and easy-to-find supplies, perfect for beginners or anyone who loves spontaneous crafting.
The most important material is your yarn. A medium-weight (category 4) acrylic, wool, or cotton-acrylic blend works wonderfully for this hat. Choose colors that reflect the playful nature of the design—pastels for sweetness, bold shades for fun, or neutrals if you prefer a classic look.
The yarn should be soft, warm, and flexible to ensure the hat is comfortable for everyday wear.
You will also need a 5.0 mm (H) Crochet hook, a pair of scissors, a yarn needle, and two removable stitch markers.
If you plan to add extra features such as embroidered whiskers or a decorative bow, prepare small scraps of contrasting yarn as well.
Once everything is gathered, you’re ready to start transforming simple yarn into an adorable Kitty Hat.
Understanding the Structure of the Kitty Hat
Before picking up your hook, it’s helpful to understand the structure of the Crochet pattern you’re about to follow.
The Kitty Hat is built from the bottom-up using basic stitches, making it approachable even for those new to Crochet.
The main body of the hat is worked in rounds, creating a soft tube that fits comfortably around the head.
Once the tube reaches the ideal height, it is gathered or folded in a way that forms the iconic cat ears.
This technique gives the hat its cute and recognizable shape without needing to separately Crochet and sew on ear pieces.
This design choice makes the process easier while also giving the finished hat a smooth, cohesive look.
Because the hat is made in continuous rounds, you will use stitch markers to track the beginning of each round.
This practice helps maintain accuracy and ensures your sides stay even.
With this simple construction method and the friendly nature of the design, even hesitant beginners can create a hat they feel proud to wear or gift.
Step-by-Step: Starting the Band of the Hat
Your first step is creating the band that will stretch comfortably around the wearer’s head.
Begin by making a chain long enough to fit around the head circumference, typically between 48 and 60 stitches for most sizes.
Make sure the chain is not too tight; it should stretch gently without losing shape.
When the chain is finished, join it into a loop with a slip stitch, being careful not to twist your chain.
Next, work one round of single Crochet into each chain.
This first round strengthens the edge and makes the band feel secure.
As you complete the round, use a stitch marker to mark your starting point.
This small detail makes a big difference as you begin to build the hat upward, round by round. Continue building the band by adding 2–3 rounds of half-double Crochet stitches.
These stitches create a soft, flexible texture that feels comfortable against the forehead.
After a few rounds, step back and stretch your work gently to check the fit.
A well-fitting band sets the foundation for the rest of the Kitty Hat, so this is a great moment to adjust tension or stitch count if needed.

Building the Body of the Kitty Hat
With the band complete, you’ll now begin working upward to form the body of the hat.
This portion of the Crochet pattern is worked in continuous rounds of half-double Crochet.
The stitch is ideal because it creates a warm fabric without being too dense.
Keep your stitch markers moving upward each round so you always know where you are.
As you Crochet round after round, you’ll notice the hat slowly forming a soft tube.
The height depends on the size you want, but most adult hats require 18–22 rounds from the band upward.
Children’s hats typically need fewer rounds. Pause occasionally to measure or try it on—this ensures your hat fits perfectly and doesn’t become too tall or short.
One of the best features of this hat is that you don’t need to decrease stitches at the top as you would in traditional hat-making.
The rectangular shape of the tube is intentional because it will form the cat ears during the finishing process.
So simply enjoy the rhythmic motion of Crochet as your fabric grows row by row.
Shaping the Iconic Kitty Ears
Now comes the magical moment—transforming your simple tube into a Kitty Hat.
Once you’ve reached the desired height, fasten off your yarn, leaving a long tail for assembly.
Lay the hat flat so that the two sides line up evenly.
Using your yarn needle, sew across the top edge in a straight line, joining the front and back together.
The next step is what creates the adorable cat ears.
Starting from the top corners, pinch inward on each side of the hat until you see a pointed ear shape form naturally.
This simple gathering technique gives the hat its personality without extra sewing or shaping.
Once you’re satisfied with the positioning, secure the folds with a few strong stitches.
After creating both ears, weave in any remaining yarn tails neatly.
Take a moment to admire your progress—you’ve just completed the most distinctive part of the Kitty Hat.
Even beginners often feel a huge sense of accomplishment at this stage, because the transformation from tube to cat ears is so delightful and rewarding.
Customization Ideas for Your Kitty Hat
One of the joys of Crochet is the endless possibility for personalization.
The Kitty Hat is especially fun to customize because its playful style invites creativity.
A simple variation is changing the color scheme. Use stripes, gradients, or multicolored yarns to create a lively and unique look.
You can also make themed hats, such as black for a Halloween vibe or pastel pink for a sweet and cozy feel.
Adding embroidered details is another charming option.
With a yarn needle and a bit of contrasting yarn, you can stitch whiskers, a tiny nose, or even sleepy cat eyes.
These details enhance the handmade charm and make your hat stand out. If you’re making the hat as a gift, consider adding initials or a small heart for a personal touch.
For crafters who love extra flair, consider attaching a bow between the ears or a small pom-pom at the back.
You can also use fuzzy yarn for the band or ears to give the hat a more whimsical texture.
Every customization adds character, allowing your Kitty Hat to reflect your personality, creativity, and Crochet style.
Finishing Touches and Care Instructions
Once your hat is complete and customized, give it a gentle stretch to help the stitches settle evenly.
This also shapes the ears more neatly. If the hat looks slightly wrinkled from handling, you can lightly steam-block it—but avoid heavy blocking because it may soften the stitch definition too much.
Caring for your handmade Kitty Hat is simple.
Most medium-weight acrylic or wool blends can be washed in cold water on a gentle cycle and laid flat to dry.
Handwashing is always the safest choice for Crochet items, especially if you’ve added embroidery or embellishments.
Good care ensures your hat lasts season after season. Before moving on to your next project, take a moment to appreciate your work.
You’ve followed a full Crochet pattern, shaped adorable cat ears, and added personal touches that make the hat uniquely yours.
That sense of accomplishment is why so many people fall in love with Crochet.
Conclusion – Share Your Kitty Hat With the World!
Congratulations! You’ve completed the Kitty Hat and learned a fun, beginner-friendly Crochet pattern that is sure to bring smiles wherever it’s worn.
Making something with your own hands is always meaningful, and this hat’s playful design makes the process even more enjoyable.
Whether you crafted it for yourself, a child, or a friend, the result is a cozy accessory filled with creativity and heart.
Now is the perfect time to share your work with others. Snap a cute photo of your finished Kitty Hat and post it in your favorite Crochet community.
Sharing your progress helps inspire other beginners and celebrates the joy of handmade creations.
You never know—your version might even spark new ideas for fellow crafters. If you enjoyed this tutorial, feel free to explore more Crochet patterns, try new stitches, or experiment with different textures and colors.
PATTERN HERE
Crochet – Tutorial
FULL PATTERN ACCESS
You will be redirected to another site
Every project helps build your skills and confidence.
Happy Crocheting, and may your next creation be just as fun and adorable as this one!