
The Log Cabin quilt is one of the most iconic and enduring patterns in the world of quilting. Its timeless design, characterized by strips of fabric arranged around a central square, has captivated quilters for generations. In this tutorial, you’ll learn how to create your own Log Cabin quilt from start to finish.
] We’ll cover everything from fabric selection to the final stitch, and even guide you through downloading and installing a quilt app to help you with your quilting projects. Whether you’re a beginner or an experienced quilter, this step-by-step guide will make your quilting journey enjoyable and rewarding.
Understanding the Log Cabin Quilt Pattern
The Log Cabin quilt pattern is a versatile and traditional design that has been around for centuries. It consists of a central square, often referred to as the “hearth,” surrounded by “logs” or strips of fabric.
These logs are added in a specific order, creating a pattern that can range from simple to intricate, depending on the arrangement of colors and fabrics. One of the reasons the Log Cabin quilt is so popular is its adaptability.
You can create a variety of effects simply by changing the color placement or the width of the fabric strips. For example, using light and dark fabrics alternately can create a striking contrast, while using a more random color arrangement can give the quilt a scrappy, homemade feel. and structure.
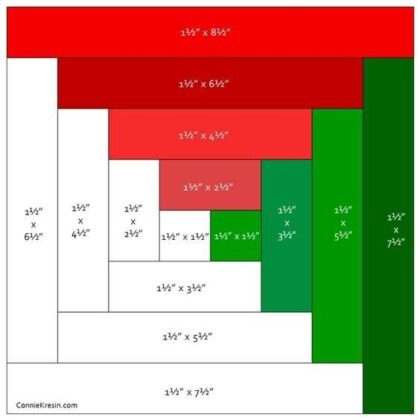
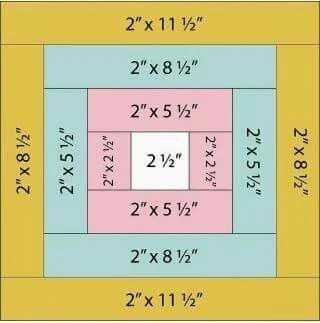
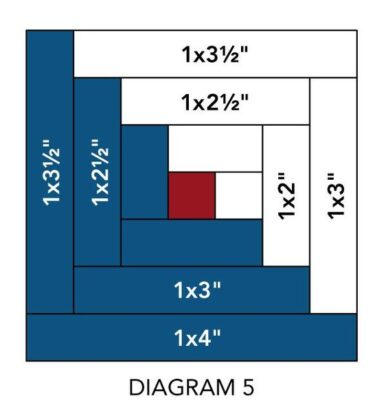
The traditional Log Cabin block starts with a central square, typically measuring 2.5 inches by 2.5 inches. Strips of fabric, usually cut to 1.5 inches wide, are then added around the square in a clockwise or counterclockwise direction. This process continues until the block reaches the desired size.
Choosing Fabrics and Preparing to Quilt
Selecting the right fabrics is crucial for creating a stunning Log Cabin quilt. The traditional design often uses a combination of light and dark fabrics to create a contrast that highlights the geometric pattern. When choosing fabrics, consider using a mix of solids and prints to add depth and interest to your quilt. It’s a good idea to prewash your fabrics to prevent any shrinkage or color bleeding later on. After washing, press the fabrics to remove any wrinkles and ensure they are smooth and flat. Next, you’ll need to cut your fabric into the necessary strips and squares. For a standard 12-inch finished Log Cabin block, you’ll need to cut your central square to 2.5 inches by 2.5 inches and the strips to 1.5 inches wide. In addition to fabric, you’ll need some basic quilting supplies, including a rotary cutter, a cutting mat, and a quilting ruler. These tools will help you cut your fabric strips accurately and efficiently. A sewing machine with a quarter-inch presser foot is also essential for sewing precise seams, which is crucial for the Log Cabin pattern.
Cutting the Fabric Strips and Central Squares
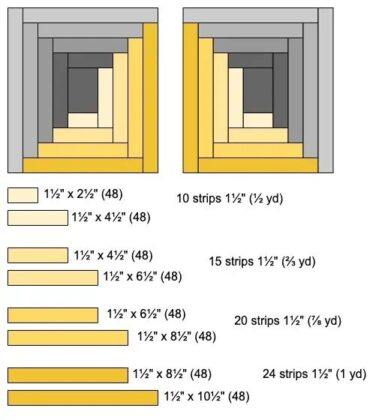
Once you have selected your fabrics, it’s time to start cutting. For a typical Log Cabin quilt, you’ll need to cut multiple strips of fabric that are 1.5 inches wide. The length of these strips will vary depending on the size of your quilt blocks, but it’s a good idea to cut them slightly longer than you think you’ll need, as it’s easier to trim them down than to add more fabric later. Start by cutting your central squares. For each block, you’ll need one square measuring 2.5 inches by 2.5 inches. This square will be the starting point for each Log Cabin block. After cutting the central squares, move on to cutting the strips. To keep things organized, separate your strips into two piles: one for light fabrics and one for dark fabrics. The number of strips you’ll need will depend on the size of your quilt and the number of blocks you plan to make. A good rule of thumb is to cut more strips than you think you’ll need. You can always use any leftover strips for other quilting projects or save them for future Log Cabin quilts.
Assembling the Log Cabin Quilt Blocks
With your fabric strips and central squares cut, it’s time to start assembling the blocks. Begin by placing the central square in the center of your workspace. Take one of the shorter strips from your light fabric pile and sew it to one side of the square using a quarter-inch seam allowance. Press the seam towards the strip. Next, take another light fabric strip and sew it to the adjacent side of the square, creating an L shape. Continue adding strips in this manner, alternating between light and dark fabrics as you go. The key to a successful Log Cabin block is to work methodically, ensuring that each strip is sewn accurately and that the seams are pressed flat as you add each new piece. As you add more strips, the block will begin to take shape. If you’re following a traditional Log Cabin pattern, you’ll want to alternate between light and dark strips to create the characteristic contrast of the design. Continue adding strips until the block reaches your desired size, usually around 12 inches square for a standard quilt.
Arranging and Joining the Quilt Blocks
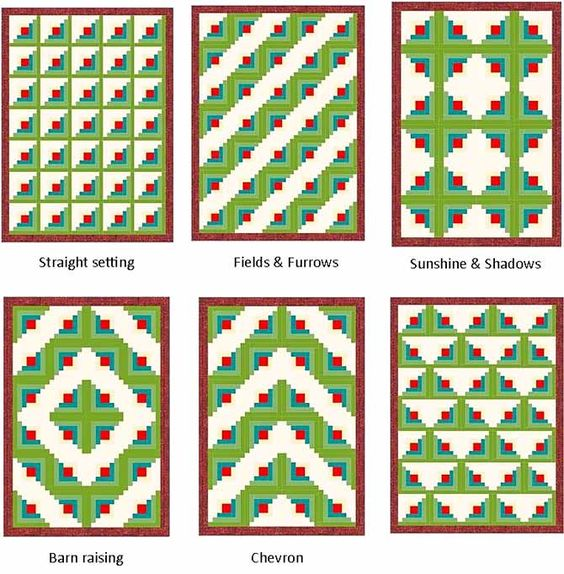
Once you’ve completed all your Log Cabin blocks, the next step is to arrange them into your desired quilt layout. The Log Cabin pattern is incredibly versatile, and there are many ways to arrange the blocks to create different effects. Some popular layouts include the “Barn Raising” pattern, where the blocks are arranged to create a diamond shape, and the “Streak of Lightning” pattern, where the blocks are placed in a zigzag formation. Experiment with different arrangements on your design wall or a large flat surface until you find a layout you like. Once you’ve decided on the arrangement, it’s time to start sewing the blocks together. Begin by joining the blocks into rows, sewing each block together with a quarter-inch seam allowance. Press the seams open or to one side, depending on your preference. After you’ve sewn the blocks into rows, sew the rows together to complete the quilt top. Be sure to match the seams as you go to ensure that your blocks are aligned properly. Press the entire quilt top to ensure that it lies flat and smooth before moving on to the next step.
Quilting and Finishing the Log Cabin Quilt
With the quilt top assembled, the next step is to quilt the layers together. Start by creating a quilt sandwich: lay the backing fabric down first, with the wrong side facing up. Place the batting on top of the backing, followed by the quilt top with the right side facing up. Smooth out any wrinkles and secure the layers with safety pins or basting spray. There are many different ways to quilt a Log Cabin quilt, depending on the look you want to achieve. You can quilt in the ditch, following the seams of the blocks, or create a more intricate design by free-motion quilting or using a quilt stencil. If you’re new to quilting, it might be a good idea to start with a simple straight-line quilting pattern, which is both easy to execute and visually effective. Once the quilting is complete, it’s time to add the binding. Cut strips of fabric to create the binding, fold them in half lengthwise, and press. Sew the binding to the edges of the quilt, folding it over to the back and hand-stitching it in place. This final step gives your quilt a polished finish and helps protect the edges from wear and tear.
Downloading and Installing a Quilt App
To help you with future quilting projects, consider downloading a quilt app. A good quilt app can provide you with a wealth of resources, including quilt patterns, fabric calculators, and even step-by-step tutorials. These apps are especially helpful for beginners, offering guidance and inspiration as you develop your quilting skills. To download a quilt app, start by searching for “quilt app” in your device’s app store. Look for an app that has good reviews and offers features that match your needs. Once you’ve found an app you like, tap the “Install” button and wait for the app to download and install on your device. After the app is installed, open it and explore the features. Most quilt apps will have a user-friendly interface that allows you to browse patterns, input your fabric measurements, and even plan your quilt projects. Take some time to familiarize yourself with the app’s functions, and don’t hesitate to use it as a valuable tool in your quilting journey. Happy quilting!Pinterest is an invaluable platform for quilt enthusiasts, serving as a dynamic hub of inspiration and resources. Users can explore a vast collection of quilt patterns, color palettes, and fabric combinations, all curated from a global community of makers. The platform’s algorithm helps you discover personalized content, showcasing trending designs, step-by-step tutorials, and innovative techniques. Whether you’re a beginner looking for foundational quilt patterns or an expert seeking creative challenges, Pinterest offers a visual journey to elevate your craft.