
Creating a Macaws Quilt is a vibrant way to bring the beauty of these colorful birds into your home. This step-by-step tutorial will guide you through the process of making a quilt that captures the essence of macaws. Using modern quilt patterns and digital tools like a quilt app can make this project easier and more enjoyable.
Understanding the Macaws Quilt Design
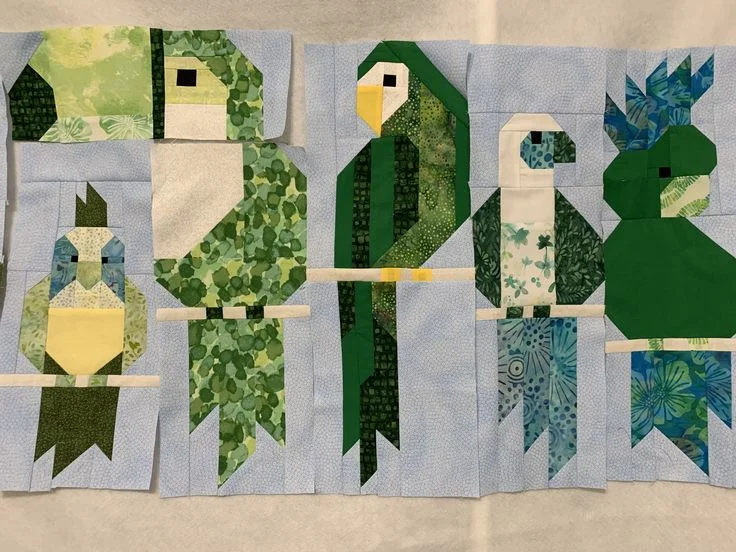
The Macaws Quilt design is inspired by the vibrant colors and patterns of macaws. These birds are known for their bright red, blue, yellow, and green feathers, which can be creatively replicated in a quilt.
Using a quilt app can help you visualize the design before you start cutting fabrics. Apps often feature pre-made quilt patterns, making it easier to choose a layout that suits your style. Additionally, these tools allow for easy adjustments to the pattern’s dimensions and color scheme.
Quilting offers a chance to experiment with unique shapes and patterns. The Macaws Quilt typically features feather-like patterns, combining straight and curved lines to mimic the natural flow of macaw feathers. With the right tools and materials, this design can come to life beautifully.
Materials Needed for the Macaws Quilt
To begin your Macaws Quilt project, gather the necessary materials. A list of high-quality fabrics and tools will ensure a smooth quilting process.
Start by selecting fabrics in bold, vibrant colors. Look for high-quality cotton or quilting fabric in shades of red, blue, yellow, green, and black for accents. You will also need batting, a quilt app for planning, and a cutting mat with a rotary cutter.
Ensure you have basic sewing supplies, including a sewing machine, thread matching your fabric colors, and quilting needles. Marking tools like fabric pencils and rulers are essential for precise cuts. If you’re using a quilt pattern from an app, print it out or keep it handy on your device.
Lastly, prepare your workspace. A clean, flat surface with ample lighting will make cutting and sewing much easier. Having all materials organized and within reach is key to staying focused and efficient.
Cutting the Fabric
Precision is crucial when cutting the fabric for your Macaws Quilt. Follow the measurements outlined in the quilt pattern to ensure all pieces fit together seamlessly.
Start by cutting large background pieces. For a standard quilt size, you’ll need a 40” x 60” base. From your vibrant fabrics, cut feather shapes in various sizes—typically 4” x 8” rectangles for the larger pieces and 2” x 4” for the smaller accents.
Use a rotary cutter and ruler for straight edges, and scissors for intricate shapes. Mark the fabric lightly with a pencil before cutting. Double-check measurements before making each cut to avoid mistakes that could waste fabric.
Assembling the Quilt Top
Piecing together the quilt top is where the magic begins. This step involves arranging your cut pieces to create the macaw-inspired design.
Lay out your pieces on a flat surface to preview the final design. Start with the larger feather shapes, placing them in a pattern that flows naturally. Add smaller accent pieces to mimic the texture and depth of feathers.
Using a sewing machine, stitch the pieces together row by row. Press each seam flat as you go to ensure a smooth finish. A quilt app can guide you during this process, showing the exact order of assembly for your chosen pattern.
Adding the Batting and Backing
Once the quilt top is complete, it’s time to assemble the quilt sandwich. This involves layering the quilt top, batting, and backing fabric.
Cut the batting and backing slightly larger than the quilt top, about 2” on each side. Lay the backing fabric wrong side up, place the batting on top, and then position the quilt top right side up. Smooth out any wrinkles to ensure a flat finish.
Secure the layers with safety pins or basting spray. This step prevents shifting during the quilting process. If you’re new to quilting, consider using a quilt app to find tutorials on proper layering techniques.
Quilting the Layers Together
Quilting the layers together is where your Macaws Quilt gains texture and durability. This step involves stitching through all layers to secure them.
Choose a quilting pattern that complements the macaw design. Feather-like motifs or wavy lines work well. Using a quilting foot on your sewing machine can make this process easier and more precise.
Start quilting from the center and work your way outward. This method prevents fabric bunching. Take your time, and check your progress frequently to ensure consistent stitching.
Binding the Edges
The final step is binding the edges of your quilt. This adds a clean, polished look and prevents the layers from fraying.
Cut binding strips 2.5” wide from your chosen fabric. Fold each strip in half lengthwise and press. Align the raw edges of the binding with the raw edges of the quilt, and stitch them together using a 1/4” seam allowance.
Fold the binding over to the back of the quilt and hand-stitch it in place. This step requires patience but results in a professional finish. If you’re unsure about binding techniques, refer to a quilt app for visual guides.
Displaying Your Macaws Quilt
After completing your Macaws Quilt, it’s time to showcase your work. This vibrant quilt can be used as a wall hanging, bedspread, or decorative throw.
Consider entering your quilt in local quilt shows or sharing it on quilting forums. The unique macaw design is sure to draw attention and inspire others. Use a quilt app to find events or online communities where you can display your creation.
Your finished Macaws Quilt is more than just a craft project; it’s a work of art that celebrates creativity and the beauty of nature. With its vibrant colors and intricate design, this quilt is bound to become a cherished item in your home.