
Quilting is a craft full of history, tradition, and creativity, and few designs carry as much cultural richness as the Navajo Quilt Block. Inspired by Native American artistry and geometric balance, this quilt pattern offers quilters a chance to play with bold colors, symmetrical shapes, and striking layouts. Whether you’re brand new to quilting or have stitched dozens of quilts before, the Navajo Quilt Block is a wonderful project that combines both beauty and meaning. In this tutorial, we’ll walk step by step through creating your own block, share a complete materials list, and provide customization ideas to make the quilt truly your own.
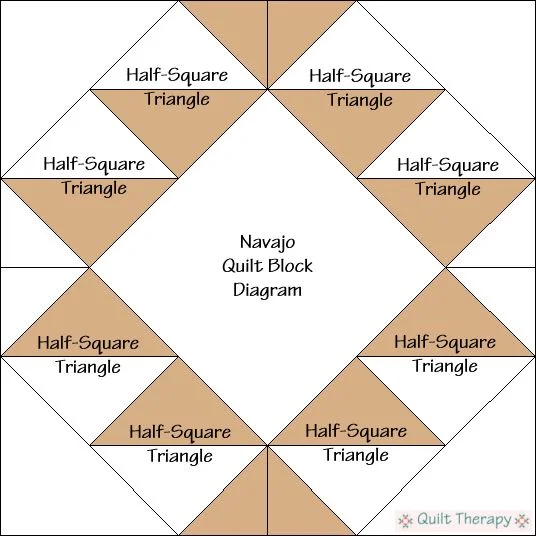
The Navajo Quilt Block is known for its sharp angles, diamond shapes, and layered geometric patterns. At first glance, it might look intimidating, but with the right approach and a little patience, even beginners can enjoy bringing this traditional design to life. By breaking it down into simple units and focusing on clean cuts and careful piecing, you’ll find the process not only manageable but also deeply rewarding. The end result is a quilt pattern that can serve as a wall hanging, a decorative throw, or a centerpiece in a larger quilt project.
This guide is designed to be accessible, encouraging, and clear. You’ll learn the foundations needed to build this quilt block, plus ideas to expand it into a full quilt or adapt it with different fabrics. Whether you’re aiming to honor the tradition of the design or simply want to add something striking to your quilting journey, this Navajo Quilt Block tutorial will guide you every step of the way. Let’s dive in and start stitching your next quilt project.
Materials You Will Need
Before you begin cutting and sewing, it’s important to gather the right tools and fabrics. Having everything ready makes the quilting process smoother and more enjoyable. For this quilt pattern, you’ll need a mix of fabrics in contrasting colors to highlight the geometric shapes. Traditional Navajo-inspired palettes often include earthy tones, bold reds, blacks, and whites, but you can adapt them to your personal style.
Here’s a basic list of materials:
- Assorted quilting cotton fabrics (3–4 colors for contrast)
- Rotary cutter and self-healing cutting mat
- Quilting ruler for accurate cuts
- Sewing machine with a ¼-inch foot
- Thread in coordinating colors
- Pins or clips
- Iron and ironing board
- Backing fabric and batting if finishing into a quilt
These materials are fairly standard for most quilt projects, but they’re essential to keeping your block sharp and professional. A rotary cutter and quilting ruler are especially helpful when working with angular shapes, as they allow for precision that scissors often cannot achieve. Accurate cutting is key in making sure the quilt block comes together cleanly and evenly.
If you plan to turn your Navajo Quilt Block into a full quilt, make sure you purchase enough fabric for multiple blocks and additional yardage for borders and sashing. Starting with one block is a great way to practice, and once you’re confident, you can expand the design into a larger quilt that makes a bold visual statement.
Cutting the Fabric Pieces
The Navajo Quilt Block relies on sharp geometric shapes, so careful cutting is one of the most important steps. Begin by pressing all your fabrics to remove any wrinkles. This ensures clean, even cuts and prevents distortion when sewing. Use your quilting ruler to measure accurately and your rotary cutter to make smooth, precise cuts.
To create one block (around 12″ finished), you will need:
- 4 diamond shapes in a main color
- 8 half-square triangles (HSTs) in two contrasting colors
- 4 rectangles for framing
- 4 smaller squares for the corners
Start by cutting strips of fabric and then sub-cutting them into the required shapes. For the diamond shapes, you can use a template or your quilting ruler angled at 45 degrees. The half-square triangles can be made by cutting squares, drawing a diagonal line, and sewing on either side before cutting them apart. This method helps maintain accuracy and reduces fabric stretching.
Keep your pieces organized by laying them out in the order they’ll be sewn. Many quilters like to use a design wall or a flat surface to arrange their pieces before stitching. This visual step allows you to check color placement and symmetry, making adjustments if necessary. Precision here will save time and frustration later in the quilting process.
Step-by-Step Assembly

With your pieces cut and arranged, it’s time to start sewing. The Navajo Quilt Block is built in layers, beginning with the smaller units and then combining them into larger sections. Always use a ¼-inch seam allowance to maintain consistency throughout the block. Press your seams carefully as you go—pressing toward the darker fabric helps avoid shadowing.
Start by sewing your half-square triangles together, pairing them into larger diamond-like units. These will form the inner structure of the block. Next, attach the main diamond shapes to these units, creating a striking central star effect. Once the center is complete, add the rectangles and corner squares to frame the block, bringing it to its final size.
Take your time with alignment, especially at the points where multiple seams meet. Pinning carefully at these intersections helps keep the quilt pattern crisp and visually balanced. Don’t be discouraged if your first block isn’t perfect—quilting is a skill that improves with practice, and each block will get easier and cleaner as you go.
After assembling the block, give it a final press to smooth the seams. At this stage, you can either stop with a single block for a small project or repeat the process to create multiple blocks for a larger quilt. Once you’ve made a few, you’ll find the rhythm of this quilt pattern quite enjoyable.
Personalizing Your Navajo Quilt Block
One of the joys of quilting is making each project your own. The Navajo Quilt Block provides an excellent canvas for creativity. By changing fabric colors, scale, or layout, you can produce a wide range of visual effects. A traditional palette gives a bold, cultural nod, while modern colors—like pastels or monochromatic schemes—can bring a fresh, contemporary feel.
You can also experiment with fabric textures. Using batiks, solids, or even metallic prints adds depth and variety to the quilt. Try alternating light and dark fabrics for a high-contrast look or choose a gradient of shades for a softer, blended effect. Each variation changes the mood of the quilt, giving you endless ways to adapt the pattern to your taste.
Another fun idea is to rotate the blocks when assembling them into a larger quilt. By arranging the Navajo Quilt Blocks in different orientations, you can create entirely new secondary patterns across the surface of the quilt. This flexibility makes the block not only beautiful on its own but also highly versatile when used in a bigger quilt project.
Wrapping Up and Sharing Your Quilt
Congratulations—you’ve completed your Navajo Quilt Block! Whether you stitched just one or created enough for a full quilt, you’ve taken part in a tradition that honors design, geometry, and creativity. The process may have required focus and patience, but the reward is a quilt pattern that is striking and full of meaning. Each block you make becomes a story stitched in fabric.
If you’ve enjoyed this project, consider making it part of a larger quilting journey. Combine your Navajo Quilt Blocks with other quilt patterns to create a sampler quilt, or dedicate an entire quilt to showcasing the repeating design. The versatility of this block ensures that it will find a place in many creative projects. You might even gift it to someone special, sharing both the beauty and the cultural significance behind the design.
We’d love to see your version of the Navajo Quilt Block! Share your finished quilt on social media, in quilting groups, or with friends who share your love of sewing. Every quilt tells a story, and yours can inspire others to pick up a needle and try their own quilt pattern. Happy quilting, and may your stitching always bring you joy.