
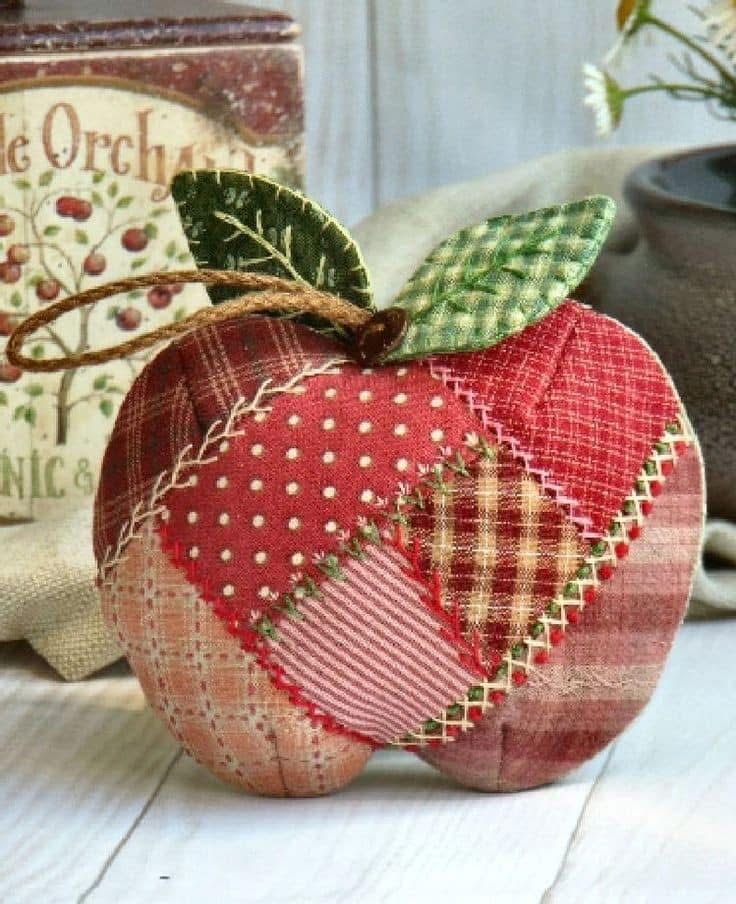
Creating handmade crafts is more than just a hobby—it’s a way of expressing creativity, slowing down, and adding warmth to everyday life. If you’ve ever wanted to try quilting but felt intimidated by large projects, a small and charming patchwork apple with embroidery is the perfect place to start. This delightful project combines simple patchwork techniques with a touch of embroidery, making it accessible even for beginners.
In this tutorial, you’ll learn step by step how to sew your own patchwork apple, add embroidered details, and explore ways to personalize it. Whether you want to use it as a decorative piece, a gift, or part of a larger quilt, this project will spark inspiration and help you fall in love with quilting patterns.
Let’s dive in and get started!
Materials You Will Need
Before starting, gather all your materials to keep the process smooth and enjoyable. Since this is a small project, you won’t need a large amount of fabric or expensive tools. Many quilters love projects like this because they use up fabric scraps you already have at home.
Here’s a simple materials list:
- Fabric scraps in red, green, and neutral tones (cotton works best)
- Needle and embroidery floss (brown, green, or black)
- Sewing thread matching your fabric colors
- Scissors or a rotary cutter and cutting mat
- Ruler for quilting measurements
- Pins or fabric clips
- Stuffing (if you’d like a padded apple)
- Iron and ironing board
Having everything prepared in advance will make your experience more relaxing. If you’re new to quilting, don’t worry about having all the professional tools—basic fabric scissors and simple thread will do the job. The beauty of this quilting pattern lies in its flexibility and accessibility.
Preparing Your Fabric
To create a patchwork apple, you’ll first need to cut your fabric pieces. Using scraps is highly recommended because they bring charm and personality to the project. Look for reds or patterned prints for the apple’s body, a green fabric for the leaf, and brown or beige tones for the stem.
Begin by ironing your fabric to remove any wrinkles. This step might seem unnecessary, but smooth fabric makes accurate cutting and sewing much easier. Using a quilting ruler, measure and cut small squares or rectangles that will form the apple’s patchwork body. Aim for consistent sizes so that the seams align neatly.
If you prefer, sketch the apple shape on paper first and cut out a template. This will help guide your design and ensure symmetry. Remember, quilting is as much about creativity as it is about precision, so don’t worry if your apple isn’t perfectly shaped. Handmade projects look best with their unique touches.
Piecing the Patchwork
Now comes the fun part—piecing your apple together. Lay out your fabric scraps in the shape of an apple, mixing patterns and shades until you like the arrangement. This step allows you to play with design before committing with stitches.
Start sewing the small fabric pieces together, row by row. Use a ¼ inch seam allowance, which is standard in quilting patterns. Press each seam flat with an iron as you go; this prevents bulk and helps the patchwork sit nicely. Keep working until you’ve created a square or rectangle of fabric that resembles the apple’s body.
Once your patchwork section is ready, trace and cut the apple shape from it. This is where your earlier template comes in handy. By cutting the patchwork into the apple outline, you give your quilted design its final shape while keeping all the charm of the patchwork.
Adding the Leaf and Stem
An apple wouldn’t be complete without its leaf and stem. Cut a small piece of green fabric into a simple leaf shape. Don’t worry about perfection—quilting thrives on handmade beauty. For the stem, use a small rectangle of brown fabric, felt, or even ribbon.
Place the leaf and stem at the top of your apple patchwork piece. Pin them securely in place. Sew around the edges using a small, neat stitch. If you’d like extra stability, you can use a zigzag stitch or even fusible webbing to attach them more firmly.
At this stage, your apple will start to come to life. The combination of patchwork, quilting patterns, and little details like the leaf and stem adds charm and dimension to the project.
Embroidering Details
Embroidery is where you can get truly creative. Adding stitches on top of your patchwork apple makes it unique and gives it a handmade touch. Use embroidery floss in earthy colors like brown or black to add veins to the leaf, outline the apple, or even create small decorative swirls.
Start with simple stitches such as backstitch or running stitch. These are beginner-friendly and create lovely outlines. If you want to add texture, try French knots for seeds or tiny flowers around your apple. Embroidery transforms your project from simple patchwork into a true work of art.
Remember, there’s no right or wrong here. Some people prefer minimal embroidery for a clean look, while others enjoy filling their quilt blocks with detailed stitching. Let your personality guide you.
Sewing and Finishing the Apple
If you’d like to keep your apple as a flat quilt block, simply back it with another piece of fabric, quilt the layers together, and finish with binding around the edges. This creates a square block that can be used in larger quilting patterns, like table runners, wall hangings, or even a cozy quilt.
Alternatively, you can turn your apple into a small stuffed decoration. To do this, cut a matching backing piece in the apple shape. Place the two pieces right sides together, sew around the edges, leaving a small opening, then turn it right side out. Fill it with stuffing, close the opening with invisible stitches, and you’ll have a soft, puffy apple.
Both options are beginner-friendly and allow you to decide how you want to showcase your work. Whether flat or three-dimensional, your patchwork apple will brighten any space.
Personalization Ideas
The beauty of quilting patterns is that they’re endlessly adaptable. Your patchwork apple doesn’t have to look like anyone else’s—it can reflect your style and creativity. Here are a few ideas to inspire you:
- Play with color: Use unconventional fabrics like pinks, blues, or even metallic prints for a modern twist.
- Seasonal apples: Create red apples for summer, green apples for spring, and golden fabrics for autumn.
- Add embellishments: Buttons, lace, or beads can add texture and character.
- Incorporate text: Embroider words like “Love,” “Harvest,” or “Home” onto your apple.
These small touches make your apple more personal and meaningful. Whether you’re quilting for yourself, a friend, or as part of a gift, personalization turns a simple project into a treasured keepsake.
Why Beginners Love This Quilting Pattern
For those new to quilting, small projects like this patchwork apple are the best way to start. They teach you essential skills—cutting, piecing, pressing, and quilting—without overwhelming you with large-scale work. Plus, they provide quick results, which keeps motivation high.
This quilting pattern also gives you the chance to practice embroidery in a low-pressure way. Since the apple is small, you can experiment with stitches and designs without committing to hours of work. Over time, these small skills will build confidence and prepare you for larger quilting projects.
Most importantly, the project is fun and satisfying. Watching a handful of fabric scraps transform into a colorful apple filled with character is one of the joys of quilting.
Share Your Patchwork Apple
Now that you’ve learned how to make a patchwork apple with embroidery, it’s time to celebrate your creativity. Whether you make one or a whole basketful, these apples are sure to bring joy to your quilting journey.
I’d love to see what you create! Share your finished project with friends, on social media, or in quilting communities. Inspiring others is part of the quilting tradition, and your patchwork apple could be the spark that encourages someone else to try quilting.
So gather your fabric scraps, thread your needle, and start stitching. Quilting patterns like this one remind us that beauty comes from simple, handmade touches. Happy quilting!