
If you love quilting and adorable feline-inspired projects, this Patchwork Cat Quilt Pattern is the perfect addition to your sewing collection. Made from colorful fabric scraps, this charming cat design is an excellent way to use leftover materials while creating a beautiful decorative piece for your home.
Whether you’re making a wall hanging, pillow cover, baby quilt, table topper, or a full-sized quilt, this cheerful patchwork cat will bring warmth and personality to your project.
Why You’ll Love This Pattern
One of the best things about this Patchwork Cat Quilt Pattern is its versatility. You can customize the colors, fabric prints, and finished size to suit any style. It is also a wonderful scrap-busting project, allowing quilters to transform small fabric leftovers into something truly special.
This project is suitable for confident beginners and experienced quilters alike. The simple shapes and straightforward construction make it easy to assemble while still delivering impressive results.
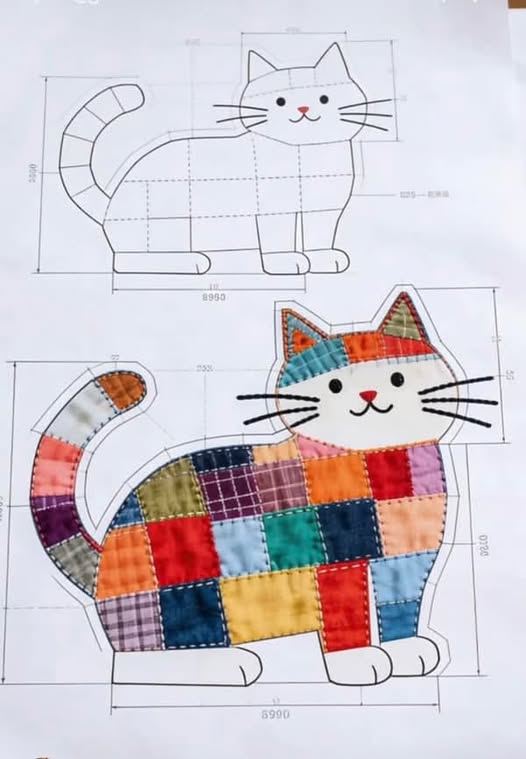
Finished Size
Approximate finished size:
9 inches wide × 8 inches high (23 cm × 20 cm)
The pattern can easily be enlarged or reduced using a photocopier or design software.
Materials Required
Before starting, gather the following supplies:
- Assorted cotton fabric scraps
- White cotton fabric for the face, paws, and tail tip
- Pink fabric scrap for the nose
- Black embroidery floss
- Matching sewing thread
- Lightweight batting (optional)
- Rotary cutter
- Cutting mat
- Quilting ruler
- Fabric scissors
- Pins or clips
- Sewing machine
- Iron and ironing board
- Fabric marking pencil
Fabric Selection Tips
The beauty of this quilt block comes from using a wide variety of fabrics. Consider mixing:
- Plaids
- Florals
- Polka dots
- Solids
- Stripes
- Novelty prints
Combining different colors and textures creates a playful patchwork effect that gives the cat its unique personality.
Cutting Instructions
For the Patchwork Body:
Cut 24 squares measuring 1½” × 1½”.
For the Head:
Cut one head shape from white fabric.
For the Ears:
Cut two outer ears and two inner ear sections.
For the Tail:
Cut five tail segments and one white tail tip.
For the Legs and Paws:
Cut four leg pieces and two paw pieces from white fabric.
Step 1 – Arrange the Body Squares
Lay out the 24 squares on a flat surface.
Experiment with color placement until you achieve a balanced design. Try distributing light, medium, and dark fabrics evenly throughout the body.
Take a photo of your layout before sewing so you can easily recreate the arrangement.
Step 2 – Sew the Patchwork Panel
Join the squares into rows.
Press seams after each row is completed.
Once all rows are finished, sew the rows together to create a single patchwork panel.
Press thoroughly to ensure a flat and professional finish.
Step 3 – Trace and Cut the Cat Shape
Place the cat template over the patchwork panel.
Trace the outline carefully using a fabric marker.
Cut along the marked lines to create the cat body.
Repeat the process for the head, tail, ears, and paw pieces.
Step 4 – Assemble the Cat Head
Attach the ears to the head section.
Add the inner ear pieces and press carefully.
At this stage, the recognizable cat silhouette will begin to emerge.
Step 5 – Create the Facial Features
The face is what gives this project its charm.
For the eyes:
Use black embroidery floss to create two small French knots or embroidered circles.
For the nose:
Cut a small pink triangle and appliqué it in the center of the face.
For the mouth:
Embroider a simple curved smile beneath the nose.
For the whiskers:
Add three whiskers on each side using black embroidery floss.
Step 6 – Construct the Tail
Join the tail sections together.
Add the white tail tip.
Press all seams carefully.
Position the tail on the body and stitch securely.
Step 7 – Attach the Head
Pin the head to the body.
Sew slowly and carefully around the neck area.
Press the seam flat.
The cat should now be fully assembled.
Step 8 – Add the Legs and Paws
Attach the legs to the lower edge of the body.
Sew the paw pieces in place.
Press thoroughly before moving to the next step.
Step 9 – Appliqué the Cat
Place the completed cat onto your chosen background fabric.
Popular project ideas include:
- Baby quilts
- Wall hangings
- Cushion covers
- Tote bags
- Table runners
- Nursery decorations
Secure the cat using a blanket stitch, zigzag stitch, or raw-edge appliqué technique.
Step 10 – Quilt and Finish
Layer your project with:
- Quilt top
- Batting
- Backing fabric
Quilt as desired.
Straight-line quilting works beautifully and helps emphasize the patchwork design.
Trim excess fabric and finish the edges with binding.
Creative Variations
Want to personalize your cat?
Try these ideas:
- Use seasonal fabrics for holiday décor.
- Create a black cat for Halloween.
- Make an orange tabby cat using warm-toned scraps.
- Add a bow tie or fabric flower.
- Stitch a tiny collar around the neck.
- Create multiple cats for an entire quilt.
Beginner-Friendly Quilting Tips
Always use a ¼-inch seam allowance.
Press after every seam.
Use sharp rotary blades for clean cuts.
Pin curved sections carefully.
Take your time when attaching small pieces.
Frequently Asked Questions
Is this pattern suitable for beginners?
Yes. The design uses simple patchwork construction and basic appliqué techniques.
Can I hand sew the project?
Absolutely. While a sewing machine speeds up the process, hand sewing works perfectly well.
What fabrics work best?
100% quilting cotton is recommended because it is easy to cut, sew, and press.
Can I enlarge the pattern?
Yes. Simply enlarge the template to create larger quilt blocks or wall hangings.
Final Thoughts
This Patchwork Cat Quilt Pattern is a delightful way to transform fabric scraps into a charming handmade project. Its colorful patchwork body, sweet embroidered face, and endless customization options make it a favorite among quilters of all skill levels.
Whether displayed as wall art, incorporated into a quilt, or given as a thoughtful handmade gift, this adorable patchwork cat is sure to bring smiles for years to come
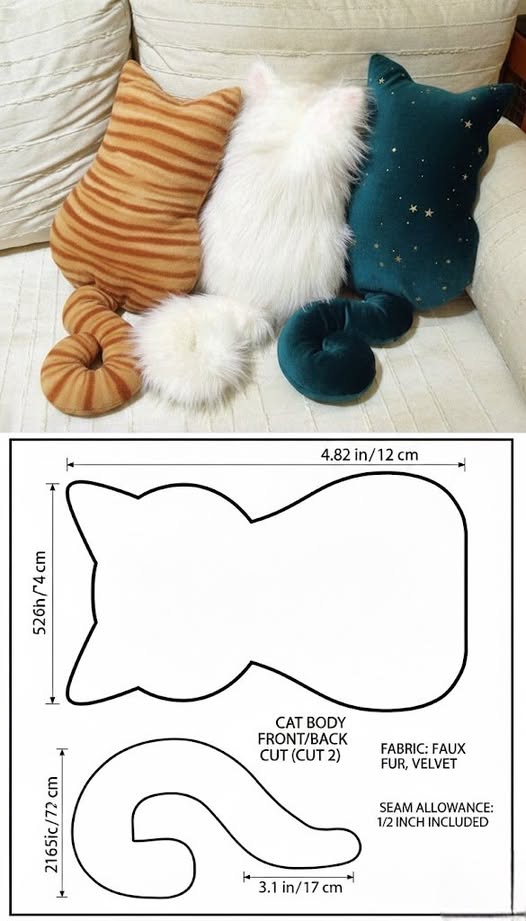
Sewing Cat Pillow
Quilt – Tutorial
FULL PATTERN ACCESS
You will remain on the same site
.