
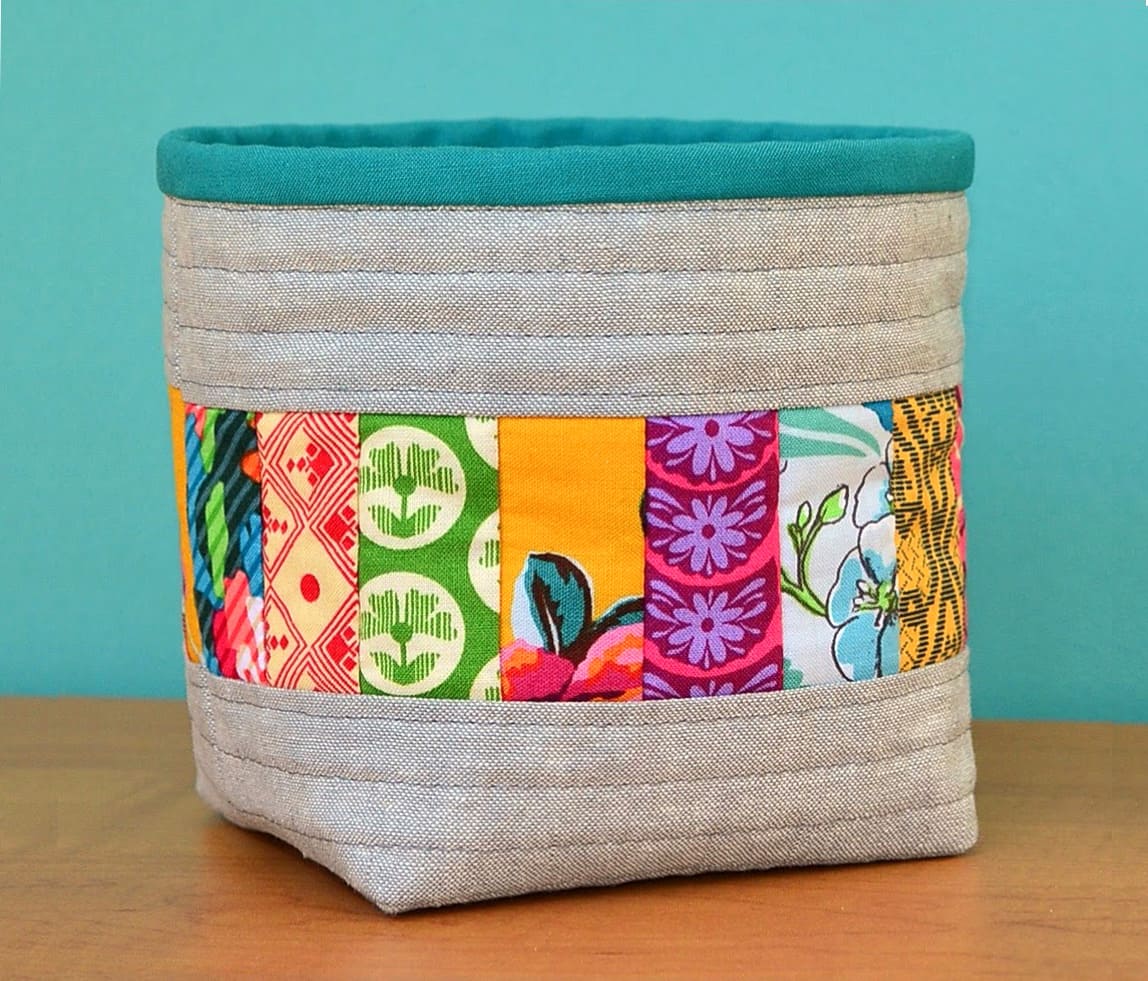
Storage solutions don’t have to be boring—especially when you’re a quilter or sewing enthusiast! In this step-by-step Patchwork Storage Basket Tutorial, you’ll learn how to make a stylish, sturdy fabric basket using scraps and traditional quilt patterns. It’s a perfect project for organizing your craft room, storing toys, or even giving as a handmade gift.
This fabric basket is the ideal beginner-friendly project that combines function with creativity. You’ll make use of leftover materials from other quilt projects, while also practicing basic piecing and construction techniques. The result? A beautiful and practical storage container that looks great in any room.
Let’s dive into the tutorial and learn how to make a quilted patchwork basket from scratch. We’ll go over materials, measurements, and full instructions—no guesswork, just sewing fun.
Why Make a Patchwork Storage Basket?
Patchwork baskets are a smart and stylish way to manage clutter. Whether you use them to organize fabrics, yarns, or toys, they bring a handcrafted touch to your home. And because you’re using quilt patterns, you can personalize every basket with your favorite colors, prints, and textures.
This project is also a great way to use up scrap fabrics from previous quilting projects. Those leftover 4” squares or jelly roll strips? Now’s the time to turn them into something useful. Using scraps means no waste—and no two baskets will ever look the same!
Best of all, making a patchwork storage basket doesn’t require advanced sewing skills. If you can sew a straight line and follow basic quilt construction, you’ll find this project incredibly rewarding.
Materials You’ll Need
Here’s a complete list of what you’ll need to sew your patchwork basket. Feel free to get creative with fabric combinations. You can choose coordinating prints for a polished look or go for a scrappy mix to highlight your favorite quilt fabrics.
- (24) 4” x 4” fabric squares for the patchwork exterior
- (2) 13” x 9” pieces of cotton batting
- (2) 13” x 9” lining fabric pieces
- (2) 13” x 9” fusible interfacing (optional for extra structure)
- (2) 4” x 13” strips for the handles (or ribbon, webbing)
- Rotary cutter, cutting mat, ruler
- Sewing machine, thread, iron, pins
If you’ve worked with quilt patterns before, you probably have most of these supplies already. You’ll also need basic sewing tools like scissors and an iron.
Cutting and Preparing Your Patchwork Panels
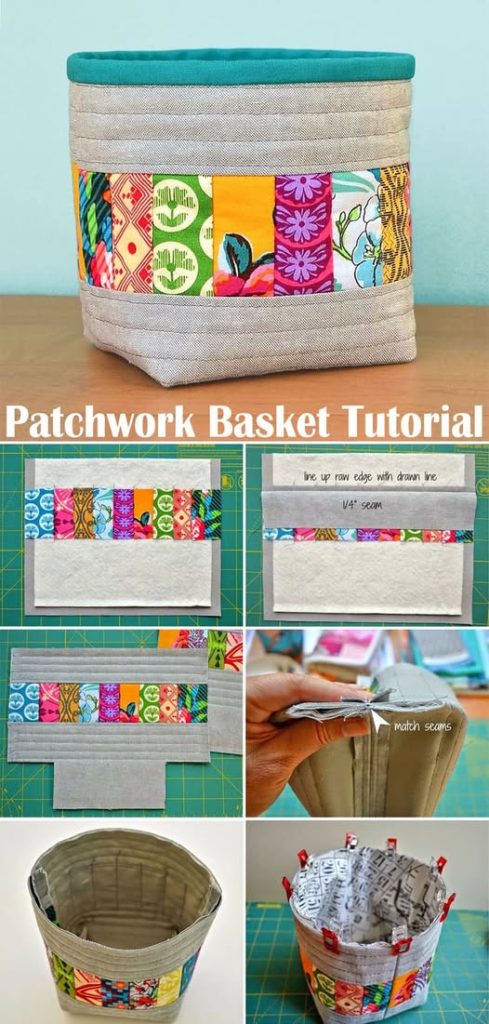
To start, cut your 24 fabric squares measuring 4” x 4” each. These will be used to create the front and back panels of your basket using a basic 4-row by 3-column layout. You can follow a color scheme or mix and match scraps for a patchwork effect.
Arrange 12 squares in a 3×4 layout for each panel. Sew the squares together in rows using a ¼” seam allowance. Then join the rows together to form each 12” x 16” patchwork panel. Press all seams flat.
Next, fuse or pin batting to the wrong side of each patchwork panel. This adds stability and gives the finished basket a soft quilted look. If using interfacing, fuse it to the lining pieces instead of the patchwork panels.
Quilting the Exterior Panels
With the batting attached, you can now quilt the patchwork panels to give them texture and structure. Use straight lines, diagonal grids, or free-motion stitching depending on your style. The goal is to secure the batting to the fabric for durability and a classic quilted look.
Quilting lines should be spaced about 1–2 inches apart. Start from the center and work outward to avoid puckering. You can mark your lines with a fabric-safe pen or use a quilting ruler as a guide.
Once quilting is done, trim your panels to measure exactly 13” wide by 9” tall. This is the size you’ll need to match the lining and finish the basket cleanly.
Assembling the Basket Exterior
Now that your quilted panels are ready, it’s time to sew the basket shape. Place the two patchwork panels right sides together and sew along the sides and bottom using a ½” seam allowance. Do not sew the top edges closed.
To create a boxed bottom, pinch each bottom corner so that the side and bottom seams align and form a triangle. Measure 2” in from the point and mark a line straight across. Sew along the line and trim off the excess corner. Repeat on both sides.
Turn the basket exterior right side out and press the seams. You’ll see the structure start to take shape—and it already looks amazing!
Preparing and Attaching the Handles
For the handles, use two 4” x 13” fabric strips. Fold each strip lengthwise, wrong sides together, and press. Open it up, then fold both long raw edges to the center crease. Fold in half again and press to create a sturdy strap that’s about 1” wide.
Topstitch along both edges of each strap for a neat finish. Position the straps on the right side of the basket’s exterior, placing them 2.5” from each side seam. Align the raw edges of the handles with the raw edge of the basket.
Baste the handles in place with a 1/8” seam to hold them while attaching the lining. Make sure the straps are not twisted and are positioned evenly on both sides.
Sewing the Lining and Final Assembly
Place the lining pieces right sides together and sew along the sides and bottom, leaving a 3” opening at the bottom for turning. Create the boxed corners on the lining the same way you did for the exterior.
Insert the exterior basket (right side out) into the lining (right side in), aligning the top edges and matching the side seams. Pin all the way around the top. Sew the top edge using a ½” seam.
Turn the basket right side out through the opening in the lining. Push out the corners and edges gently. Then sew the opening in the lining closed with a small topstitch or invisible ladder stitch.
Final Touches and Ideas for Customization
Press the top edge of the basket and topstitch around it for a polished look. This step also helps keep the lining in place and reinforces the top edge for durability.
Now your patchwork storage basket is ready to use! It’s perfect for holding fabric scraps, sewing tools, toys, books, or bathroom items. You can make multiple baskets in different colors and quilt patterns to match different rooms or seasons.
Want more functionality? Add pockets to the inside, a drawstring top, or make a set of nesting baskets in different sizes. Once you master the basic pattern, the possibilities are endless.
Conclusion: A Quilted Project Worth Repeating
This Patchwork Storage Basket Tutorial is a rewarding way to combine quilting with practicality. Whether you’re an experienced quilter or a beginner looking for a creative challenge, this project delivers big results with minimal materials.
Using scraps and simple quilt techniques, you’ve made something beautiful and useful. Plus, you now have another way to use your favorite quilt patterns outside of bed quilts and wall hangings.
Don’t forget to share your finished basket with your quilting group or on social media—it’s always inspiring to see how others mix fabrics and personalize their projects. Happy quilting!