
Creating a Patchwork Tote Bag with Cat Appliqué is a wonderful way to combine creativity, practicality, and the charm of handmade quilting. This project is perfect for beginners who want to explore basic patchwork, simple appliqué techniques, and quilted construction in one satisfying piece. The finished bag is sturdy, functional, and adorable, making it ideal for everyday use or as a thoughtful handmade gift.
This tutorial is designed to guide you step by step through the entire process, from choosing fabrics to assembling the final bag. You don’t need advanced skills or expensive tools—just patience, curiosity, and a love for fabric. Along the way, you’ll naturally practice essential quilting techniques that can be applied to many future projects.
By the end of this guide, you’ll not only have a beautiful tote bag but also a deeper understanding of how patchwork, appliqué, and quilting come together in a cohesive Quilt project. Let’s get started and enjoy the creative journey together.
Materials and Tools You Will Need
Before starting your Patchwork Tote Bag, gathering the right materials will make the process smoother and more enjoyable. You’ll need a selection of cotton fabrics for the patchwork frame, a sturdy fabric like denim or canvas for the bag body, and a neutral background fabric for the cat appliqué panel. Lightweight batting is recommended to give the bag structure without making it bulky.
Basic sewing tools are just as important as the fabric itself. Prepare a sewing machine, sharp fabric scissors or a rotary cutter, pins or clips, an iron, and a cutting mat if you have one. For the appliqué, you may also want fusible web, embroidery thread, or fabric markers to add small details to the cat design.
Having everything ready before you begin helps maintain focus and reduces interruptions. This project follows a simple Quilting Pattern, so organization is key. Once your materials are laid out, you’ll be able to move confidently from one step to the next.
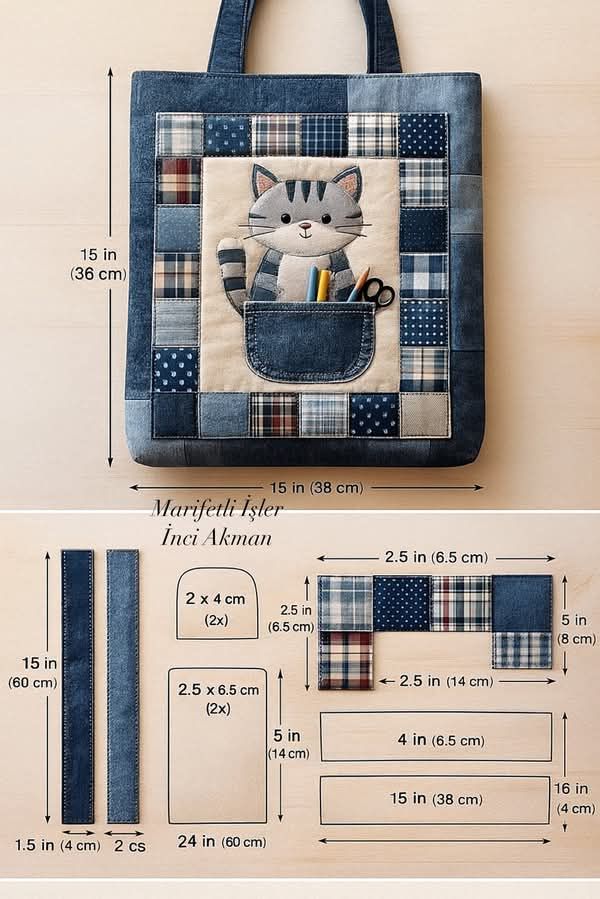
Cutting the Fabric Pieces
Accurate cutting is one of the most important steps in any quilting project. Start by cutting the main bag panels according to your desired size, keeping both front and back panels identical. Cut the lining fabric to match these dimensions, as well as batting pieces for quilting later.
Next, cut the patchwork strips and squares that will form the frame around the cat appliqué. Mixing small prints, solids, and denim textures creates visual interest while still keeping the design balanced. Consistency in size is essential, so take your time measuring and trimming each piece.
Finally, cut the pieces for the handles and the front pocket. Press all fabric pieces with an iron after cutting to ensure clean edges and accurate seams. This preparation step sets a strong foundation for a polished and professional-looking Quilt finish.
Preparing the Cat Appliqué Panel
The cat appliqué is the focal point of this tote bag, adding personality and charm. Begin by transferring your cat design onto fusible web or directly onto fabric if you prefer raw-edge appliqué. Carefully cut out each shape, including ears, face, and tail if applicable.
Fuse the appliqué pieces onto the background fabric following the manufacturer’s instructions. Make sure everything is centered and aligned before pressing, as repositioning afterward can be difficult. This step allows beginners to achieve clean results without complex stitching techniques.
Once fused, stitch around the edges using a straight stitch, zigzag, or blanket stitch. This secures the appliqué and adds decorative detail. Appliqué work like this is a great way to personalize a Quilting Pattern while building confidence in your sewing skills.
The patchwork frame surrounds the cat panel and gives the bag its quilted character. Start by sewing the patchwork squares and rectangles into strips, pressing seams open or to one side for a neat finish. Arrange the pieces before sewing to balance colors and patterns.
Attach the patchwork strips to the sides of the appliqué panel first, then add the top and bottom strips. Sewing in this order helps maintain straight edges and proper alignment. Press after each seam to keep the panel flat and professional.
This framed design is common in many Quilt projects because it highlights a central motif while adding texture and interest. Even beginners can achieve beautiful results by working slowly and checking measurements as they go.
Quilting the Front and Back Panels
Quilting adds durability and structure to the tote bag. Layer the front panel with batting and a backing fabric, then pin or clip the layers together securely. Simple straight-line quilting works perfectly for beginners and complements the patchwork design.
Stitch evenly spaced lines across the panel, following the patchwork seams or creating a grid pattern. This step not only strengthens the bag but also enhances its handmade appearance. Repeat the same process for the back panel to ensure consistency.
Quilting is where your project truly becomes a Quilt, even in bag form. Practicing these techniques will make future quilting projects feel less intimidating and more enjoyable.
Assembling the Tote Bag
With all panels quilted, it’s time to assemble the bag. Place the front and back panels right sides together and sew along the sides and bottom, leaving the top open. Box the corners if desired to add depth and stability to the bag.
Next, sew the lining pieces together in the same way, leaving a small opening for turning the bag later. Attach the handles to the outer bag, ensuring they are evenly spaced and securely stitched.
Insert the outer bag into the lining, right sides together, and sew around the top edge. Turn the bag right side out through the lining opening and stitch it closed. This construction method is common in many Quilting Pattern projects and produces a clean, professional finish.
You can add extra details such as buttons, embroidery, or decorative stitching to personalize the bag further. These small touches make the project uniquely yours without requiring advanced techniques.
Details like pockets and embellishments are what transform a simple Quilt project into a practical everyday item. Don’t be afraid to experiment and let your creativity shine.
Personalization Ideas and Variations
One of the best things about this project is how easy it is to customize. You can change the cat design to another animal, adjust the color palette, or use fabric scraps for a more eco-friendly approach. Each variation gives the same Quilting Pattern a completely new look.
You can also resize the tote bag to suit your needs. Make it larger for shopping, smaller for crafting supplies, or add interior pockets for organization. Adjusting dimensions is a great way to build confidence in modifying patterns.
Personalization makes handmade items special and meaningful. This project encourages beginners to explore their own style while still following a clear and approachable Quilt structure.
Final Thoughts and Invitation to Share
Completing a Patchwork Tote Bag with Cat Appliqué is a rewarding experience that combines creativity, skill-building, and practical use. This project introduces essential quilting techniques in a friendly and achievable way, making it perfect for beginners.
As you use your tote bag, you’ll appreciate the time and care that went into each stitch. Every Quilt project tells a story, and this one reflects your growing confidence and love for handmade crafts.
If you enjoyed this tutorial, share your finished bag with friends, on social media, or in your favorite quilting community. Inspire others to try this Quilting Pattern, and don’t forget to celebrate your beautiful handmade creation.