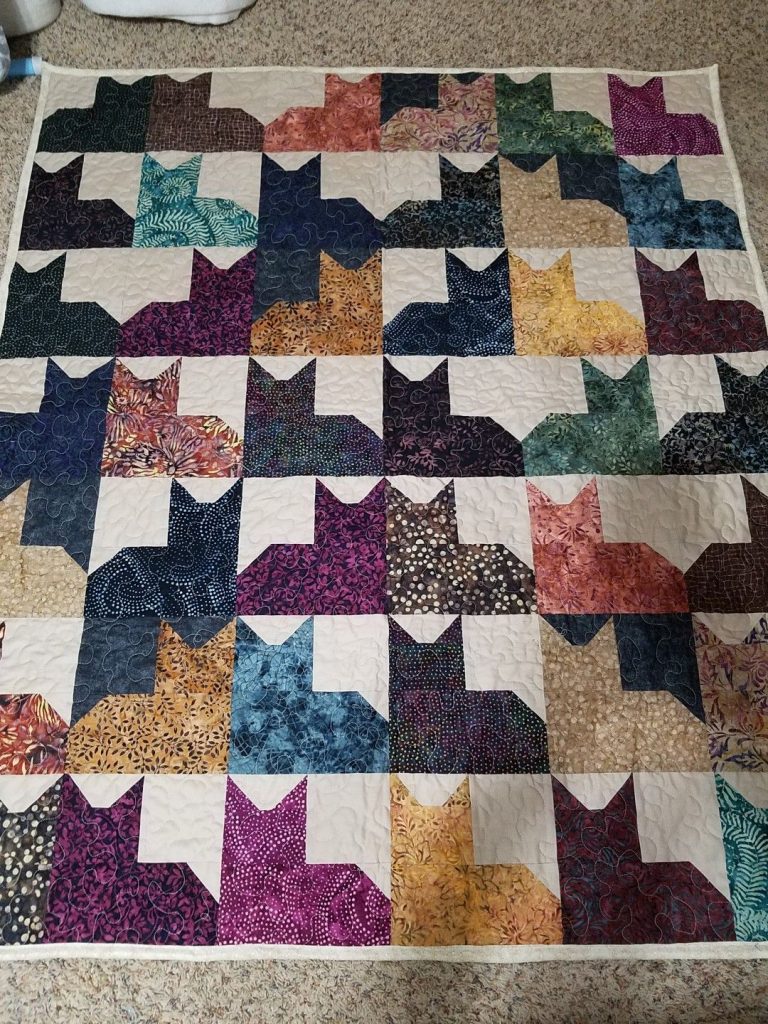
If you’re a cat lover and a quilt enthusiast, then this Pins & Paws Cat Quilt is the perfect project for you. This charming and playful design captures the spirit of our feline friends while providing a creative way to use your favorite fabric scraps. Whether you’re new to quilting or looking for a relaxing project, this tutorial will walk you through each step—from choosing your fabrics to assembling your quilt pattern.
In this beginner-friendly guide, we’ll explore materials, cutting instructions, block assembly, and customization ideas. Let’s dive into the delightful world of quilting, where creativity meets coziness—one paw at a time!
Materials You’ll Need
Before you start sewing, gather all your materials to make the process smoother and more enjoyable. One of the best things about the Pins & Paws quilt pattern is that it’s fat quarter and scrap-friendly, meaning you can get creative with different prints and textures.
Materials list:
- Fabric scraps or fat quarters in assorted colors (for cats and background)
- 1 yard of white or low-volume background fabric
- ½ yard of sashing and border fabric
- ½ yard for binding
- 1½ yards of backing fabric
- Batting to fit finished quilt size
- Rotary cutter, ruler, and self-healing mat
- Sewing machine and matching thread
- Iron and ironing board
- Quilting pins or clips
Having these items prepared ahead of time will make your quilting experience more efficient and enjoyable. You can always adapt the fabric requirements based on how large or small you want your quilt to be. This tutorial focuses on a lap-sized quilt using a repeatable cat block pattern.
Cutting Instructions
To keep things organized, label your fabric pieces with sticky notes or fabric labels. The Pins & Paws quilt uses repeated cat-shaped blocks, which means you’ll be cutting the same pieces multiple times.
Basic cutting measurements for one block:
- Cat Body: (1) 5” x 5” square
- Cat Head: (1) 3” x 3” square
- Cat Ears: (2) 2” x 2” squares (background fabric)
- Paws: (2) 1.5” x 2” rectangles
- Background: multiple 2.5” squares and strips for spacing

Cutting all your pieces before you begin piecing will save you time. Stack and strip-cut where possible to maintain consistency. Make sure your rotary blade is sharp for clean edges, which will help your seams line up more precisely.
When cutting fabric for the background and sashing, remember to add extra if you plan to enlarge the quilt. You can also use different shades of white or cream to create a soft, textured look across the quilt pattern.
Piecing the Cat Blocks
Now it’s time to bring those cats to life! The piecing process for each cat block is simple and repetitive, making it a great practice project for beginners learning to perfect their quarter-inch seam.
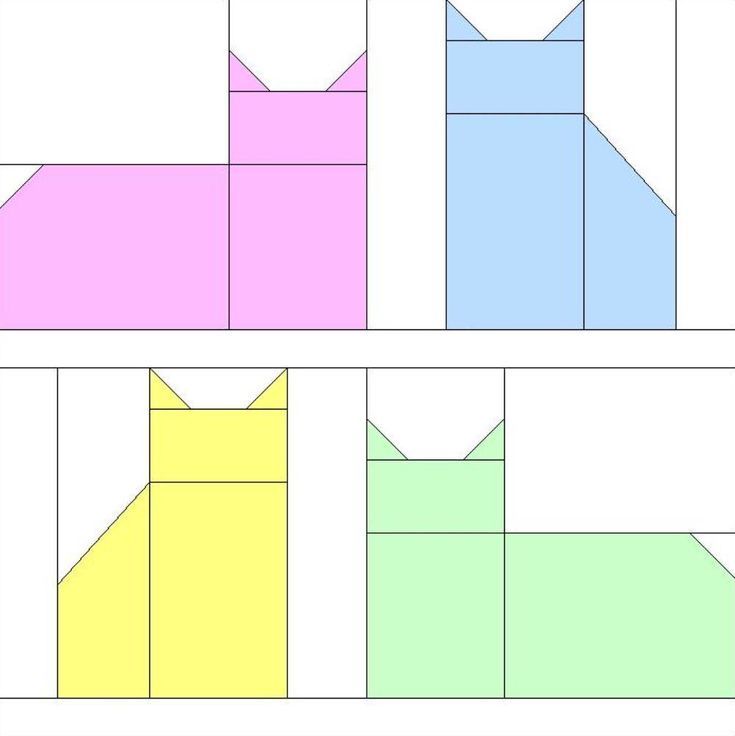
Start by assembling the cat’s ears. Use the background squares and sew them diagonally onto the top corners of the cat head square. Trim the corners and press the seams open. This creates a triangle effect that looks like ears!
Next, sew the head to the body piece. Below that, attach the paw rectangles, making sure everything is centered. Press all seams flat. Repeat this process for as many cat blocks as you plan to include in your quilt.
Arrange your blocks in a pleasing order before sewing them together. You can alternate colors or make a rainbow of cats—it’s entirely up to your creative vision. The beauty of a quilt like this lies in its playful unpredictability.
Adding Sashing and Borders
Adding sashing (strips of fabric between blocks) gives your quilt a clean and structured look. For the Pins & Paws quilt, use strips of background fabric between each row of cat blocks to let each one shine individually.
Cut your sashing strips about 2.5” wide and long enough to span each block row. Sew them between each block vertically and then add horizontal sashing rows. Press seams as you go to keep everything flat.
Once the sashing is complete, it’s time to add the border. The border frames the quilt and adds a finishing touch. Use a solid or patterned fabric that complements your cats. Cut your border strips about 3” to 4” wide and attach them to each side of the quilt top.
With the sashing and borders in place, your quilt top is complete! Step back and admire your whimsical creation—each cat adding its own personality to the quilt pattern.
Quilting and Binding
Now that your quilt top is finished, it’s time to make it into a quilt sandwich—layering the backing, batting, and top. Make sure all layers are flat and smooth, and baste them together using pins or spray adhesive.
You can quilt by hand or machine depending on your preference. A simple straight-line quilting pattern works well with this design and allows the cat shapes to remain the focus. Stitch in the ditch (along the seams) or create a gentle diagonal grid to add texture without overpowering the block design.
After quilting, trim the excess batting and backing. Then prepare your binding strips and attach them using your favorite binding method. Binding is like the ribbon on a gift—it wraps everything up and gives your quilt a polished look.
Customization Ideas
The Pins & Paws Cat Quilt offers endless opportunities for customization. You can change the style and personality of each cat simply by choosing different fabrics or adding embellishments.
Try using floral prints, polka dots, or batiks for a fun variation. You can even applique whiskers or embroider little noses and eyes to give your quilted cats even more character. Add a paw-print fabric for the background or backing for a thematic finish.
Want to make a larger quilt? Just keep repeating the cat blocks and adjust your border and backing sizes accordingly. This quilt pattern also makes a wonderful wall hanging, baby quilt, or gift for a fellow cat enthusiast.
Share Your Cat Quilt with Us!
We hope this Pins & Paws Cat Quilt tutorial has inspired you to create a quilt that’s both playful and personal. Whether it’s your first quilt or one of many, this project is a delightful way to celebrate creativity and your love of cats.
Once you finish your quilt, be sure to share it online or with your local quilting group. Use hashtags like #PinsAndPawsQuilt or #CatQuiltPattern so others can see your unique interpretation of this fun quilt pattern. You might even inspire someone else to pick up their needle and thread!
Remember—every quilt tells a story, and we can’t wait to see how your Pins & Paws Cat Quilt comes to life. Happy quilting!

