
If you’re a fan of eye-catching quilt patterns that shine with personality and style, the Pop Star Quilt Block might just be your next favorite project. Its bold design and symmetry create a dynamic focal point in any quilt, making it ideal for modern and traditional designs alike. This tutorial will walk you through everything you need to know to sew a Pop Star Quilt Block from start to finish.
Whether you’re a beginner or experienced quilter, this guide is packed with helpful tips, measurements, and best practices to help your quilt block turn out beautifully. We’ll also cover variations and how to incorporate this block into a full quilt layout. Ready to add some star power to your next quilt project? Let’s dive in.
Below, you’ll find a full breakdown of the materials you’ll need, cutting dimensions, layout instructions, and stitching advice. Let’s begin with what makes the Pop Star Block so special in the world of quilt patterns.
What is a Pop Star Quilt Block?
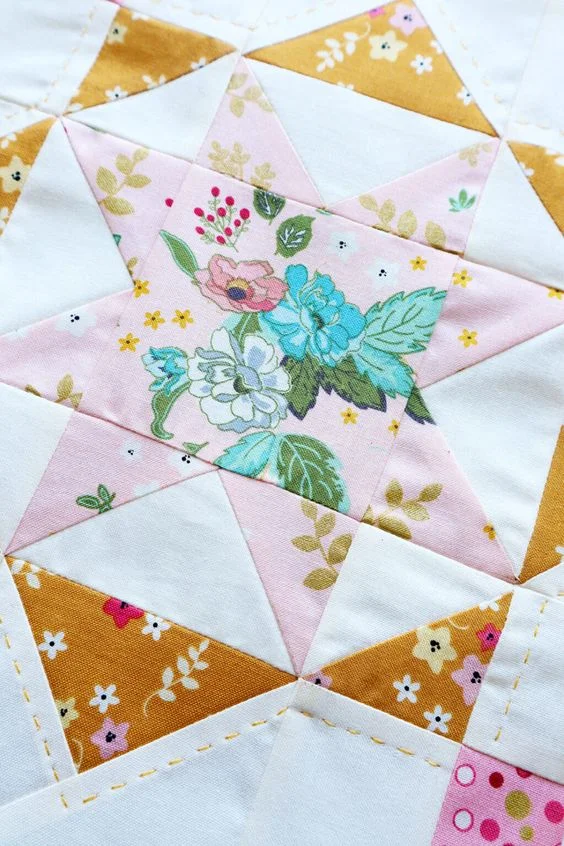
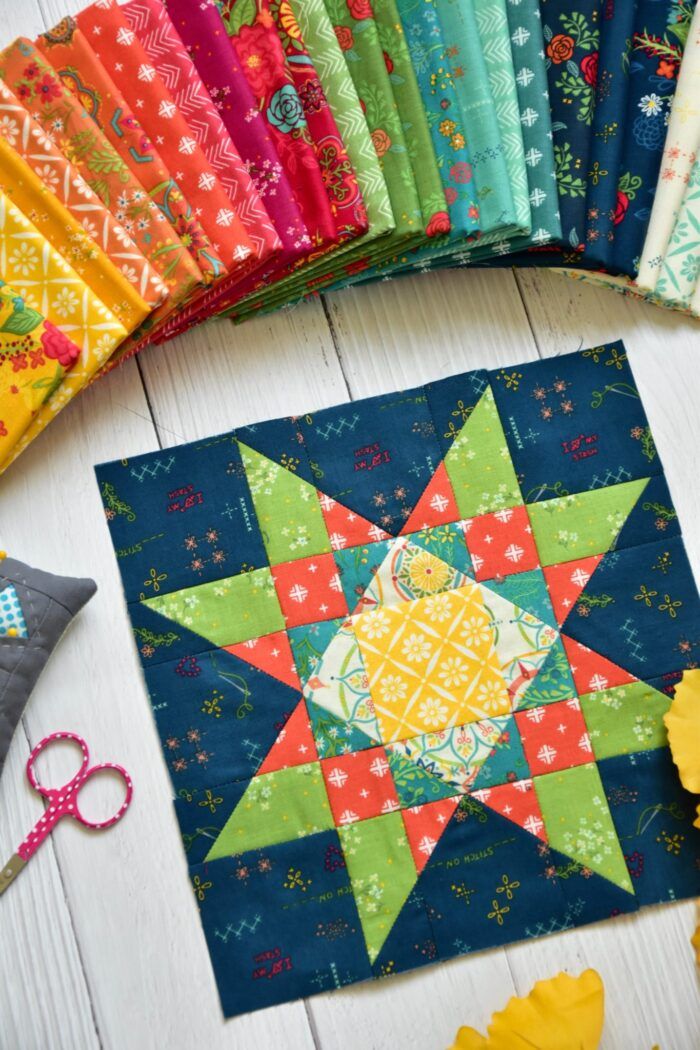
The Pop Star Quilt Block is a radiant design that uses a combination of half-square triangles and square-in-a-square units to create a dazzling starburst shape. The geometric angles and color contrasts mimic the energy of a superstar taking center stage—hence the name “Pop Star.”
This type of quilt block is popular because it’s versatile. You can create different moods just by changing the fabric color or pattern. Use bold solids for a modern look or soft florals for something more traditional. The block works great in both large quilts and wall hangings.
Its layered appearance makes it look complex, but it’s surprisingly straightforward to make. With a few simple techniques and careful cutting, even a beginner can successfully sew a Pop Star Quilt Block.
Materials and Tools You’ll Need
Before diving into the sewing process, it’s important to gather all your materials. You’ll need a mix of light and dark fabrics to create the star contrast that defines the Pop Star Block. Here’s a quick checklist:
- Light fabric for the background
- Dark fabric for the star points
- Accent fabric for the inner star
- Rotary cutter, cutting mat, and quilting ruler
- Sewing machine with a 1/4-inch foot
- Iron and pressing surface
- Matching thread
Choosing high-contrast fabrics is key to making the design pop. Don’t be afraid to experiment with bright colors or metallic prints. A neutral background will help the star shape stand out clearly.
Keep in mind that fabric quality matters. Quilting cotton is the best choice because it holds its shape and presses well. Pre-washing your fabric helps prevent shrinkage and bleeding.
Fabric Cutting Instructions
For one 12” finished Pop Star Quilt Block, cut the following pieces:
- (4) 4.5” squares of light fabric (background)
- (4) 4.5” squares of dark fabric (star points)
- (4) 3.5” squares of light fabric (for corner HSTs)
- (4) 3.5” squares of dark fabric (for corner HSTs)
- (1) 3.5” square of accent fabric (center)
These measurements will yield a 12.5″ block unfinished (including seam allowance), which becomes 12″ when sewn into a quilt top. Accuracy in cutting is essential for alignment later.
To streamline the process, stack and cut multiple layers of fabric using a rotary cutter and acrylic ruler. Be sure to label your pieces with sticky notes or organize them in piles to avoid confusion.
If you want a larger or smaller block, simply scale the measurements while maintaining the proportions. A design wall or digital quilt design app can help you visualize the final look.
Making the Half-Square Triangles (HSTs)
Let’s start by making the corner half-square triangles (HSTs). Take your (4) 3.5” light squares and (4) 3.5” dark squares and pair them together, right sides facing. Draw a diagonal line from corner to corner on the wrong side of each light square.
Sew a 1/4” seam on both sides of the drawn line, then cut along the line to create two triangles. Press the seams toward the dark side and trim each unit to 3” square.
You will now have 8 HST units. These form the pointed star edges in each corner of the block. Lay them out on a design board or table to visualize the star shape before assembling.
Assembling the Center Star
The center of the Pop Star Quilt Block features a square-in-a-square effect. Place your 3.5” accent fabric square in the center. Surround it with four of the 4.5” dark squares, using the “stitch and flip” method to create the triangle points.
Draw diagonal lines on the wrong side of each dark 4.5” square. Align one dark square on each corner of the center square, right sides together, and sew along the marked lines. Trim 1/4” away from the seam and press outward.
Repeat this process for all four corners, and you’ll have a beautiful starburst center. This unit will now measure 6.5” square, which will fit seamlessly into the rest of your layout.
Laying Out the Block
With your HSTs, background squares, and center star unit ready, it’s time to arrange the block. Layout all pieces in a 3×3 grid as follows:
- Corners: Each corner should have two HSTs creating a “V” shape.
- Sides: Place the light 4.5” squares on the midpoints of each side.
- Center: Your 6.5” center star unit goes in the middle.
Double-check your layout before sewing. The HSTs should point toward the center star, creating a seamless and dynamic design. Adjust placements if necessary to maintain symmetry.
Once you’re happy with the layout, sew the rows together, then join the rows to complete the block. Use consistent 1/4” seam allowances and press seams as you go.
Final Pressing and Finishing
After stitching all pieces together, give your block a final press. Use a bit of steam and press from the back side to avoid distorting the front design. Your block should measure 12.5” square, ready to be sewn into a larger quilt.
If the block is slightly off, you can square it up using a ruler. Be careful not to trim too much, as this could affect how it aligns with other blocks in your quilt.
At this point, you can repeat the process to create more blocks or experiment with layout ideas. The Pop Star design looks stunning when alternated with plain blocks or placed on-point in a larger quilt pattern.
Creative Ways to Use the Pop Star Quilt Block
This block isn’t just for full-sized quilts. It makes a bold statement in smaller projects too, such as pillows, tote bags, or mini wall quilts. Try using metallic fabrics or batiks for a more artistic flair.
You can also incorporate the Pop Star block into a sampler quilt, pairing it with other classic quilt patterns like Ohio Star or Sawtooth Star. This adds variety and keeps the design interesting.
Don’t forget about borders and sashing. Framing each Pop Star block with a contrasting fabric can help it stand out even more and gives you extra space to grow your quilt dimensions.
Conclusion: Shine Bright with the Pop Star Quilt Block
The Pop Star Quilt Block is a brilliant design that brings sparkle and movement to any quilt. With just a few fabric cuts and careful piecing, you can create a dynamic block that will impress everyone who sees your work.
From beginners to seasoned quilters, this block is a fun and rewarding addition to your quilt patterns library. Its starburst motif looks stunning in a range of fabrics and can be adapted for quilts of any size.
So go ahead—light up your next quilting project with the Pop Star Quilt Block. With this guide in hand, you’re ready to stitch up something truly spectacular.