
Autumn is the perfect season to bring warmth and charm into your home, and what better way to do it than with a handmade pumpkin quilt block and table runner? Whether you’re a beginner in quilting or an experienced quilter looking for a fun fall project, this tutorial will guide you step by step in creating a beautiful pumpkin-themed centerpiece for your table. Using a simple quilt pattern, you can easily craft a festive table runner that will brighten any room.
Quilting allows you to combine creativity and precision, and making a pumpkin quilt block is no exception. This project is not only visually pleasing but also a great way to practice your basic quilting skills, including cutting, piecing, and quilting. By the end of this tutorial, you’ll have a delightful autumn table runner ready to display or gift to a loved one.
Before we dive into the step-by-step instructions, let’s go over the materials you’ll need and how to choose fabrics that will bring your pumpkin quilt block to life.
Materials Needed for Pumpkin Quilt Block
To make your pumpkin quilt block and table runner, gather the following materials:
- Fabric: You’ll need a selection of cotton quilting fabrics. Choose a main fabric for the pumpkin, a background fabric, and complementary fabrics for leaves and stems. Autumnal colors like orange, brown, green, and cream work beautifully.
- Batting: A small piece of cotton or polyester batting to give your block dimension.
- Thread: Matching or contrasting cotton thread suitable for quilting.
- Cutting Tools: Rotary cutter, cutting mat, and quilting ruler for precise cuts.
- Sewing Machine: Although you can hand-sew, a machine will make the process faster and neater.
- Iron and Ironing Board: Pressing your pieces as you sew ensures smooth seams and a professional finish.
- Pins or Clips: To hold pieces together before stitching.
- Quilting Needles: Both for machine quilting and hand finishing if needed.
Having these materials ready will make the quilting process smoother and more enjoyable. Picking high-quality fabrics and coordinating colors will ensure your pumpkin quilt block pops and looks professionally made.
Step 1: Cutting the Fabric
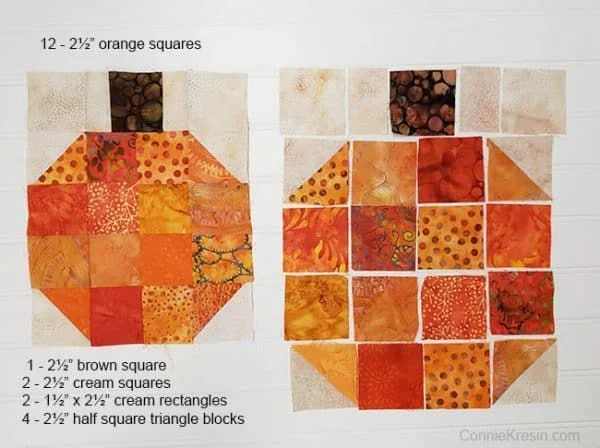
Start by cutting your fabric into pieces based on the pumpkin quilt pattern. For a standard pumpkin block:
- Cut your background fabric into squares or rectangles according to your pattern size.
- Cut the pumpkin shape from your chosen pumpkin-colored fabric. Many beginners find it easiest to trace a pumpkin template onto the fabric before cutting.
- Cut smaller pieces for leaves and stem if your design includes them.
Precision is key in quilting, so use a rotary cutter and ruler to ensure straight edges and accurate measurements. Remember, even small variations can affect the overall alignment of your quilt block. Take your time, and double-check your cuts before moving on.
After cutting, organize your pieces by type (pumpkin, leaves, stem, background) to make the assembly process easier. Keeping everything neat will help prevent mistakes during sewing.
Step 2: Piecing the Pumpkin Block
Once your fabric is cut, it’s time to piece your pumpkin quilt block together:
- Layout: Arrange your cut pieces on a flat surface according to the quilt pattern. This allows you to visualize the finished block and make adjustments if needed.
- Sewing: Using a ¼-inch seam allowance, sew the pumpkin pieces together first, then add the leaves and stem if included.
- Pressing: Press each seam with an iron as you go to keep your block flat. Pressing seams open or to one side depends on your preference, but consistent pressing will make assembly easier.
Working carefully during this step ensures that your quilt block comes together neatly. If you’re new to quilting, consider using pins or clips to hold pieces in place while sewing. This reduces shifting and keeps your seams aligned.
Step 3: Assembling the Table Runner
Now that your pumpkin quilt block is complete, it’s time to create your table runner:
- Decide Layout: Depending on your chosen pattern, you can make a table runner with multiple pumpkin blocks or a single block surrounded by background fabric strips.
- Sew Blocks Together: Stitch your blocks and background strips according to your quilt pattern. Consistent seam allowance is key to keeping the runner’s edges even.
- Add Borders: To frame your table runner, add border strips if desired. This step gives your project a polished look and adds size if needed.
After sewing all pieces together, press the completed runner to prepare for quilting. At this stage, your table runner is essentially a “quilt top” ready to be layered with batting and backing fabric.
Step 4: Quilting Your Table Runner
Quilting adds texture and stability to your pumpkin table runner:
- Layering: Place the backing fabric face down, then the batting, and finally your quilt top face up. Smooth out wrinkles and pin or baste the layers together.
- Quilting: Sew through all layers following the pumpkin quilt pattern or free-motion quilting if you prefer. You can quilt around the pumpkin shapes, leaves, or create a simple grid pattern.
- Trimming: Trim excess batting and backing fabric before adding binding.
Quilting can be as simple or intricate as you like. Beginners can stick to straight lines or outline the pumpkin, while experienced quilters might enjoy decorative stitching to enhance the design.
Step 5: Adding the Binding
Binding finishes your table runner and keeps all edges neat:
- Cut Binding Strips: Cut strips of fabric for binding, usually 2.5 inches wide.
- Sew Binding: Fold the strips in half lengthwise and press. Attach to the quilt edges by sewing with a ¼-inch seam allowance. Miter corners for a professional look.
- Hand-Finish or Machine-Finish: You can hand-stitch the binding on the back or machine-stitch it for a quicker finish.
Binding adds the final touch to your quilted table runner, ensuring durability and a polished presentation.
Ideas for Personalization
Your pumpkin quilt block and table runner can be customized in countless ways:
- Fabric Choices: Experiment with different autumn hues, patterns, or textures. Try batiks, plaids, or even metallic fabrics for a unique look.
- Additional Embellishments: Add embroidery, buttons, or appliqué for extra charm. A stitched vine or leaf pattern can enhance the pumpkin design.
- Size Variations: Make smaller blocks for coasters or larger blocks for a centerpiece table runner. Multiple blocks sewn together create a festive table runner for longer tables.
Personalizing your project allows you to express creativity and make a quilt that’s truly yours. It also makes a perfect handmade gift for friends and family during the fall season.
Final Touches and Display
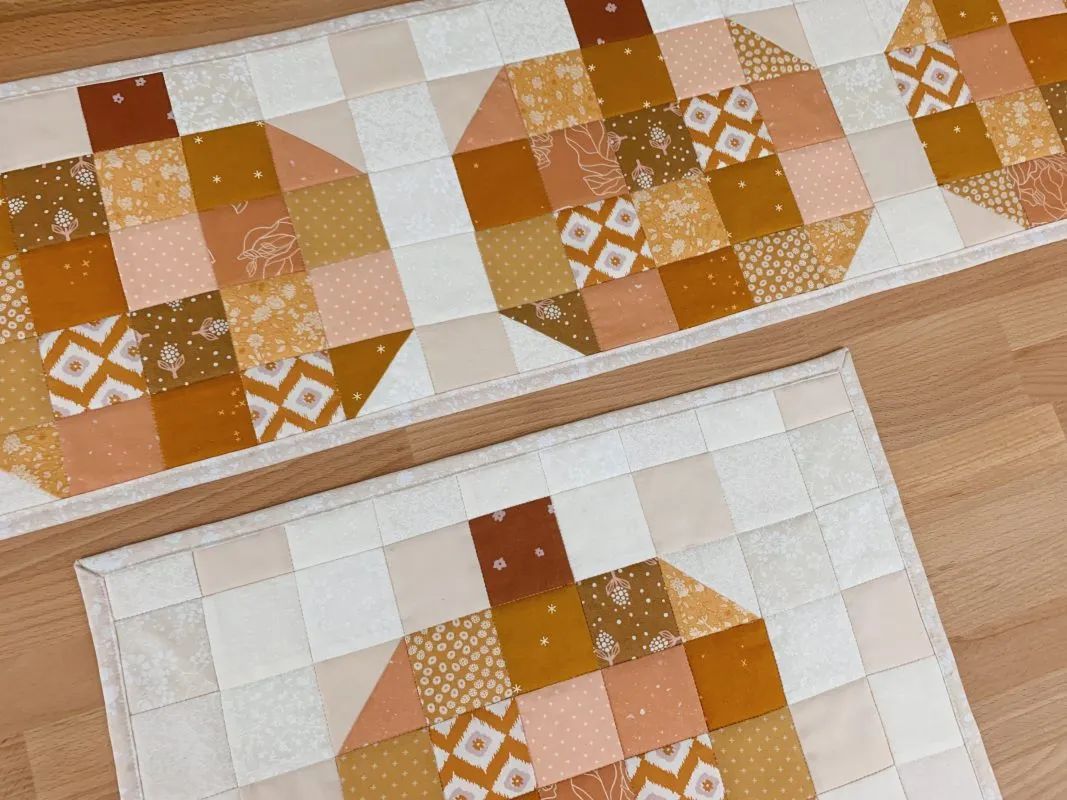
Once your pumpkin table runner is complete, give it a final press to remove any wrinkles. Display it proudly on your dining table, sideboard, or coffee table to instantly bring a cozy autumn vibe to your home. Pair with candles, small pumpkins, or seasonal decor to complete the look.
Quilting projects like this one are not only decorative but also satisfying to create. Each stitch represents time, care, and creativity, making your pumpkin quilt block and table runner a labor of love.
Remember, the joy of quilting comes from experimenting and enjoying the process. Mistakes are part of learning, and even small errors can lead to unique, charming designs.
Share Your Project
We’d love to see your pumpkin quilt blocks and table runners! Share your finished project with your quilting community, friends, or on social media using your favorite hashtags. Inspiring others with your work spreads creativity and encourages fellow quilters to try this delightful autumn project.
If you’ve followed this tutorial, you now have a beautiful pumpkin-themed quilted table runner ready for display. Keep practicing your quilting skills and exploring new quilt patterns—your handmade creations can bring warmth and joy to any space.

This tutorial emphasizes quilt and quilting pattern naturally throughout, is beginner-friendly, and encourages personalization and sharing.