
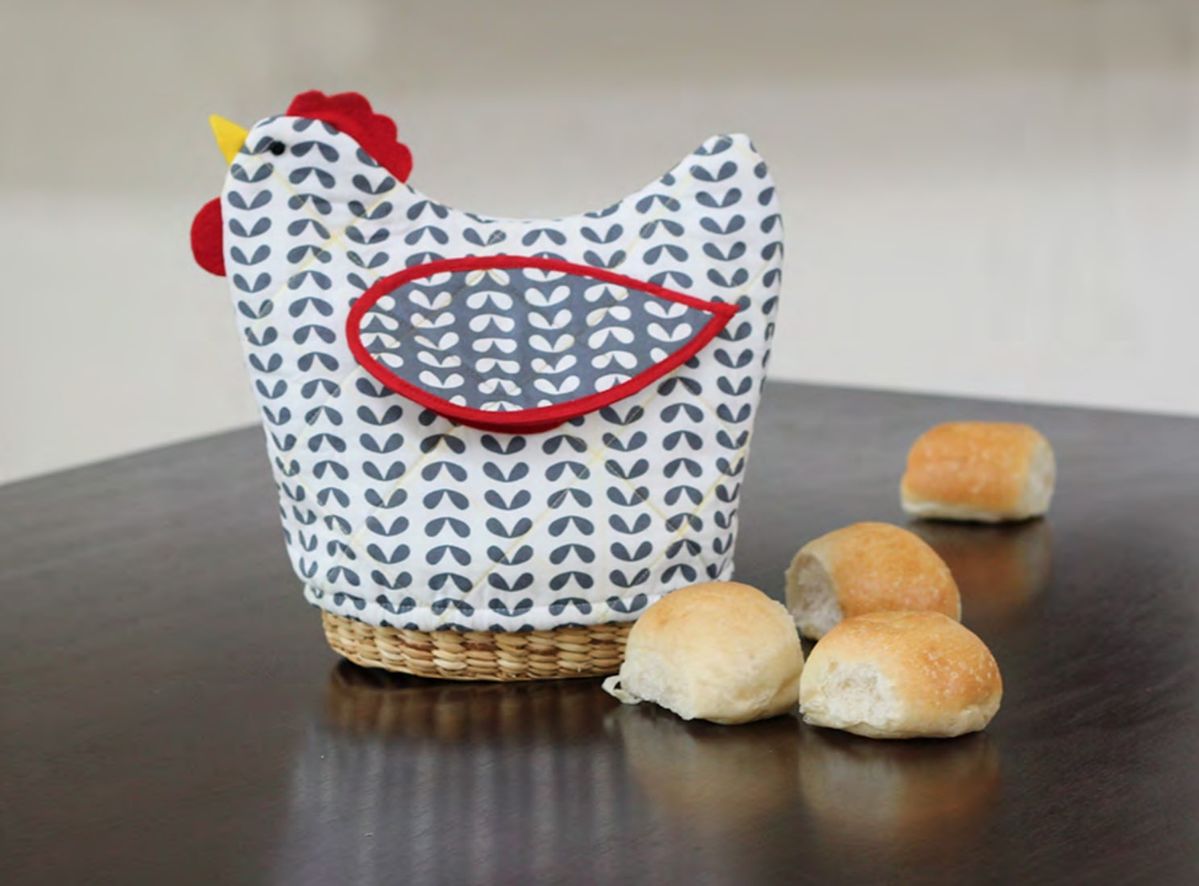
There’s something magical about serving warm bread in a basket, especially when it’s covered with a beautiful, handmade quilted cover. Not only does it keep your bread warm, but it also adds a touch of charm to your table setting. This quilt pattern is perfect for beginners who want to create a functional yet beautiful piece. Whether you’re making it for your home, gifting it to a friend, or selling it at a craft fair, this project will quickly become one of your favorites.
In this tutorial, we’ll guide you step-by-step through creating your own Quilted Bread Basket Cover. We’ll cover everything from materials to cutting, piecing, quilting, and finishing. You don’t need advanced quilting skills—just a bit of patience, creativity, and a love for handmade beauty. Let’s get started and bring some coziness to your breadbasket.
Materials You’ll Need
Before you start, make sure you have all your materials ready. Being prepared will make the quilting process smooth and enjoyable. The beauty of this quilt pattern is that it’s flexible—you can use scraps from other quilting projects or choose fabrics that match your kitchen décor.
Here’s a basic list of what you’ll need:
- Fabric for the top layer: Choose cotton quilting fabric in prints or solids (around 18″ x 18″)
- Fabric for the lining: Plain or coordinating cotton fabric of the same size
- Batting: Thin cotton or polyester batting, also cut to 18″ x 18″
- Bias binding: Pre-made or handmade, about 1 yard
- Sewing thread: Coordinating or contrasting color, depending on your style
- Quilting ruler, rotary cutter, and cutting mat
- Iron and ironing board
- Sewing machine with quilting foot (optional)
While this list gives you the basics, you can customize the size depending on your breadbasket. The standard 18-inch square works well for most round or oval baskets.
Cutting the Fabric and Batting
The first step in any quilting project is precise cutting. Good cuts mean neat seams and a professional finish. Using a rotary cutter and quilting ruler will make your life much easier and ensure accuracy.
- Cut the top layer from your chosen fabric to 18″ x 18″.
- Cut the lining fabric to match the same size.
- Cut the batting so it’s slightly larger than the fabric pieces (about 18.5″ x 18.5″)—this allows for slight shifting during quilting, and you can trim it later.
If you want to add extra visual interest, you can piece together your top layer instead of using a single fabric square. This is a great opportunity to experiment with different quilt blocks or use scraps to make a patchwork top.
Layering the Quilt Sandwich
Now that you’ve cut your pieces, it’s time to create your “quilt sandwich.” This is the layered structure that will be quilted together.
- Lay down the batting on your workspace.
- Place the lining fabric on top of the batting, right side up.
- Place the top layer on top, right side down, aligning the edges.
You’ll want to secure the layers using quilting clips or safety pins. This prevents shifting while quilting. If you’re making a patchwork top, be sure to press all seams flat before layering to reduce bulk and improve the finished look.
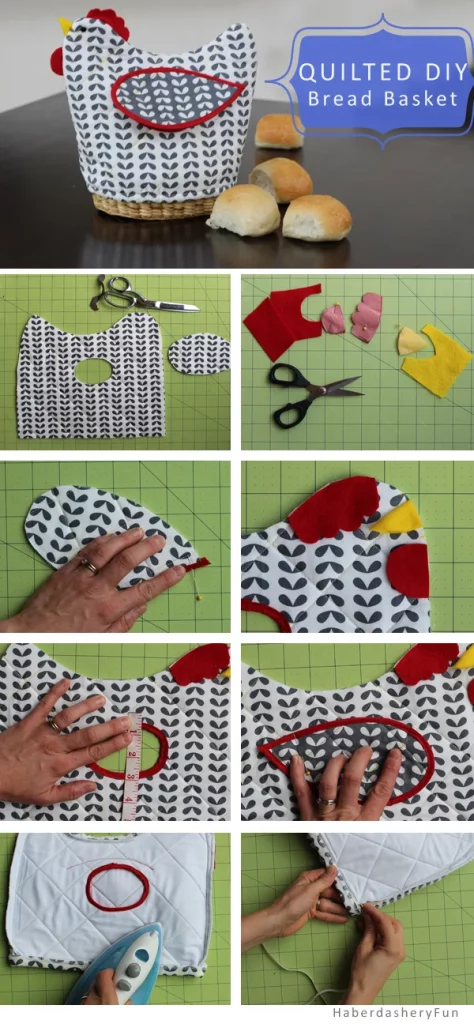
Quilting the Layers
This is where your breadbasket cover starts to take shape. Quilting not only adds beauty but also ensures durability. For this quilt pattern, straight-line quilting is a perfect choice, especially for beginners.
- Mark your quilting lines using a fabric-safe marking pen or chalk. You can do diagonal crosshatch lines, straight parallel lines, or even a grid pattern.
- Sew along the marked lines, starting from the center and working outward to prevent fabric shifting.
- Trim excess batting and fabric edges once quilting is complete, making the piece neat and square.
If you’re more experienced, you can try free-motion quilting for a decorative touch. Simple swirls or loops can add an elegant look to your breadbasket cover.
Adding the Binding
The binding gives your quilted breadbasket cover a clean, polished edge. You can buy pre-made bias binding or make your own from matching fabric.
- Align the raw edge of the binding with the raw edge of your quilted square, right sides together.
- Sew the binding around all four edges, mitering the corners neatly.
- Fold the binding over to the back side and stitch it down by hand or machine.
Choosing a contrasting color for the binding can make the quilt pop, while a matching color gives a softer, more subtle finish.
Shaping the Bread Basket Cover
To make your quilted square fit snugly over a breadbasket, you can add ties or elastic.
- Ties: Sew fabric strips or ribbons to each corner. These can be tied together to hug the basket’s shape.
- Elastic: Sew a casing around the edges and insert elastic for a fitted look.
Both methods work well—ties give a rustic, farmhouse vibe, while elastic offers a neat and practical solution for everyday use.
Personalization Ideas
The best part about this quilt pattern is the endless room for personalization. Here are some creative ideas to make your breadbasket cover uniquely yours:
- Seasonal Fabrics: Use holiday-themed fabrics for Christmas, Easter, or Thanksgiving.
- Embroidery: Add embroidered initials, a family name, or small bread-themed motifs.
- Patchwork Style: Combine small quilt blocks like nine-patch or log cabin for a charming, scrappy look.
These small custom touches turn a simple quilted cover into a treasured keepsake.
Care and Maintenance
A quilted breadbasket cover is made to be used, but it’s also easy to care for. Since it’s made from cotton fabric, you can simply toss it in the washing machine on a gentle cycle and tumble dry low. Press with a warm iron to keep it looking crisp and fresh.
Over time, your quilt will soften, giving it that well-loved, vintage feel. If you’ve used high-quality quilting fabric and batting, it will last for many years, becoming a staple in your kitchen.
Conclusion – Share Your Creations!
Making a Quilted Bread Basket Cover is a fun and rewarding project that combines creativity with practicality. This simple quilt pattern allows even beginners to create something beautiful for their home while practicing essential quilting skills.
We’d love to see how your breadbasket covers turn out! Share your photos and tag them on social media so other quilting enthusiasts can be inspired. Every handmade piece tells a story—yours might just inspire the next quilter to start stitching.
So gather your fabrics, thread your needle, and get ready to quilt a little warmth into your kitchen.