
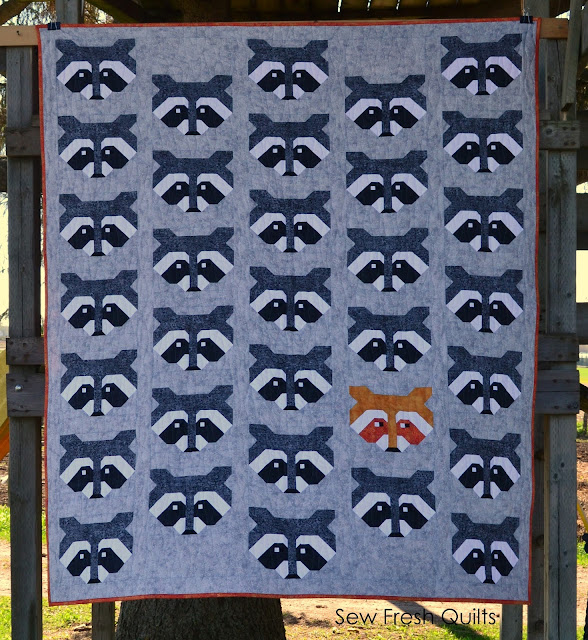
Quilting is a beautiful and rewarding craft that allows you to create stunning designs while expressing your creativity. One of the most charming quilt patterns to try is the Raccoon Quilt, featuring adorable raccoon motifs that bring a playful and cozy touch to any space. This tutorial will guide you through the process, from fabric selection to assembling your quilt.
Materials Needed for Your Raccoon Quilt
Before starting, gather all the necessary materials to ensure a smooth quilting process. Having everything prepared will make it easier to follow the tutorial without interruptions.
- Cotton fabric in gray, black, white, and brown tones (for raccoon features)
- Background fabric (light-colored or patterned)
- Quilting batting
- Fabric scissors or rotary cutter
- Sewing machine and thread (matching colors)
- Iron and ironing board
Choosing high-quality cotton fabric ensures durability and a professional finish. Always pre-wash your fabric to prevent shrinkage after assembling the quilt. An ironing board will help in achieving crisp seams, which is essential for precision quilting.
Cutting the Fabric for the Quilt Blocks
To create the Raccoon Quilt pattern, precise cutting is key. Use a rotary cutter and quilting ruler for accuracy. Below are the fabric measurements you need:
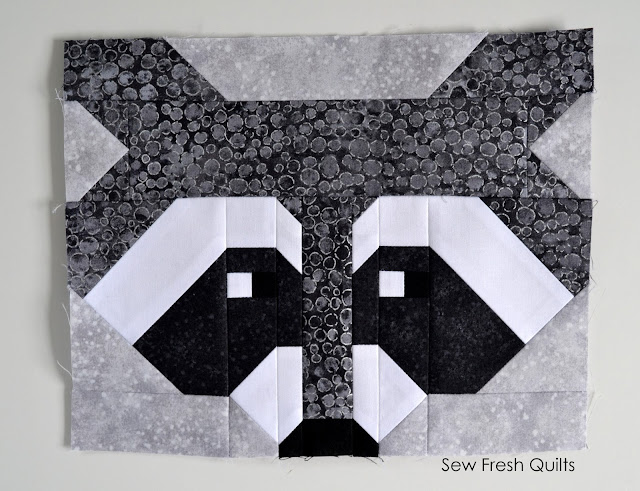
- Gray fabric: Cut 6” x 6” squares for the raccoon face (4 per block)
- Black fabric: Cut 2” x 2” squares for the eyes and nose
- White fabric: Cut 3” x 3” squares for raccoon eye highlights
- Background fabric: Cut 10” x 10” squares for the base of each quilt block
These precise cuts allow the quilt blocks to fit together seamlessly. Accurate cutting is crucial, as any mistakes can lead to misalignment in the final quilt layout. Always double-check measurements before making cuts to avoid fabric waste.
Piecing the Raccoon Quilt Blocks
Now that all pieces are cut, it’s time to assemble the quilt blocks. Start by arranging the raccoon facial features on the background fabric.
Sew the black squares for the eyes and nose onto the gray fabric pieces. Use a ¼-inch seam allowance to maintain consistency. Attach the white fabric highlights to add definition to the eyes, creating a realistic raccoon expression.
Once all facial features are sewn together, iron the seams flat for a polished look. Pressing the seams properly ensures that the fabric lays flat, preventing puckering when assembling the quilt top.
Assembling the Quilt Top
After creating individual raccoon quilt blocks, the next step is arranging them into a cohesive design. Lay out the blocks on a large surface to finalize the quilt layout.
Arrange the blocks in rows, ensuring that the raccoon faces are evenly distributed. Alternate background colors if using different prints to create visual interest. Pin the blocks together before sewing to prevent shifting during stitching.
Sew the blocks together row by row, then join the rows to complete the quilt top. Take your time during this step to align seams properly, ensuring a professional finish.
Adding Borders and Sashing
Adding borders and sashing gives your quilt a polished and framed look. Choose a complementary fabric color that enhances the raccoon design.
Cut 2.5” wide strips for the sashing and borders. Attach sashing between each block first, then add the border strips around the quilt edges. Sew with a consistent seam allowance to keep the design balanced.
Press the seams open to reduce bulk and achieve a smooth quilt surface. A well-pressed quilt top ensures easier layering when adding batting and backing.
Quilting and Finishing Touches
Now that the quilt top is assembled, it’s time to layer it with batting and backing fabric. This step is crucial for durability and comfort.
Lay the backing fabric on a flat surface, place the batting on top, and then position the quilt top. Pin all layers together or use quilting spray to keep them secure. Choose a quilting pattern that complements the raccoon design, such as simple straight-line quilting or free-motion stitching.
After quilting, trim any excess fabric and batting, ensuring even edges. The final step is adding the binding, which gives the quilt a clean and durable finish.
Binding Your Raccoon Quilt
Binding seals the edges of the quilt, giving it a professional and sturdy finish. Cut 2.5” wide strips of fabric for the binding, sewing them together to match the quilt’s dimensions.
Fold the binding in half lengthwise and press. Attach it to the quilt edges using a ¼-inch seam allowance, folding it over to the back and stitching it down by hand or machine. Ensure smooth corners by mitering them for a neat appearance.
The binding process is essential in securing the quilt layers together. Take your time to ensure even stitching for a flawless final look.
Final Thoughts on Your Raccoon Quilt
Congratulations! You’ve completed your Raccoon Quilt, a charming and cozy piece that showcases your quilting skills. Whether you use it as a decorative throw or a heartfelt gift, this quilt is sure to be cherished.
Quilting is a rewarding craft that allows for creativity and self-expression. Experiment with different fabric colors and patterns to make each raccoon quilt unique. Happy quilting!
By following this detailed Raccoon Quilt Tutorial, you’ve mastered another stunning quilt pattern. Keep exploring new quilt patterns and techniques to enhance your quilting journey!