
The Rainbow Seminole Patchwork is a vibrant and intricate quilting technique that originates from the Seminole Tribe of Florida. This style of quilt involves piecing together strips of fabric in striking geometric designs, creating bold patterns that stand out in any project. Whether you’re an experienced quilter or just starting, this tutorial will guide you through each step to create your own quilt patterns inspired by the Seminole tradition.
Selecting the Right Fabric and Tools
Choosing the right fabric is essential for a visually stunning quilt. Opt for bright, contrasting colors that will create the signature rainbow effect. Cotton fabric is highly recommended for its durability and ease of handling.
Essential tools include a rotary cutter, quilting ruler, cutting mat, and a sewing machine. These tools ensure precision in your cuts and stitches, making it easier to assemble the intricate quilt patterns.
Additionally, consider pre-washing your fabric to prevent shrinkage and color bleeding. Properly preparing your materials will result in a long-lasting and professional-looking quilt.
Cutting the Fabric – Measurements and Pieces
For a balanced Rainbow Seminole Patchwork, precise cutting is crucial. Below are the recommended fabric measurements:
- Primary colored strips: 2” x 18” (each in six different colors of the rainbow)
- Background strips: 2” x 18” (white or black fabric for contrast)
- Border strips: 3” x width of quilt top (for finishing edges)
Using a rotary cutter and quilting ruler, cut each strip with precision. Arrange the colors in a pleasing gradient to ensure a seamless transition between hues.
Labeling your strips before sewing can help maintain order and avoid confusion. Lay out the pieces to visualize how they will come together before stitching.
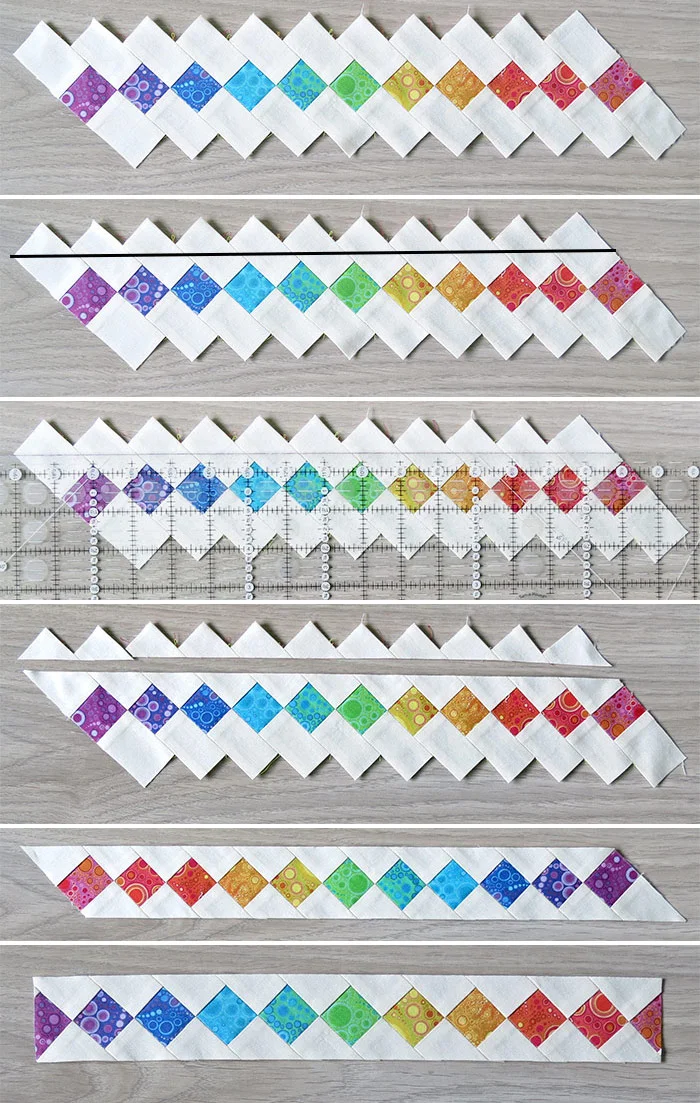
Sewing the Seminole Strips Together
Begin by sewing each colored strip to a background strip with a 1/4-inch seam allowance. Press the seams open to reduce bulk and achieve a crisp finish.
Next, cut the sewn strips into 2-inch segments and rearrange them diagonally to create the Seminole pattern. The staggered arrangement is what gives this quilt pattern its distinct look.
Carefully sew the segments together in rows, making sure the corners align perfectly. Pinning the pieces before stitching helps maintain accuracy and prevents shifting.
Assembling the Quilt Top
Once the Seminole strips are complete, arrange them to form the desired layout. You can alternate the direction of the strips to create movement within the design.
Sew each row together, taking care to align seams for a polished appearance. Press the seams to one side to maintain the structural integrity of the quilt.
Adding a border can help frame the patchwork and provide a finished look. Choose a complementary fabric that enhances the rainbow effect without overpowering the design.
Quilting and Finishing Touches
Layer the quilt top with batting and backing fabric, ensuring all layers are smooth and aligned. Pin or baste the layers together to secure them before quilting.
You can use straight-line quilting to follow the geometric lines of the patchwork or opt for free-motion quilting for a more artistic effect. The choice of quilting design can enhance the texture and dimension of your quilt patterns.
Finish the quilt by attaching the binding along the edges. A double-fold binding provides durability and a professional finish. Hand-stitch or machine-stitch the binding to secure it in place.
Conclusion
Creating a Rainbow Seminole Patchwork quilt is a fun and rewarding experience that allows you to experiment with color and geometric patterns. This unique quilting technique brings a vibrant touch to any project while honoring a rich cultural tradition.
By carefully selecting fabrics, measuring accurately, and assembling with precision, you can create a stunning quilt that showcases your creativity and craftsmanship. Whether used as a decorative wall hanging, table runner, or full-sized quilt, this pattern is sure to be a showstopper.
Start your Rainbow Seminole Patchwork today and bring a splash of color to your quilting journey!