
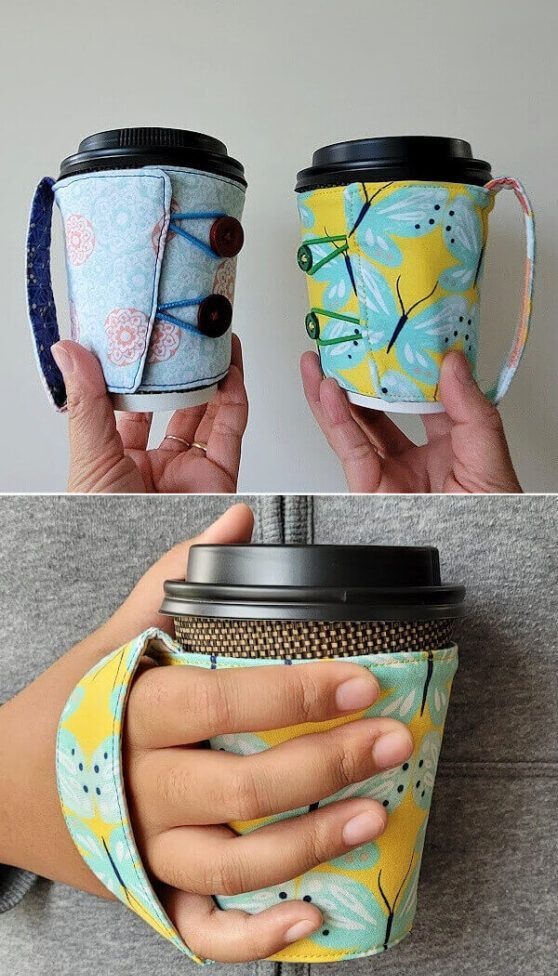
Do you love quilting and want a quick, fun project that adds a touch of style to your coffee routine? A Reversible Coffee Cup Cozy is the perfect way to combine creativity and practicality. Not only will this cozy keep your hands safe from hot drinks, but it’s also an excellent beginner-friendly project for anyone interested in learning about a simple quilt pattern. In this tutorial, you’ll learn how to make a charming reversible cup cozy that you can show off every time you grab a cup of coffee.
This project is ideal for using up leftover fabric from larger quilting projects. With just a few scraps and a little time, you can create something that is both functional and beautiful. If you’ve ever wanted to try quilting but didn’t know where to start, this is a fantastic introduction. Plus, because it’s reversible, you’ll have two styles in one—perfect for matching your mood or the season.
Ready to dive in? Let’s go through everything you need, step-by-step instructions, and some creative ways to personalize your coffee cup cozy. By the end of this guide, you’ll have a stylish and practical accessory that reflects your unique quilting style.
Materials Needed for Your Coffee Cup Cozy
Before starting, gather your materials so you can enjoy a smooth crafting process. This project doesn’t require a lot of fabric or complex tools, which makes it perfect for beginners. Most of these items are likely already in your quilting toolbox.
What You’ll Need:
- Two pieces of fabric (cotton quilting fabric works best) – at least 5” x 11” each
- A small piece of batting (the same size as your fabric pieces)
- Quilting ruler, rotary cutter, and cutting mat
- Pins or clips
- Sewing machine (or needle and thread for hand sewing)
- Coordinating thread
- A button or elastic loop for closure
- Optional: Binding fabric (if you want to add a binding finish)
When choosing fabric, pick two contrasting patterns for the reversible effect. For example, you could use a bright floral on one side and a simple geometric print on the other. This gives you two stylish options without extra effort. Make sure your batting is thin enough so the cozy doesn’t feel bulky when wrapped around your cup.
If you’re new to quilting, this is a great opportunity to practice cutting, layering, and stitching. The small size of the cozy makes it a stress-free project, and because it’s reversible, you’ll get to experiment with mixing and matching prints, just like with other quilt patterns.
Cutting and Preparing Your Pieces
The first step is to prepare your pieces so everything fits together perfectly. Precision cutting is key in any quilt pattern, even for a small project like this one. Let’s go through the process carefully so your cozy looks neat and professional.
Start by cutting two rectangles of fabric measuring 5” x 11” each. These will form the front and back of your cozy. Next, cut a piece of batting to the same size. If you have a favorite quilt pattern, you can even piece small fabric strips together instead of using a single piece for the outer layer. This will give your coffee cozy a beautiful quilted look.
Once everything is cut, stack your layers: batting on the bottom, one fabric piece right-side up, and the other fabric piece right-side down. Pin or clip the layers together, making sure the edges are even. This setup will allow you to sew and then turn the cozy right-side out for a clean finish.
Sewing the Cozy
Now comes the fun part—sewing! With your layers pinned together, you’re ready to stitch your reversible coffee cup cozy. Don’t worry; this part is easy and quick, even for beginners.
Start by stitching around the edges with a ¼-inch seam allowance, leaving a 2-inch opening on one of the long sides. This opening will allow you to turn the cozy right-side out later. Clip the corners slightly (being careful not to cut through your stitches) to reduce bulk and create crisp edges when turned.
Turn the cozy right-side out through the opening and use a blunt tool, like a knitting needle, to push out the corners. Press the cozy flat with an iron, folding the raw edges of the opening inward. Topstitch all around the edge of the cozy, closing the opening and adding a nice finished look. If you want to quilt the layers together, you can add a few decorative quilting lines across the cozy at this stage.
Adding the Closure
To make your cozy practical, you need a way to secure it around your coffee cup. A button and elastic loop are a simple and stylish option. Alternatively, you can use Velcro or snaps if you prefer a more adjustable closure.
If you’re using a button and elastic loop, cut a small piece of elastic and form it into a loop. Insert it into one of the short sides before topstitching so it gets sewn in securely. Then, sew your button onto the opposite short side, making sure it lines up with the elastic loop when wrapped around a standard coffee cup.
The closure adds functionality and gives you an opportunity to add a decorative touch. Choose a button that complements your fabric design or stands out as a fun accent. This is where your creativity can shine!
Ideas for Personalization
One of the best things about this project is how easy it is to customize. A quilt pattern like this is a blank canvas for creativity, and you can make it as simple or as detailed as you like.
You could piece together scraps from previous quilt projects to create a patchwork-style cozy. This not only reduces waste but also gives your cozy a unique, colorful look. You can also experiment with decorative quilting stitches or even embroidery to add names, initials, or fun motifs to your design.
For seasonal variations, use fabrics with holiday themes—pumpkins for fall, snowflakes for winter, or bright florals for spring. The reversible nature of this cozy means you can pair two different themes in one piece, making it even more versatile.
Share Your Creation!
Congratulations! You’ve completed your Reversible Coffee Cup Cozy using a simple yet stylish quilt pattern. This project is quick, beginner-friendly, and an excellent way to use up fabric scraps while learning basic quilting techniques.
Now it’s your turn to share your masterpiece! Post a photo of your finished cozy on social media or with your favorite quilting community. Seeing how others personalize their projects can inspire even more creativity. Don’t forget to gift a few cozies to friends—they make thoughtful handmade gifts that everyone will appreciate.
Ready to take your quilting skills further? Keep experimenting with different fabrics, patterns, and embellishments. Each cozy you make will help you improve your skills and express your unique style. Happy quilting!