
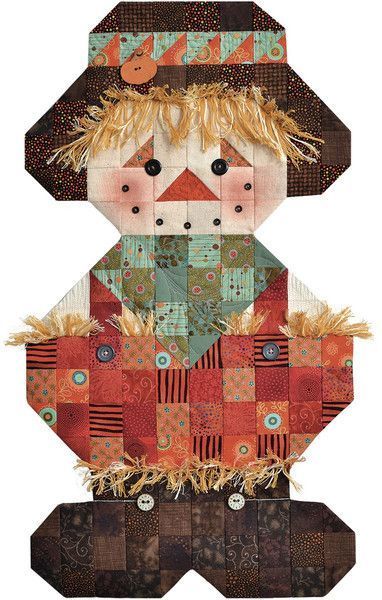
Creating a Scarecrow Quilt Pattern is a fun and heartwarming way to welcome the autumn season into your home. Scarecrows symbolize the harvest, the cozy charm of the countryside, and the joy of handmade décor. Whether you’re an experienced quilter or just starting out, this project offers the perfect balance between simplicity and creativity. With the right materials and a bit of guidance, you’ll have a unique quilt ready to display or gift.
In this tutorial, we will go step-by-step through the process of making your own Scarecrow Quilt. You’ll find everything from the list of materials, fabric cutting instructions, and assembly tips, to creative ideas for personalizing your project. The finished quilt pattern can be adapted to various sizes, from small wall hangings to larger lap quilts, depending on your preference.
So, gather your fabrics, prepare your sewing tools, and let’s bring a cheerful scarecrow to life with needle and thread. This is a project designed to be approachable for beginners while still being satisfying for more experienced quilters. Let’s dive into the details!
Materials You Will Need
Before starting, it’s important to gather all the necessary supplies. Having everything ready ensures your quilting process flows smoothly. For the Scarecrow Quilt Pattern, you will need a mix of autumn-themed fabrics, preferably in warm tones like oranges, browns, yellows, and greens. A variety of textures will add depth and charm to your finished quilt.
Basic materials list:
- Fabric scraps in assorted colors for the scarecrow’s hat, face, clothes, and background
- Fabric for the quilt backing (cotton recommended)
- Batting for the quilt middle layer
- Thread in matching and contrasting colors
- Sewing machine (or needle for hand quilting)
- Rotary cutter, self-healing cutting mat, and quilting ruler
- Pins or fabric clips
- Iron and ironing board
Choosing fabrics with different prints can make your scarecrow look more playful. For example, a plaid hat, denim-like overalls, and a polka-dot scarf add personality to the design. Remember, your scarecrow should tell its own story through the colors and patterns you choose.
Cutting the Fabric Pieces
Once your materials are ready, the first step is to cut the fabric according to the quilt pattern. Cutting accurately is essential to ensure your pieces fit together perfectly. Use a rotary cutter and ruler for clean edges, and double-check your measurements before making each cut.
For a basic wall hanging size (approximately 24″ x 24″), you’ll need:
- Background squares: (4) pieces of 6” x 6”
- Hat: (1) triangle 8” base x 6” height
- Face: (1) rectangle 6” x 8”
- Overalls: (2) rectangles 4” x 8”
- Arms: (2) strips 3” x 10”
- Decorative patches: (optional) small squares or shapes
- Border strips: cut according to the finished size desired
If you’re making a larger quilt, simply adjust these measurements proportionally. You can also cut additional scarecrow blocks and join them together for a repeating quilt pattern. The flexibility of the design is one of its biggest advantages.
Assembling the Scarecrow Block
Start with the scarecrow’s face and hat. Place the face rectangle on the background square, then position the hat triangle above it. Pin in place and sew along the edges, using a quarter-inch seam allowance. Press the seams flat with your iron for a crisp look.
Next, add the scarecrow’s overalls. Sew the overall rectangles beneath the face section, attaching them to the background pieces. For extra detail, you can applique small fabric patches or buttons on the overalls. The arms should be sewn horizontally across the block, giving the impression that the scarecrow is stretching them wide.
Once your scarecrow figure is complete, add border strips around the block to frame it. This helps the scarecrow stand out and makes the block easier to integrate into a full quilt. Press everything again before moving to the quilting stage.
Quilting and Backing
Lay out your quilt top (with the scarecrow block and any additional blocks if making a larger quilt) on a flat surface. Place the batting underneath, followed by the quilt backing fabric. Smooth out all layers and pin or baste them together to prevent shifting.
You can quilt your scarecrow design using simple straight-line quilting or try free-motion quilting for added texture. Quilting along the outline of the scarecrow can make the figure pop, while diagonal lines or crosshatch patterns can add a rustic feel to the background. Remember, quilting not only holds the layers together but also adds personality to your finished piece.
After quilting, trim away any excess batting and backing. Then, attach the binding around the edges. Binding can be done by hand for a traditional look or by machine for a quicker finish. Either way, the binding will give your quilt a polished, complete appearance.
Personalization Ideas
One of the joys of working with a scarecrow quilt pattern is how much you can customize it. Adding little embellishments like embroidered facial features, real buttons, or a small fabric bird perched on the hat makes your quilt truly unique.
You could also play with seasonal themes. For example, a Halloween scarecrow could wear a black hat and hold a tiny pumpkin, while a spring version could feature bright floral fabrics. Using scraps from past quilting projects gives the scarecrow a nostalgic touch, making it a “memory quilt” of sorts.
If you enjoy experimenting, try mixing traditional piecing with applique techniques for the scarecrow’s accessories. This adds dimension and texture, giving your quilt a handcrafted, whimsical charm that draws attention.
Final Touches and Display
Once your quilt is finished, take a moment to admire your work. A scarecrow quilt makes a wonderful seasonal decoration for your living room, dining area, or front porch. You can hang it on a wall, drape it over a chair, or use it as a festive table topper.
These quilts also make heartfelt gifts. Imagine presenting a handmade scarecrow quilt to a friend or family member during the harvest season—it’s both beautiful and meaningful. Because you’ve invested time and creativity into the project, it becomes a keepsake they’ll cherish for years.
Don’t forget to label your quilt. Adding a small fabric tag with your name, the date, and perhaps a special message will turn your scarecrow quilt into a treasured heirloom. This little detail often becomes one of the most meaningful parts of the piece.
Share Your Scarecrow Quilt
Making a scarecrow quilt pattern is more than just sewing—it’s about telling a story with fabric and thread. Each choice of color, texture, and embellishment adds personality and charm. Whether you followed the tutorial exactly or took your own creative path, the result is a quilt that reflects your unique style.
We’d love to see your finished scarecrow quilts! Share your creations with friends, post them on social media, or join a quilting group to inspire others. The quilting community thrives on sharing ideas, and your work might spark someone else’s next project.

Now that you know how to make your own scarecrow quilt, why not start gathering fabrics today? Autumn is the perfect season to let your creativity shine, and this cheerful project is the ideal way to welcome it into your home.
If you want, I can also prepare a matching printable PDF pattern sheet for this tutorial so readers can