
Are you tired of losing your scissors or having them poke through your sewing bag? A well-designed Scissors Case can solve these problems while adding a touch of charm to your sewing kit. In this Scissors Case Tutorial, we’ll guide you step-by-step through the process of making a custom quilted scissors holder using beautiful quilt patterns. This is a beginner-friendly project and the free pattern includes all necessary fabric cuts and measurements.
This sewing project is perfect for quilters who want to use up fabric scraps or showcase their favorite prints. It also makes a thoughtful handmade gift for fellow sewing lovers. Whether you’re a fan of modern quilt aesthetics or traditional patchwork, you can tailor your scissors case to match your unique style.
Let’s dive into this tutorial and create a practical, stylish, and protective home for your scissors. We’ll walk you through the materials, measurements, cutting guide, and stitching steps in detail.
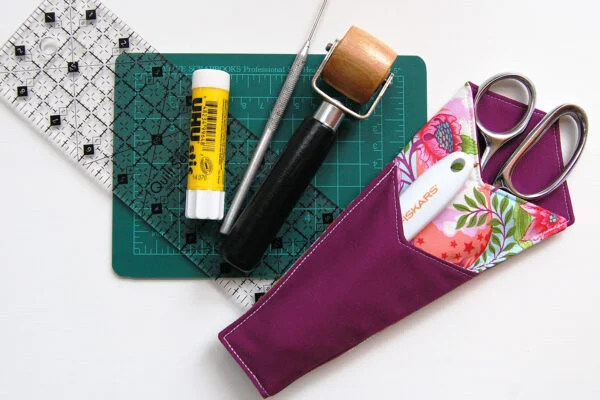
Materials Needed for Your Scissors Case
Before starting this quilting project, gather all your materials and tools. Having everything on hand will make the process smoother and faster. You don’t need a lot of fabric, which makes this an ideal scrap-busting project for any quilter.
Here’s what you’ll need:
- 2 fabric pieces (exterior and lining): 8” x 10” each
- 1 piece of cotton batting: 8” x 10”
- 1 piece of fabric for flap: 5” x 5”
- Binding strip: 2.5” wide, about 20” long
- Button, snap, or Velcro (optional)
- Matching thread, rotary cutter, ruler, pins, and sewing machine
These materials can easily be substituted or customized depending on your quilt patterns and fabric choices. You can go bold with prints or stick with subtle solids—whatever best fits your aesthetic.
Cutting and Preparing the Fabric
Start by cutting your fabrics according to the sizes listed above. Precision is key here—make sure to use a rotary cutter and a quilting ruler to get clean, accurate edges. This will ensure that everything aligns well when it’s time to sew the layers together.
Place the cotton batting between the two 8” x 10” fabric pieces (exterior and lining), creating a sandwich. Use quilting pins or clips to secure the layers. This is where you can get creative and use quilt techniques like diagonal or free-motion quilting to add texture to your scissors case.
Next, quilt the layers together using straight lines spaced 1” apart or your preferred quilting method. This not only secures the layers but adds decorative flair. Once the quilting is done, trim the edges to ensure the piece remains 8” x 10”.
Making the Flap for the Case
The flap adds a polished look and helps keep your scissors safely inside the case. Take the 5” x 5” square and fold it in half diagonally, wrong sides together, to form a triangle. Press well with an iron.
Topstitch along the folded edge for a clean finish. If you prefer a curved flap, you can use a small bowl or template to round the corners before sewing. This is a great place to add decorative stitches or a fun fabric from your favorite quilt patterns stash.
Once the flap is ready, set it aside. You’ll attach it to the main body of the scissors case in a few steps, but for now, it’s prepped and ready.
Folding and Shaping the Scissors Case
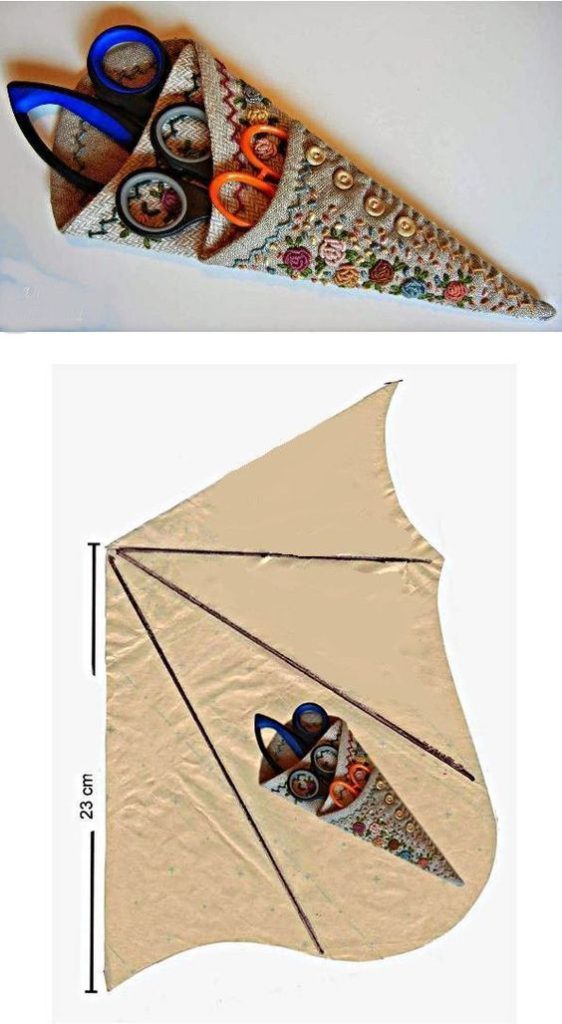
Now it’s time to shape the case into its final form. Lay your quilted 8” x 10” rectangle with the lining side facing up. Bring the bottom edge up toward the top, stopping about 3 inches from the top edge to form a pocket. Pin in place.
Take your triangular flap and position it with the raw edges aligned at the top center back of the case, right sides facing. Pin everything together. The flap should cover the pocket and extend slightly below the top edge when folded down.
Stitch around both sides and the bottom edge using a 1/4” seam allowance. This secures the flap and closes the pocket of your scissors case.
Binding the Edges – Clean and Professional Finish
Use your 2.5” wide binding strip to bind the raw edges of the scissors case. Fold the strip in half lengthwise and press. Open the strip and align one raw edge with the edge of the case, right sides together. Stitch along the crease line.
Fold the binding over to the back side of the case and secure it using clips or pins. Stitch it down by hand or machine to finish the edge cleanly. Miter the corners if necessary for a neater look, especially if you rounded them earlier.
Binding gives your project a truly finished appearance and adds strength to the edges. It’s a small detail that makes your handmade case look professional—just like in high-end quilt projects.
Adding a Closure (Optional)
If you want added security, consider adding a closure to the flap. A button and loop, snap fastener, or Velcro strip can all work beautifully. Choose an option that complements your fabric and overall style.
To attach a button, sew it onto the pocket section and create a small loop of elastic or ribbon on the inside tip of the flap. Snap fasteners are easier to use and especially handy if you’re giving the scissors case to a child or beginner sewer.
This step is optional, but it enhances usability and durability. It also gives you another opportunity to showcase your personality through design choices and embellishments.
Customizing Your Scissors Case with Quilt Patterns
One of the best parts of this project is the freedom to customize it with your favorite quilt patterns. You can make the case entirely from patchwork blocks, or use it to showcase a beautiful focal fabric.
If you’re feeling adventurous, try incorporating a mini quilt block like Flying Geese or Log Cabin into the front panel of the case. Not only does it look amazing, but it also gives you a chance to experiment with quilt techniques on a small scale.
Your scissors case can also become a part of a matching sewing set. Use the same quilt patterns to create a needle book, pincushion, or thread catcher for a cohesive and charming collection.
Final Thoughts – Why You’ll Love This Scissors Case
This project is a fantastic blend of function and creativity. It’s quick to make, useful for everyday sewing, and a great opportunity to explore quilting techniques without committing to a full quilt. Plus, it’s a fun way to use up your favorite fabric scraps.
Making a Scissors Case Tutorial – Free Pattern helps you build confidence in small sewing projects while practicing straight-line quilting, binding, and assembly. It’s a great beginner-friendly introduction to quilt patterns and handcraft techniques.
Whether for yourself or as a gift, this scissors case is sure to be loved and appreciated. Personalize it, enjoy the process, and take pride in your beautiful handmade accessory!