
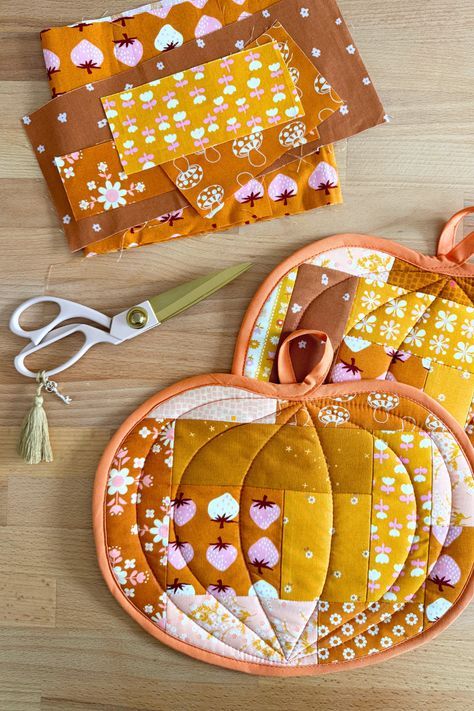
If you love the cozy, handmade aesthetic of fall, this Scrappy Quilted Pumpkin Pot Holder is the perfect project for you. It combines the charm of quilting with a functional and festive design that brightens up any kitchen. Whether you are an experienced quilter or just getting started, this step-by-step tutorial will guide you through the process, from gathering materials to finishing the final stitch. Best of all, it’s a fantastic way to use up fabric scraps and create a practical yet beautiful kitchen accessory.
In this tutorial, you’ll learn how to cut and piece your fabric, assemble your quilt pattern, and quilt the layers together for a stunning pot holder that will impress anyone. By the end, you’ll not only have a pumpkin-themed pot holder but also gain skills to create more quilted projects. Ready to get started? Let’s dive in!
Why Make a Scrappy Quilted Pumpkin Pot Holder?
There’s something magical about fall colors and pumpkin-themed décor. Adding a handmade touch makes it even more special. A quilted pot holder is practical because it protects your hands and surfaces from heat, but it also doubles as an adorable decoration for your kitchen. When you make it with scraps, you’re also creating an eco-friendly project by repurposing leftover fabric pieces.
This project is beginner-friendly because it uses simple quilt patterns and small pieces of fabric. You don’t need a huge stash or expensive tools—just basic quilting supplies and a bit of time. Plus, the pumpkin shape adds a festive twist that makes it a wonderful seasonal gift for friends and family. Who wouldn’t love a handmade pot holder for Thanksgiving or Halloween?
Another great reason to try this project is that it introduces you to the concept of quilting on a small scale. Working on pot holders is a great way to practice techniques like piecing, quilting, and binding without committing to a full-size quilt. If you’ve been curious about quilting, this is a fantastic place to start.
Materials You’ll Need
Before you start cutting and sewing, make sure you have all the necessary supplies. Having everything ready will make the process smooth and enjoyable. Here’s what you’ll need:
- Fabric scraps in autumn colors (orange, brown, green, cream)
- Batting (cotton or heat-resistant, like Insul-Bright for pot holders)
- Backing fabric (cotton works best)
- Binding fabric (coordinating color)
- Thread (neutral or matching color)
- Sewing machine (with quilting foot if possible)
- Scissors or rotary cutter
- Cutting mat and quilting ruler
- Pins or clips
- Pumpkin template (you can draw your own or download one online)
Optional but helpful:
- Walking foot for even quilting
- Heat-resistant batting for extra protection
Once you have everything ready, it’s time to move on to the fun part: creating the pumpkin quilt pattern.
Step-by-Step Instructions
Creating your Scrappy Quilted Pumpkin Pot Holder is simple when you break it down into manageable steps. Follow along and you’ll have a beautiful quilted piece in no time.
Step 1: Cut Your Fabric
Start by selecting your fabric scraps in warm, autumn-inspired colors. Cut them into small squares or strips, roughly 2.5 inches wide. Don’t worry if they’re not perfect—this project is meant to be scrappy and fun. Arrange your pieces in a pleasing pattern until you’re happy with the layout.
Step 2: Piece the Pumpkin Top
Sew your fabric scraps together using a ¼-inch seam allowance, creating a rectangular panel that’s large enough to cover your pumpkin template. Press the seams flat as you go to keep your quilt pattern neat and tidy. Once your panel is big enough, place the pumpkin template on top and cut out the shape.
Step 3: Assemble the Layers
Now it’s time to create the quilt sandwich. Lay the backing fabric right side down, then place the batting on top, and finally, your scrappy pumpkin panel right side up. Smooth out any wrinkles and pin or clip the layers together.
Quilting is the part where your pot holder starts to come to life. It adds texture and durability to your project. For beginners, simple quilting lines are the best choice.
Start by stitching straight lines across the pumpkin, following the natural curves or sections of your fabric pieces. You can stitch vertically, horizontally, or even diagonally for a more dynamic look. This is where you can experiment and make your pot holder unique. If you have a walking foot, it will help prevent shifting, but it’s not essential.
After quilting, trim any excess batting and backing around your pumpkin shape. Make sure everything is neat and ready for the binding step. This is also a good time to check that your pot holder feels thick enough to protect your hands from heat. If it seems too thin, you can add an extra layer of batting before trimming.
Adding the Binding and Stem
To finish your pot holder, you’ll need to add binding around the edges and a stem at the top for that perfect pumpkin look. Cut a strip of binding fabric, about 2.5 inches wide, and long enough to go around the pumpkin. Fold it in half lengthwise and press.
Sew the binding to the front of the pumpkin, raw edges aligned, then fold it to the back and hand-stitch or machine-stitch it down. Take your time with the curves—pinning helps keep things smooth. For the stem, use a small piece of green fabric. Fold it into a rectangle, sew the edges, and attach it to the top before closing the binding.
Once your binding is secure, your Scrappy Quilted Pumpkin Pot Holder is complete! Give it a final press to make everything look crisp and professional.
Personalization Ideas
One of the best things about this project is how easy it is to customize. You can change up the colors to match your kitchen or create a set of pumpkins in different shades. Add fun details like embroidered veins, appliqué leaves, or even a cute fabric bow for extra flair.
You can also play with different quilt patterns when piecing your fabric scraps. Try a log cabin design, diagonal stripes, or even tiny patchwork squares for a more detailed look. For an extra functional touch, sew a small loop at the top so you can hang your pot holder when it’s not in use.
If you’re making these as gifts, consider personalizing them with initials or small messages embroidered on the back. Handmade kitchen items are always appreciated, and these little touches make them even more special.
Share Your Quilted Pumpkin Pot Holder!
Congratulations—you’ve just made a gorgeous, scrappy quilted pumpkin pot holder! Now it’s time to show off your hard work. Take a photo and share it on social media or with your quilting group. You can also tag your favorite quilting apps or communities to inspire others. Don’t forget to share your unique twist on the quilt pattern and how you customized it.
Making small quilted projects like this is a wonderful way to use up scraps, practice new techniques, and bring warmth into your home. If you enjoyed this tutorial, why not make a whole set of seasonal pot holders? They make great gifts and add a cozy touch to any kitchen. Happy quilting!