
Creating your own shoulder bag can be one of the most satisfying sewing projects. Not only do you get to practice your quilting skills, but you also end up with a stylish and functional accessory that you can proudly say you made yourself. In this tutorial, we’ll walk through a step-by-step guide to making a shoulder bag using a free pattern. Along the way, we’ll also talk about personalization ideas and how you can use quilting patterns to make your bag truly unique. Whether you’re a beginner or already familiar with quilting, this project is simple, fun, and incredibly rewarding.
Materials You’ll Need
Before diving into the sewing, let’s gather all the materials. Having everything on hand will make the process smoother and more enjoyable.
- Printed free shoulder bag pattern (like the one shown in the image above)
- Fabric for the bag body (cotton, linen, or canvas works great)
- Lining fabric (a lighter cotton or polyester)
- Fusible interfacing for added strength
- Sewing machine with quilting foot (optional, but helpful)
- Coordinating thread
- Fabric scissors or rotary cutter
- Pins or sewing clips
- Measuring tape
- Iron and ironing board
- Optional: zipper or magnetic snap for closure
It’s always a good idea to pre-wash your fabrics to avoid shrinkage later. Also, if you’re planning to add quilting patterns to your bag, choose fabrics that contrast nicely so the stitching will stand out.
Preparing the Pattern
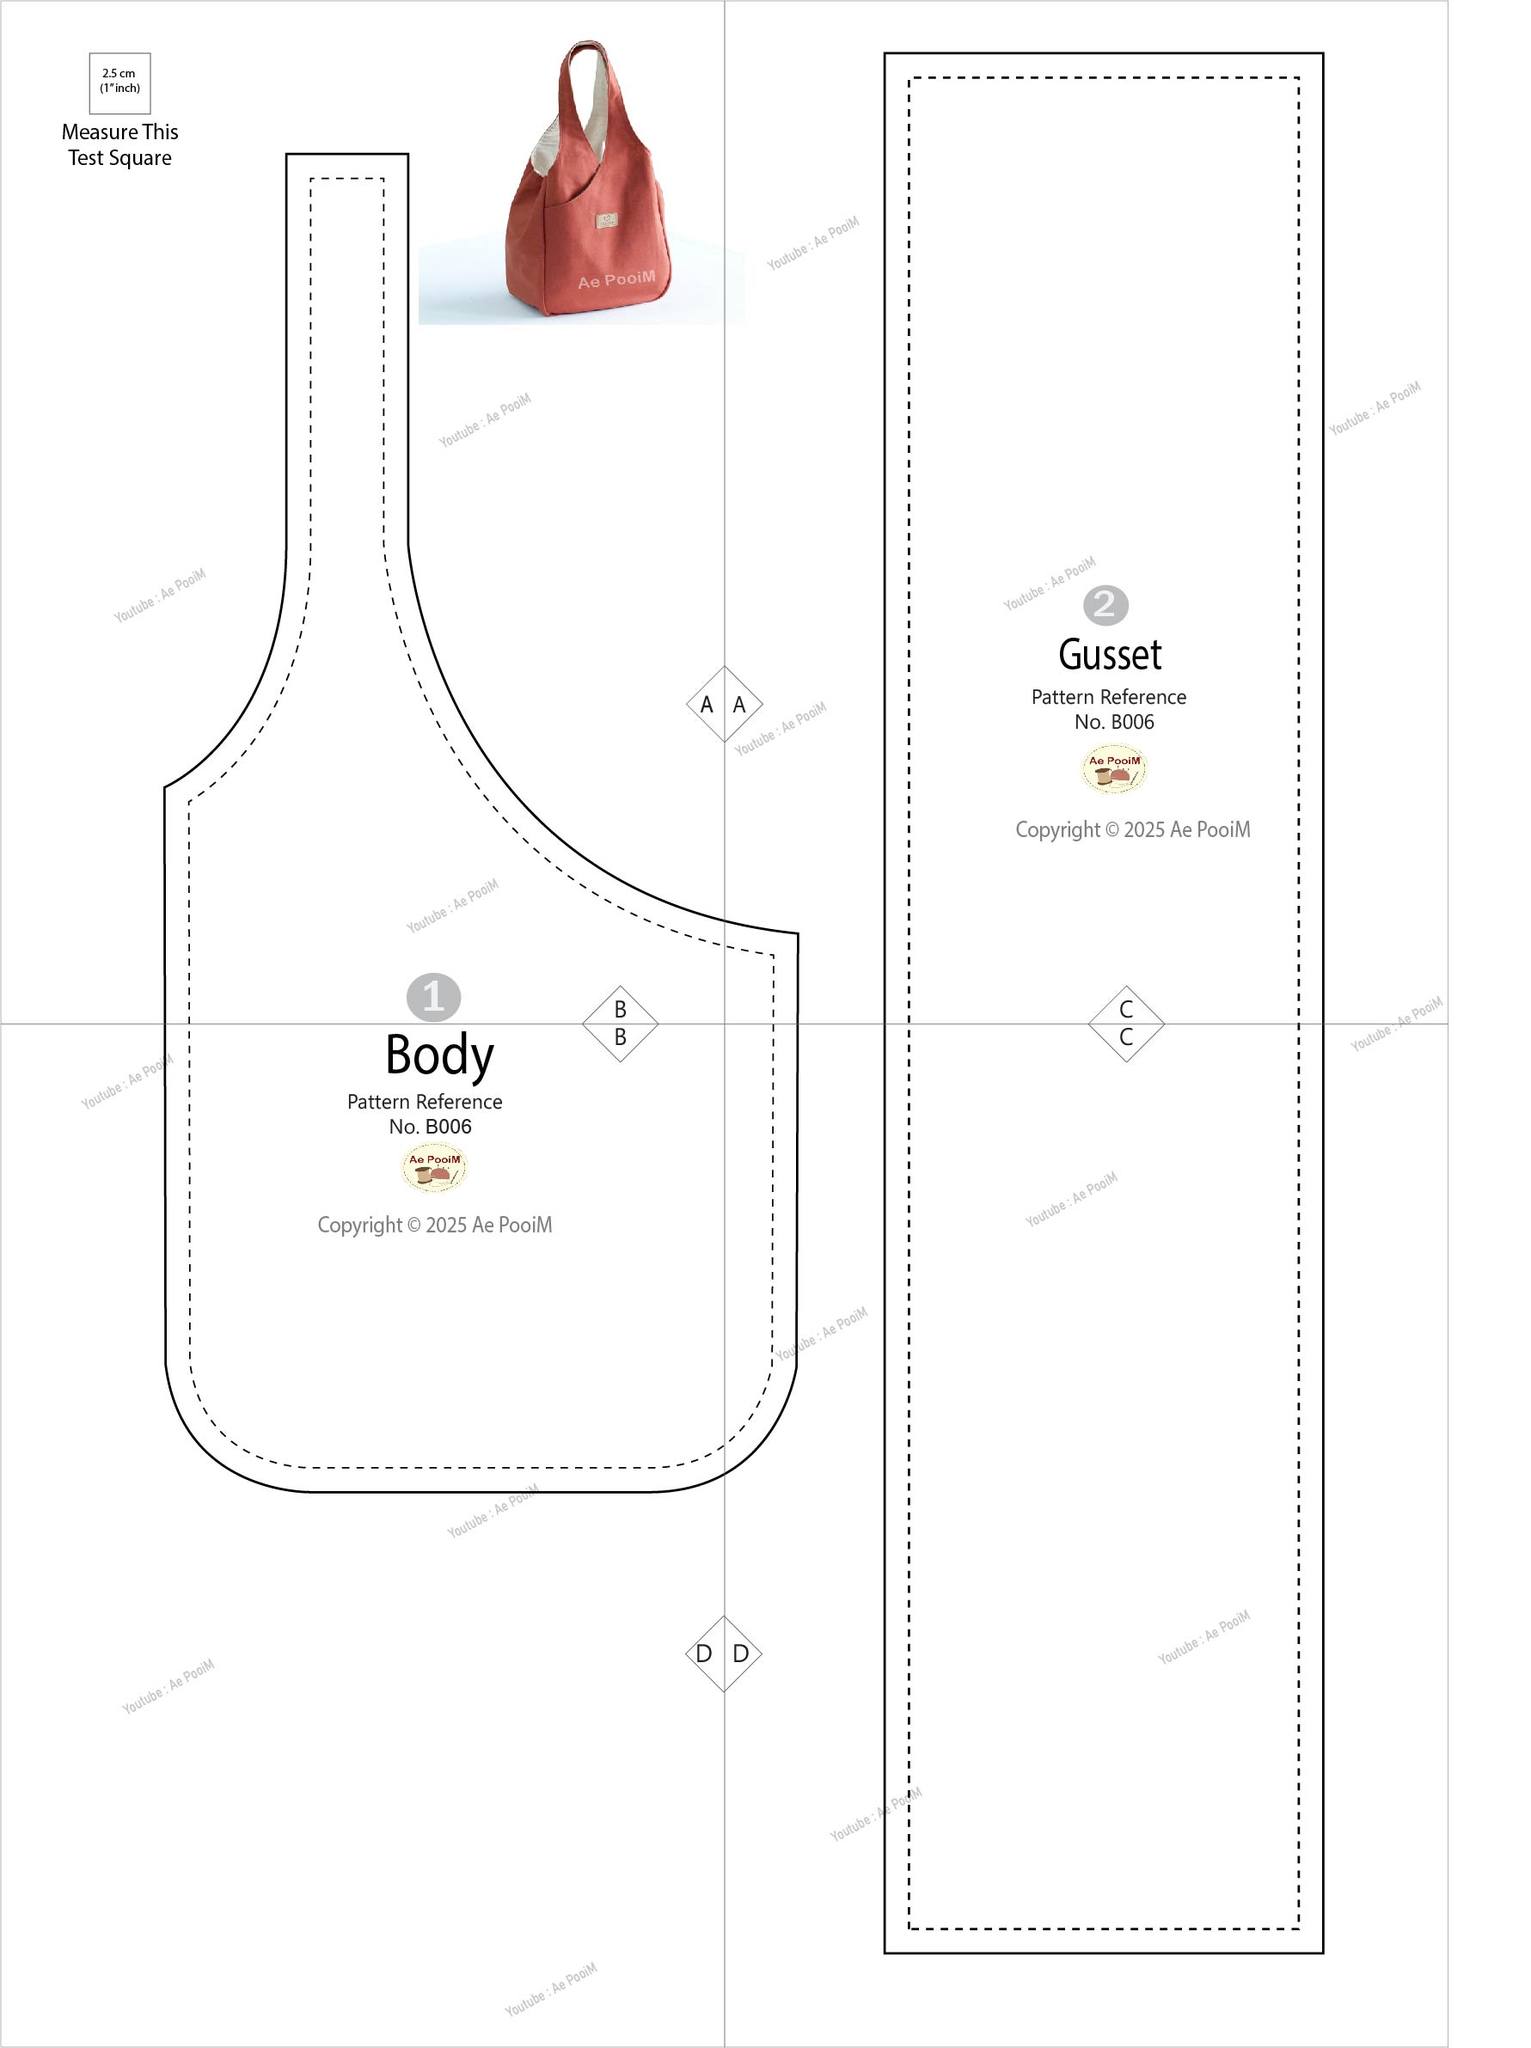
Start by printing your free shoulder bag pattern. The pattern usually includes two main pieces: the Body and the Gusset. Make sure to measure the test square on the pattern to confirm that it printed at the correct size. This step is crucial to ensure your bag will have the right proportions.
Cut out the paper pattern pieces and trace them onto your chosen fabrics. For a quilted look, you can layer batting between the main fabric and the lining before cutting. This not only adds structure but also gives you the chance to add beautiful quilting patterns to the fabric panels.
Remember to cut two pieces of the Body (front and back) and one long piece of the Gusset. Also, cut the same pieces in lining fabric and interfacing for extra durability. Once cut, iron the interfacing to the wrong side of the outer fabric pieces.
Quilting the Fabric
This step is optional but highly recommended if you want a quilt-inspired shoulder bag. Quilting adds not only beauty but also texture and strength to your fabric.
To do this, sandwich batting between your outer fabric and the lining. Use safety pins or quilting clips to hold the layers in place. Then, with your sewing machine, stitch straight lines, diagonal grids, or free-motion quilting patterns across the fabric panels. If you’re a beginner, start with simple straight lines spaced evenly apart.
Quilting patterns are a wonderful way to make your bag look more professional. They also allow you to showcase your creativity, whether through geometric lines, floral motifs, or abstract designs.
Assembling the Bag Body
With your quilted pieces ready, it’s time to assemble the bag body. Take the two Body pieces and the long Gusset piece. Pin one edge of the gusset to the front body piece, aligning the notches marked on the pattern. Sew slowly around the curves, easing the fabric as needed.
Repeat this step by attaching the other side of the gusset to the back body piece. Once complete, you’ll see the bag starting to take shape. Trim any excess threads and press the seams with your iron.
For a professional finish, you can also topstitch around the seams. This not only looks neat but also strengthens the construction of your shoulder bag.
Adding the Lining
To make your bag more durable and stylish inside, let’s add a lining. Sew the lining pieces together in the same way you assembled the outer bag (Body + Gusset). If you’d like to add a pocket, now is the time to sew one onto the lining panel before assembling.
Once the lining is complete, keep it inside out and slip it into the main bag (which should be right side out). Align the top edges and pin them together. Sew around the top edge, leaving a small opening if you plan to turn the bag inside out through the lining.
After stitching, carefully turn the bag right side out through the opening. Push the lining down inside the bag and give it a good press with the iron.
Straps and Closures
Now it’s time to add straps. The pattern provides a guide for strap placement, but you can also customize the length depending on your preference. Cut two strips of fabric or use pre-made webbing straps. For a quilted effect, you can also add batting inside the straps and stitch quilting patterns along them.
Pin the straps to the top edge of the bag, making sure they are evenly spaced. Sew them securely in place. For added strength, use a box stitch or an “X” stitch where the strap meets the bag.
If you want extra security, add a zipper or magnetic snap closure at the top of your shoulder bag. This step is optional but highly useful if you plan to carry valuables.
Personalization Ideas
This is where you can let your creativity shine. Your shoulder bag doesn’t have to look like anyone else’s. By using quilting techniques, fabric choices, and embellishments, you can make your bag one of a kind.
- Fabric choices: Mix and match different prints, solids, or textured fabrics. Quilters often use scraps from past projects to create colorful patchwork designs.
- Embroidery: Add hand-stitched details or machine embroidery for a personalized touch.
- Appliqué: Sew fabric shapes onto the body for decorative accents.
- Pockets: Include inside or outside pockets for functionality.
By incorporating quilting patterns into your design, you’re not only practicing your skills but also adding a charming, homemade feel to your project.

Finishing Touches
Once your straps and lining are secured, give the entire bag a final press with your iron. Check the seams to ensure everything is strong and neat. Trim any stray threads and admire your finished shoulder bag.
This bag is versatile enough for everyday use and stylish enough to be a statement piece. The quilted look also adds a cozy, handmade charm that makes it stand out compared to store-bought bags.
Whether you keep it for yourself or give it as a gift, this shoulder bag will surely be treasured. Handmade items always carry special meaning, especially when they are crafted with care.
Share Your Project
Congratulations—you’ve completed your quilt-inspired shoulder bag using a free pattern! This project is perfect for practicing quilting skills while creating something practical. Remember, every bag will look different depending on the fabrics, quilting patterns, and personalization choices you make.
We’d love to see your finished bag! Share your project on social media, sewing forums, or with your local quilting group. Not only will you inspire others, but you’ll also get feedback and new ideas for your next project. Who knows? You might even start a trend in your sewing community.
So go ahead—grab that free pattern, pull out your favorite quilting fabrics, and create a bag that reflects your style. Happy sewing and happy quilting!