
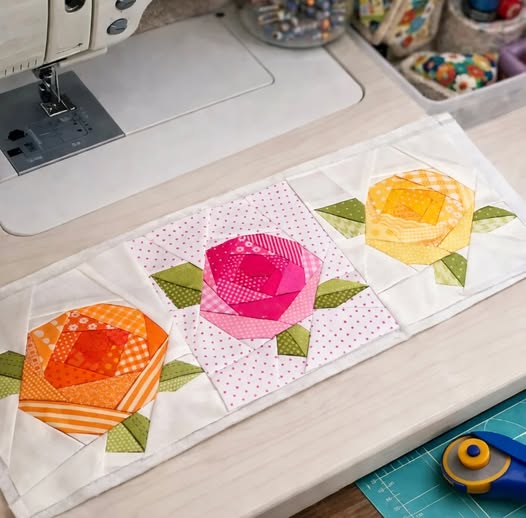
Spring is the perfect time to bring fresh colors and blooming flowers into your sewing room, and the Spring Roses Quilt Pattern is a wonderful project to celebrate the season. Inspired by delicate garden roses, this charming quilt block combines simple piecing techniques with a striking floral design that looks much more complicated than it actually is.
Whether you’re creating a table runner, wall hanging, baby quilt, or a full-size bed quilt, these rose blocks will add elegance and warmth to your home. The pattern is beginner-friendly for quilters who already know basic piecing and is equally enjoyable for experienced quilters looking for a relaxing weekend project.
The soft pinks, sunny yellows, vibrant oranges, and fresh greens make every block resemble a blooming spring garden. By changing the colors, you can also create summer roses, autumn flowers, or even Christmas-inspired floral quilts.
Why You’ll Love This Quilt
- Beginner-friendly construction
- Beautiful three-dimensional rose appearance
- Great scrap fabric project
- Perfect for spring home décor
- Easy to customize with different colors
- Ideal for quilts, pillows, runners, placemats, and wall hangings
Finished Block Size
- Approximately 10″ x 10″ (finished)
You can combine as many blocks as you’d like.
Examples:
- 3 blocks = Table Runner
- 9 blocks = Baby Quilt
- 16 blocks = Lap Quilt
- 36 blocks = Queen Quilt
Materials Needed
Fabrics
For one block you’ll need:
Rose Fabric
- 3 coordinating prints
- Fat eighth or fabric scraps work perfectly
Leaves
- Green fabric (2 shades recommended)
Background
- White or cream fabric
- Tone-on-tone prints
- Small polka dots
- Tiny floral prints
Sewing Supplies
- Rotary cutter
- Cutting mat
- Quilting ruler
- Fabric scissors
- Sewing clips or pins
- Iron and ironing board
- Sewing machine
- Neutral thread
- Seam ripper
- Fabric marking pencil
Fabric Color Suggestions
Spring colors work beautifully:
- Soft Pink
- Hot Pink
- Coral
- Peach
- Yellow
- Apricot
- White
- Cream
- Sage Green
- Olive Green
- Mint Green
Cutting Guide
Rose Fabrics
Cut strips and squares according to your preferred block size.
You’ll use:
- Small center square
- Narrow strips
- Medium strips
- Outer strips
These strips are sewn in a spiral (log cabin style) to create the illusion of rose petals.
Leaves
Cut:
- Four small green triangles
or
- Four half-square triangle units
Background
Cut four corner pieces.
These create the crisp white background around each flower.
Step 1 – Create the Rose Center
Begin with the smallest square in the middle.
This becomes the center of the rose.
Press carefully after every seam.
Step 2 – Add the First Petals
Sew narrow fabric strips around the center square.
Rotate the block after each strip.
Always press outward.
The spiral effect begins to appear almost immediately.
Step 3 – Continue Building the Rose
Keep adding strips in a clockwise direction.
Mix light and dark fabrics to create natural depth.
Alternate prints to imitate real rose petals.
Do not worry if every strip is slightly different—the variation adds realism.
Step 4 – Square Up the Flower
Trim the rose block so all edges are perfectly straight.
A square ruler makes this much easier.
Accuracy here will help the finished quilt fit together beautifully.
Step 5 – Make the Leaves
Create four small green leaf units.
Position them around the rose:
- Top left
- Top right
- Bottom left
- Bottom right
The leaves should point toward the flower.
Step 6 – Add the Background
Sew the white background pieces around the flower.
The clean background allows the colorful rose to become the focal point.
Press all seams flat.
Step 7 – Assemble the Block
Join all sections together.
Double-check that:
- Leaves point inward
- Rose remains centered
- Corners stay square
Trim if necessary.
Step 8 – Make Additional Blocks
Repeat the process using different color combinations.
Ideas include:
- Pink roses
- Yellow roses
- Orange roses
- Red roses
- Lavender roses
- White roses
Each block will have its own personality.
Step 9 – Arrange the Quilt
Lay the blocks on a flat surface.
Move them around until the colors feel balanced.
Mix bright flowers with softer shades for a natural garden effect.
Take a photo before sewing rows together.
Step 10 – Assemble the Quilt Top
Sew blocks into rows.
Then join the rows.
Press seams in alternating directions to reduce bulk.
Step 11 – Add Borders (Optional)
Borders can completely transform the quilt.
Ideas include:
- White border
- Floral border
- Green vine border
- Pink gingham border
- Patchwork border
Step 12 – Quilt the Layers
Layer:
- Quilt top
- Batting
- Quilt backing
Baste well before quilting.
Simple quilting ideas:
- Meandering
- Loops
- Leaves
- Swirls
- Echo quilting
- Feather motifs
Step 13 – Bind the Quilt
Trim excess batting.
Attach double-fold binding.
Hand stitch or machine stitch the back.
Give the quilt one final press.
Your Spring Roses Quilt is finished!
Customization Ideas
You can personalize your quilt in countless ways:
- Rainbow roses
- Vintage floral fabrics
- Cottage-style prints
- Batik fabrics
- Modern solids
- Low-volume backgrounds
- Seasonal color palettes
Helpful Tips
- Always use a consistent ¼” seam allowance.
- Press after every seam for flatter blocks.
- Chain-piece multiple blocks to save time.
- Starch fabrics before cutting for greater accuracy.
- Use scraps to make every flower unique.
Perfect Projects Using These Blocks
This rose block works beautifully for:
- Table runners
- Wall hangings
- Throw pillows
- Baby quilts
- Lap quilts
- Bed quilts
- Tote bags
- Mini quilts
- Placemats
- Decorative cushions
Final Thoughts
The Spring Roses Quilt Pattern captures the beauty of a blooming garden in fabric. With its spiral-pieced roses, fresh green leaves, and crisp background, it creates a timeless design that looks elegant in any color palette. Best of all, it’s an excellent scrap-busting project, allowing you to transform small fabric pieces into stunning floral blocks.
Whether you sew a single block for a decorative pillow or dozens of blocks for a full-size quilt, this project is sure to become a favorite in your quilting collection. Gather your favorite fabrics, enjoy the relaxing piecing process, and let your creativity blossom one rose at a time. Inspired by popular spring rose quilt block techniques that combine log cabin-style piecing with half-square triangle leaves, this style is loved by quilters for its beautiful dimensional floral effect.