
Creating your own storage basket from cloth and cardboard is not only a fun DIY project but also a practical solution for organizing your home. With just a few simple materials and basic sewing skills, you can craft a stylish and sturdy basket that looks like something straight out of a home décor magazine. Whether you’re storing craft supplies, kids’ toys, or bathroom essentials, this handmade storage basket will bring both charm and functionality into your space.
In this tutorial, we’ll go through every step in detail, from the materials you need to the sewing process and finishing touches. Even if you’re a beginner, don’t worry—this project is approachable, creative, and completely customizable. Let’s dive into the joy of making something with your own hands.
Why Make a Storage Basket from Cloth and Cardboard?
Sewing your own storage basket is more than just a crafting project—it’s about blending creativity with sustainability. Instead of buying mass-produced organizers, you can recycle cardboard and pair it with beautiful fabric for a one-of-a-kind piece. The result is eco-friendly and cost-effective, all while giving your home a personalized touch.
Another reason to make your own basket is the endless design freedom. With so many fabric options, you can easily match your basket to any room style—modern, rustic, playful, or elegant. A handmade basket not only keeps your things neat but also serves as a decorative accent.
And let’s not forget the personal satisfaction. Sewing a storage basket allows you to learn new skills, experiment with sewing patterns, and enjoy the process of turning everyday materials into something useful. Once you finish your first one, you might find yourself making a whole set for different corners of the house!
Materials You Will Need
Before starting, gather all your supplies so the process runs smoothly. For one medium-sized storage basket, here’s what you’ll need:
- Cardboard: Strong and thick, preferably corrugated, to form the structure.
- Fabric (outer layer): Choose a sturdy cotton or canvas for durability.
- Fabric (lining): A softer fabric like quilting cotton works well.
- Batting or interfacing: To give your basket a cushioned and professional look.
- Thread: Coordinating color for sewing.
- Sewing machine and needles: A basic machine is enough for this project.
- Scissors and rotary cutter: For precise cutting.
- Measuring tape or ruler: Accuracy is important for fitting fabric to cardboard.
- Hot glue gun or fabric glue: To help secure cardboard in place.
Having all materials ready will make each step more enjoyable. Feel free to choose fabrics with patterns that inspire you—this is where your creativity shines!
Preparing the Cardboard Base
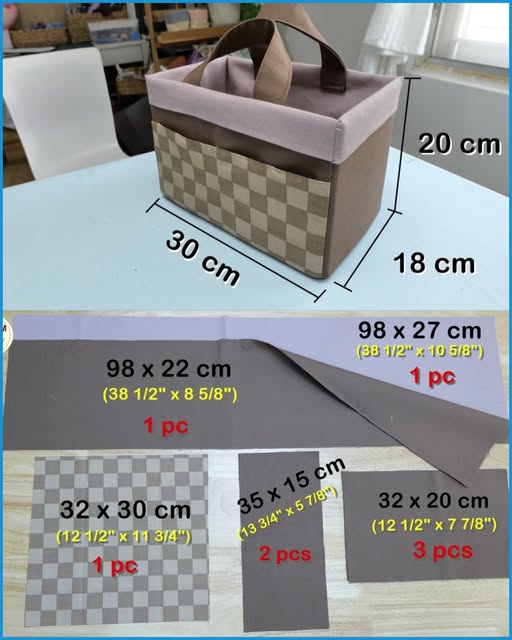
The cardboard acts as the skeleton of your basket, so make sure it’s sturdy and properly measured. Start by deciding the size of your basket—maybe a small one for remote controls or a large one for blankets. Measure and cut the cardboard into five pieces: one for the base and four for the sides. Ensure the sides match the base dimensions accurately to form a box.
Once the pieces are cut, assemble them with masking tape or glue. Don’t worry about the edges looking rough; the fabric covering will hide everything. The goal here is to create a strong, stable frame. If you want extra sturdiness, double up the cardboard layers before assembling.
This step is crucial because the strength of your basket depends on it. Take your time, double-check your measurements, and make sure everything fits snugly together. A well-prepared base makes sewing and covering much easier in the later steps.
Cutting the Fabric and Sewing the Outer Layer
With the cardboard ready, it’s time to focus on fabric. Measure each cardboard side and add at least one inch on all edges for seam allowance. Cut your outer fabric pieces accordingly. You’ll also need to cut pieces of batting or interfacing to match the fabric sizes for added strength and a soft feel.
Next, layer the fabric and batting together, then sew along the edges to create panels that will wrap around the cardboard. Use a straight stitch on your sewing machine, keeping the seams neat. If you’re new to sewing, don’t worry—straight lines are all you need for this step. It’s a great practice for beginners to get more comfortable with their sewing machine.
Once all the panels are prepared, sew them together to form the basket’s outer shell. At this point, you’ll start seeing your project come to life, which is always exciting! The sewing pattern is simple: just a series of rectangles coming together into a cube.
Adding the Inner Lining
The lining not only gives your basket a clean finish but also protects the cardboard from wear and tear. Use the same measurements as the outer panels, but cut them slightly smaller so the lining fits snugly inside the basket. Soft cotton fabric works best here since it’s easy to sew and manage.
Sew the lining pieces together just as you did with the outer fabric. You’ll create a fabric cube without the cardboard inside. Make sure the seams are pressed and neat, as this will determine how polished your basket looks when finished.
After sewing, slip the lining inside the basket frame, aligning the corners carefully. You can fold the top edges over the cardboard and sew them in place, or glue them if you prefer a no-fuss method. Both approaches work well, depending on how permanent you want the lining to be.
Assembling the Basket
Now comes the fun part: bringing everything together. Place the cardboard frame inside the sewn outer fabric shell, making sure the corners fit smoothly. The batting will help the fabric cling to the cardboard while adding a soft, cushioned texture.
Next, fold the fabric edges over the top of the cardboard and secure them with a combination of sewing and glue. Once that’s done, tuck the lining into place and finish the top seam by hand-stitching or machine-stitching all around the edge. This step ensures your basket looks tidy and professional.
Take a moment to admire your creation—you’ve transformed flat cardboard and fabric scraps into something useful and beautiful! This is where the satisfaction of sewing truly shines, as you now have a handmade storage basket ready for use.
Ideas for Personalization
The best part about this project is how customizable it is. You can make baskets in different sizes and fabrics to fit every corner of your home. For a rustic look, use burlap or linen fabric. For a playful, child-friendly design, choose colorful cotton with fun prints. You can even add appliqués or fabric paint for extra flair.
Handles are another great option for personalization. Simply sew fabric strips, braid some rope, or use leather scraps to create sturdy handles on the sides of your basket. This makes them even more practical, especially if you plan to move them around frequently.
Finally, consider labeling your baskets. Sew or glue on fabric tags to identify what’s inside—perfect for organizing craft supplies, toys, or seasonal items. With just a little imagination, your baskets can be both functional and decorative.
Wrapping Up – Share Your Creations
Making a storage basket from cloth and cardboard is a project that combines practicality, creativity, and the joy of sewing. It’s an ideal beginner-friendly sewing pattern that helps you practice essential skills while producing something useful for your home. The process is straightforward, and the results are always rewarding.
Now it’s your turn! Gather some fabric scraps, a sturdy piece of cardboard, and your sewing machine to start crafting your own basket today. Remember, no two handmade baskets will look the same, and that’s what makes them special.
If you give this project a try, don’t keep it to yourself—share your storage basket with friends, family, or even in your favorite sewing groups. Seeing what others create is inspiring and helps keep the sewing community connected. So go ahead, make your basket, and let the world see your creativity!