
If you’ve been searching for a practical yet charming project to brighten up your home, a storage basket made of fabric is the perfect choice. This tutorial will guide you through the process of creating a sturdy and beautiful basket that not only organizes your space but also shows off your creativity. The best part? You don’t need to be an advanced sewer or quilter to complete it—this project is perfect for beginners and seasoned makers alike. Along the way, we’ll also explore how quilt techniques and a quilt pattern can add texture and personality to your finished basket.
Fabric baskets are ideal for holding toys, sewing supplies, bathroom essentials, or even as decorative planters (with a liner). They’re lightweight, washable, and can be customized in endless ways to suit your décor. By using quilting methods, you’ll give the basket extra strength and a cozy, handmade feel. Let’s get started and turn a few pieces of fabric into something both useful and stylish!
Materials You Will Need
Before diving into the steps, it’s essential to gather all your materials. One of the joys of this project is how simple the supply list is, and you may already have most of these items in your sewing room. Choosing your fabrics thoughtfully will make the basket even more personal, so consider mixing solid colors with prints or even repurposing old fabric scraps.
Here’s a complete list:
- Two coordinating pieces of cotton fabric (for the outer layer and lining)
- Fusible interfacing or quilt batting for structure
- Scissors or rotary cutter
- Quilting ruler and cutting mat
- Sewing machine and thread
- Pins or fabric clips
- Iron and ironing board
Optional but recommended: use a quilt pattern to piece together the outer fabric layer. This adds visual interest and allows you to practice basic quilting techniques. A patchwork design made from leftover quilt scraps can turn a simple storage basket into a mini work of art.
Cutting and Preparing the Fabric
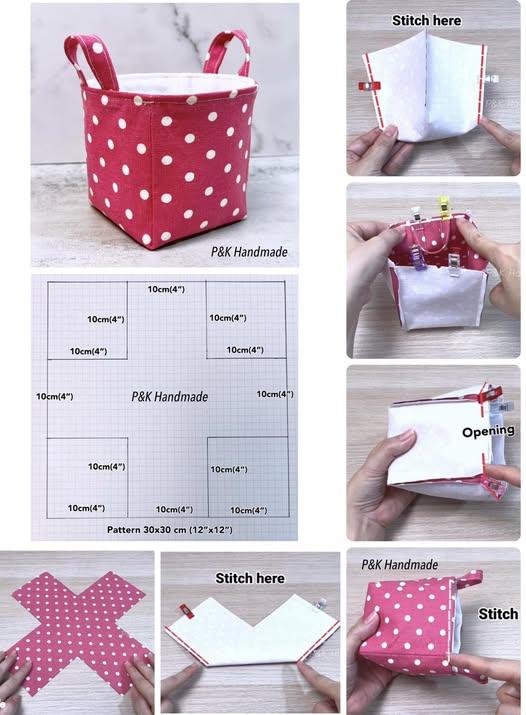
To create a basket, you’ll want two main fabric pieces: one for the outside and one for the lining. Cut each fabric into two rectangles measuring 16” x 18”. These dimensions will produce a medium-sized basket, but feel free to adjust them to create larger or smaller versions. Remember to cut your interfacing or quilt batting to the same size as your outer fabric for stability.
Once cut, fuse the interfacing to the wrong side of the outer fabric using your iron. If you’re using quilt batting instead, simply baste it in place with a few quick stitches. Quilting this layer in straight or diagonal lines will give your basket added sturdiness and bring in that timeless quilt texture. It’s an easy way to mimic a classic quilt pattern while also reinforcing the fabric.
Don’t forget to press your fabrics well before sewing. A neatly pressed piece of fabric not only looks professional but also makes the sewing process smoother. At this point, your fabric pieces should be crisp, stable, and ready to sew into shape.
Sewing the Outer Basket
Start by folding the outer fabric piece in half lengthwise, right sides together, so that it forms a rectangle. Sew along the side and bottom edges with a ½-inch seam allowance, leaving the top edge open. Repeat this step with the lining fabric. Be sure to backstitch at the beginning and end to secure your seams.
To form the basket’s base, pinch each corner flat and measure a 4-inch triangle from the seam. Mark a line and sew across it, then trim off the excess. This step creates a square bottom, giving your basket structure and depth. Repeat this process for all four corners (two on the outer fabric and two on the lining).
When you turn the outer basket right side out, you’ll start to see the shape taking form. Press it gently with an iron to smooth the seams. Quilting on the outside layer is optional but highly recommended, as it gives your basket that beautiful quilted look and extra sturdiness for daily use.
Sewing the Lining and Assembling the Basket
The lining is sewn in the same way as the outer fabric, but you’ll leave a 4-inch opening along one of the side seams. This opening will allow you to turn the basket right side out later. Make sure the corners are also boxed in the same manner so the lining fits snugly inside.
Once both the outer basket and the lining are complete, place the lining inside the outer basket with right sides facing each other. Align the top raw edges and pin or clip them in place. Sew all the way around the top edge with a ½-inch seam allowance. This seam is crucial, as it connects both pieces and creates a polished finish.
Carefully pull the outer basket through the opening left in the lining, then push the lining down inside the basket. Close the lining’s opening with a small topstitch or hand stitch. Finally, press the top edge of the basket and run a line of topstitching around it for a neat, professional look.
Adding Handles (Optional but Practical)
If you’d like to add handles to your fabric basket, cut two strips of fabric measuring 12” x 3”. Fold each strip in half lengthwise, then fold the raw edges toward the center and stitch along both long edges. This creates sturdy handles that can be attached to the basket’s sides.
Position the handles evenly on both sides of the basket and stitch them securely in place. Handles make the basket more functional for carrying items and add a decorative touch. If you’re following a quilt pattern on your outer fabric, consider using a solid fabric for the handles to balance the design.
Handles aren’t mandatory, but they add another layer of customization. For instance, you could make leather or rope handles instead of fabric ones. This small detail can transform your project from a simple fabric bin into a stylish home accessory.
Personalization and Creative Ideas
The beauty of sewing your own storage basket lies in the endless ways you can personalize it. You might choose a minimalist approach with neutral fabrics or go bold with bright patchwork inspired by your favorite quilt. Adding embroidery, appliqué, or even fabric labels can make the basket uniquely yours.
Another fun idea is to create seasonal versions. For example, use festive red and green fabrics for a holiday basket, or pastel tones for springtime organization. You can also adapt a favorite quilt pattern to cover the outer fabric, turning leftover quilt scraps into functional storage solutions.
Don’t be afraid to experiment. Try different sizes, shapes, and fabrics. A deep, tall basket works well for storing blankets, while a shallow, wide one is perfect for organizing desk supplies. Each project helps you practice sewing and quilting techniques while making something useful.
Final Touches and Inspiration
By now, you should have a beautiful fabric basket that’s both sturdy and stylish. The topstitching gives it a professional finish, the lining makes it neat inside and out, and the quilting provides durability. If you added handles, your basket is even more versatile and ready for everyday use.
Take pride in the details. Press your basket one last time to ensure crisp edges, and admire how your fabric choices and quilting design came together. Each stitch represents time, care, and creativity, transforming simple fabric into something practical and beautiful.
Remember, the more you practice, the better your sewing and quilting skills will become. Each basket is a learning opportunity, whether it’s experimenting with a new quilt pattern or simply trying a different fabric combination.
Share Your Fabric Basket Project
Now that you’ve completed your fabric storage basket, it’s time to share your creation! Handmade projects like this inspire others and encourage creativity. Post your basket on social media, show it to friends, or gift it to someone who will appreciate a thoughtful, practical present.
Don’t forget that this project can be repeated again and again with different fabrics, sizes, and quilting styles. A set of baskets in coordinating fabrics makes for a beautiful and organized space. You’ll be surprised at how quickly your handmade baskets become part of your everyday home.
So, grab your fabrics, experiment with a quilt pattern, and enjoy the process of sewing something that blends practicality with artistry. And when you’re done, share your finished basket—you never know who you might inspire to pick up a needle and try quilting or sewing for themselves!