
Introduction to String Quilt Blocks
String quilt blocks are a fantastic way to use up fabric scraps while creating vibrant and dynamic quilt patterns. This quilting technique is perfect for beginners and experienced quilters alike, offering a fun and creative way to experiment with colors and patterns.
String quilts date back to early quilting traditions, where resourceful quilters used fabric strips, or “strings,” to create unique and beautiful designs. These quilt patterns emphasize improvisation and creativity, making each quilt a one-of-a-kind masterpiece.
The versatility of string quilting allows you to design anything from simple geometric patterns to complex artistic layouts. Whether you prefer traditional or modern quilt designs, string quilt blocks can bring a fresh and exciting element to your quilting projects.
Materials Needed for String Quilt Blocks
Before you begin crafting your string quilt blocks, gather the necessary materials. Using a mix of colors and textures will enhance the final design and add depth to your quilt.
- Fabric strips (strings): Choose an assortment of cotton fabrics in various colors and patterns. Strips should be between 1″ to 2.5″ wide.
- Foundation fabric: Lightweight muslin or paper is commonly used as the base for sewing fabric strips.
- Sewing machine and thread: A basic sewing machine with a straight stitch is sufficient for this project.
- Rotary cutter, ruler, and cutting mat: These tools help cut precise fabric strips and blocks.
- Iron and ironing board: Pressing the strips after sewing ensures a smooth and polished finish.
Having these materials ready before you start will make the process more efficient and enjoyable, allowing you to focus on the creative aspects of string quilting.
Step-by-Step Guide to Making String Quilt Blocks
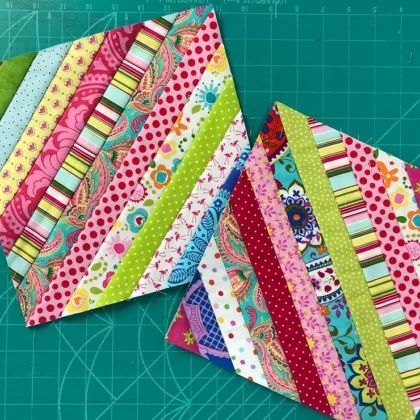
String quilt blocks are easy to assemble using a simple strip-sewing technique. Follow this step-by-step guide to create your own beautiful quilt blocks.
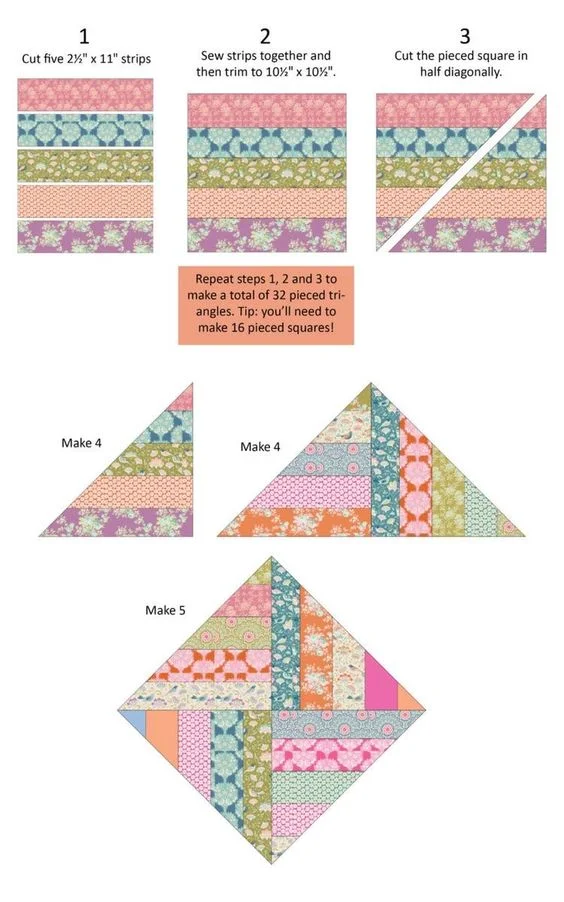
- Prepare your foundation fabric: Cut squares of muslin or paper to the desired block size (typically 8″ x 8″ or 10″ x 10″).
- Select and arrange your fabric strips: Lay out the fabric strings in an eye-pleasing color arrangement.
- Sew the strips to the foundation: Place the first strip diagonally across the foundation square and sew it in place. Continue adding strips on either side, pressing after each seam.
Once the foundation is covered, trim the block to the correct size using a rotary cutter. These trimmed blocks can then be joined together to form a quilt top with endless design possibilities.
Choosing the Right Quilt Patterns for String Quilting
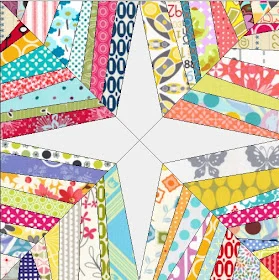
There are various ways to arrange string quilt blocks to create stunning quilt patterns. The arrangement of the blocks can drastically change the overall look of the quilt.
- Diamond Layout: Position blocks in a diamond pattern to create a striking visual effect.
- Chevron Design: Alternate the direction of string blocks for a zigzag or chevron appearance.
- Herringbone Effect: Arrange blocks to mimic the classic herringbone pattern seen in flooring and textiles.
Experimenting with different layouts will help you find a design that suits your style and showcases your fabric choices beautifully.
Tips for Perfecting Your String Quilt Blocks
String quilting is a forgiving technique, but there are a few tips to ensure your blocks turn out perfectly every time.
- Use a consistent seam allowance: A ¼” seam ensures all strips are securely sewn without excessive bulk.
- Press as you go: Pressing each strip after sewing prevents fabric distortion and keeps blocks flat.
- Trim blocks accurately: Use a rotary cutter and quilting ruler to maintain uniform block sizes.
By following these best practices, your finished quilt will have a professional appearance and long-lasting durability.
Finishing Your String Quilt
Once you have assembled your string quilt blocks, it’s time to complete the quilt. The finishing process includes piecing the blocks together, adding batting, and quilting the layers.
- Assemble the quilt top: Sew the string blocks together, arranging them according to your chosen pattern.
- Layer with batting and backing: Place the quilt top over batting and backing fabric, securing with pins or basting spray.
- Quilt and bind: Use machine quilting or hand quilting to secure the layers, then finish with a fabric binding to enclose raw edges.
Finishing a string quilt is a rewarding process, allowing you to showcase your creativity and craftsmanship in a completed quilt project.
Conclusion
String quilt blocks offer an exciting way to experiment with color, texture, and design in quilting. Whether you are a beginner looking for an easy project or an experienced quilter wanting to use up fabric scraps, string quilting is a fantastic technique to explore.
By following this guide and incorporating different quilt patterns, you can create stunning string quilts that reflect your unique style. So, gather your fabric strips, start sewing, and enjoy the creative journey of making string quilt blocks!