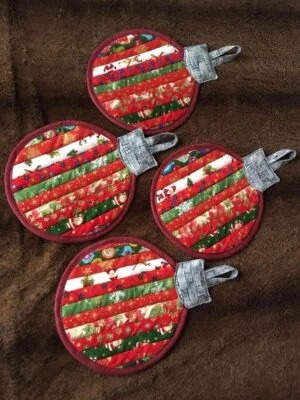
The Stripey Christmas Ornament Quilt pattern is a charming and straightforward project perfect for adding a festive touch to your holiday decor. This pattern features a series of ornament-shaped blocks, each with a unique stripey design, ideal for showcasing bold and bright holiday fabrics. Whether you’re a seasoned quilter or just starting, this project offers an opportunity to experiment with patterns and textures while embracing the spirit of the season.
This design is versatile, allowing you to use leftover fabric strips or pre-cut pieces, making it both budget-friendly and sustainable. Below is a step-by-step guide to help you create this delightful quilt, complete with measurements to ensure precision.

Step-by-Step Instructions with Measurements
Materials Needed:
- Fabric strips: Assorted holiday-themed fabrics cut into 1.5-inch wide strips.
- Background fabric: 1 yard for the quilt block backgrounds.
- Ornament topper fabric: ¼ yard (gold or silver recommended).
- Backing fabric: 1.5 yards.
- Batting: 36 x 44 inches.
- Binding fabric: ⅓ yard.
- Rotary cutter and mat: For precise cutting.
- Sewing machine and thread: Matching or contrasting as desired.
Step 1: Create the Ornament Stripes
- Cut fabric strips into lengths of 6.5 inches.
- Sew 5–7 strips together to form a rectangle, ensuring alternating colors or patterns.
- Press seams flat. Each rectangle should measure 6.5 x 8 inches.
Step 2: Shape the Ornament
- Using a circular or oval template (approximately 6 inches wide), trace the shape onto the striped fabric rectangle.
- Cut out the ornament shape, ensuring clean, smooth edges.
Step 3: Prepare the Background Blocks
- Cut background fabric into 10-inch squares.
- Center the ornament shape onto each square, leaving room for the ornament topper at the top.
Step 4: Add the Ornament Topper
- Cut a 1 x 2-inch rectangle from the topper fabric.
- Position the topper at the top of the ornament shape and attach it with a straight or decorative stitch.
Step 5: Assemble the Quilt Top
- Arrange the blocks in a grid pattern, alternating colors and placements for visual interest.
- Sew the blocks together with a ¼-inch seam allowance.
- Add a 2.5-inch border around the quilt for a finished look.
Step 6: Layer, Quilt, and Bind
- Layer the quilt top, batting, and backing fabric. Baste securely.
- Quilt around the ornament shapes and add additional quilting designs as desired.
- Trim the edges and attach the binding to complete your quilt.
The Stripey Christmas Ornament Quilt is a creative and joyful project that will brighten any holiday space. Enjoy the process of crafting this festive piece, and let it bring warmth and cheer to your home!
