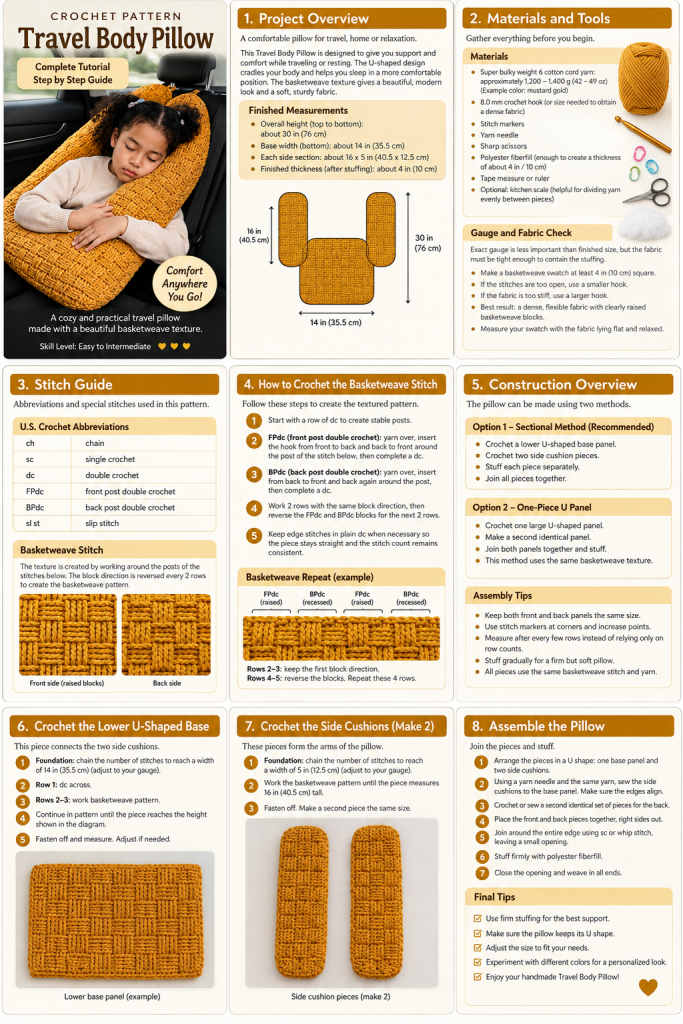
Travel Body Pillow Pattern is a practical crochet project designed to create a large, supportive U-shaped pillow for relaxing during long trips, reading, resting, or simply enjoying extra body support at home. Inspired by the project shown in the reference image, this crocheted pillow combines a long U-shaped construction with a textured basketweave crochet stitch, rounded upper curves, generous dimensions, and a soft stuffed interior. The result is a substantial handmade pillow with a beautiful woven appearance.
Unlike a small traditional travel neck pillow, this crochet travel body pillow extends much farther down the body. The two long arms can rest along either side of the user, while the curved upper section provides a comfortable area for leaning or resting. The approximate proportions shown in the inspiration are around 30 inches (76 cm) long with each lower arm measuring approximately 14 inches (35.5 cm) across, although these dimensions can easily be customized.
Texture is one of the most attractive elements of this project. Alternating front post double crochet and back post double crochet stitches creates the basketweave effect visible throughout the long sections. This technique produces a thick, structured crochet fabric that is especially suitable for decorative cushions because it looks intricate while relying on a manageable repeating stitch sequence. The instructions below use U.S. crochet terminology and provide a flexible framework that can be adjusted according to yarn, gauge, and desired pillow size.
Materials, Measurements, and Crochet Stitches
For the Travel Body Pillow Pattern, choose a yarn that produces a substantial but comfortable fabric. A medium-weight #4 yarn held double or a bulky #5 yarn is a practical choice. Cotton blends, acrylic blends, and other soft, durable washable yarns can work particularly well.
A project of this size requires significantly more yarn than a standard cushion. Depending on yarn thickness, gauge, and finished dimensions, approximately 1,800–2,500 yards (1,645–2,285 m) may be required. Always purchase extra yarn when possible, particularly if you want the entire pillow to come from the same dye lot.
A 6.0–7.0 mm crochet hook is a useful starting range for bulky yarn. If using two strands of worsted-weight yarn together, test several hook sizes before beginning. The ideal fabric should be dense enough to contain the stuffing without becoming stiff.
The approximate finished measurements for a large version are 30 inches (76 cm) from top to bottom, with two elongated lower arms and an overall width that can reach approximately 26–30 inches (66–76 cm) depending on shaping. Each lower section may be approximately 12–14 inches (30.5–35.5 cm) wide.
The principal crochet stitches used are chain (ch), slip stitch (sl st), single crochet (sc), double crochet (dc), front post double crochet (FPdc), and back post double crochet (BPdc). You should also be comfortable increasing and working around curved sections.
Other supplies include stitch markers, scissors, yarn needle, flexible measuring tape, and a generous quantity of polyester fiberfill. A removable fabric insert can also be made if you prefer to keep the crochet shell separate from the stuffing.
Creating the Base and Basketweave Body
Begin the Travel Body Pillow Pattern at the bottom of one arm. Chain enough stitches to create approximately 12–14 inches (30.5–35.5 cm) of width after the first few rows. Because yarn and hook combinations vary considerably, measuring your actual crochet fabric is more reliable than relying on a universal starting chain.
Work the first foundation row in double crochet. Crochet several additional rows until you have a stable base for the textured section. Keep the edges straight and count your stitches regularly.
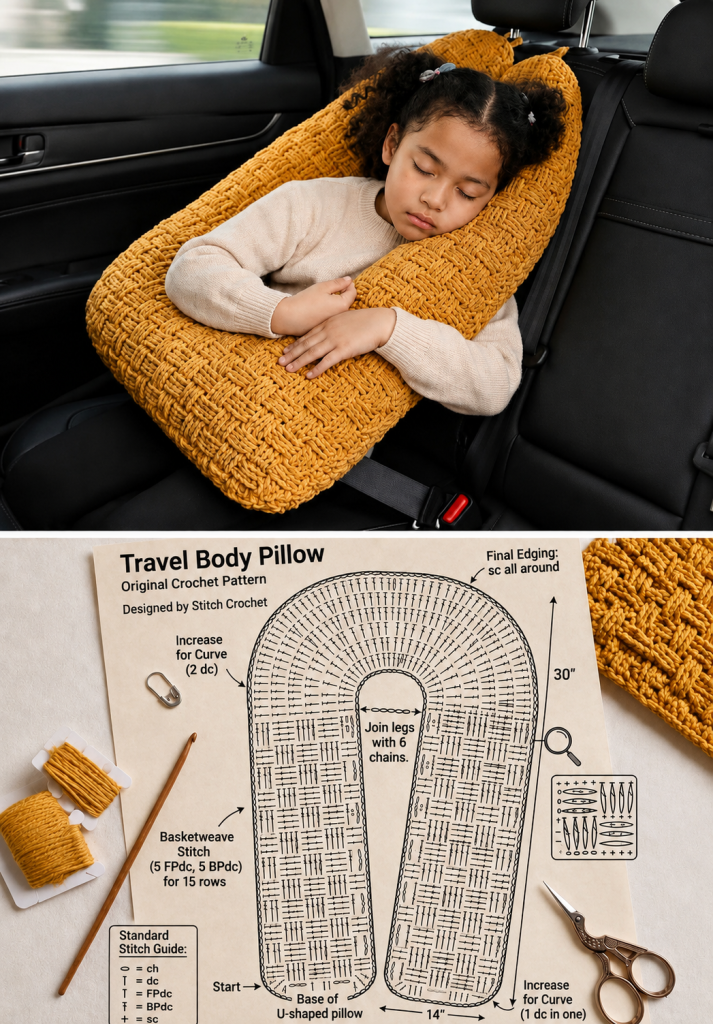
To begin the basketweave stitch, chain 2 or 3 according to your preferred turning method. Work 5 FPdc around the next 5 posts, followed by 5 BPdc around the next 5 posts. Repeat this sequence across the row. Adjust the final repeat if necessary to accommodate your stitch count.
For the following rows, continue working the post stitches as established. After approximately five rows, reverse the texture: work BPdc over the previous FPdc sections and FPdc over the previous BPdc sections. This reversal produces the recognizable woven-block appearance.
Continue alternating the textured blocks every five rows. The reference design suggests approximately 15 rows of basketweave before transitioning into major shaping, but the exact number can be increased for a longer pillow.
Make a second lower arm using the same stitch count, gauge, and number of rows. Both sides should match as closely as possible. Place them beside one another periodically during construction to check their dimensions.
Joining the Arms and Shaping the U-Shaped Upper Section
Once both long sections are complete, the next stage of the Travel Body Pillow Pattern creates the characteristic U shape. Position the two arms parallel to one another with a comfortable opening between them.
The reference construction suggests connecting the inner sections with approximately 6 chains. This bridge creates the narrow curved area at the base of the upper opening. The exact chain count can be adjusted according to your gauge and preferred spacing.
After joining, begin crocheting around the combined structure. Work across one arm, around the connecting chain section, and across the second arm. Place stitch markers at important transition points so that increases remain symmetrical.
To create the rounded shoulders of the U, increases must be introduced gradually. A basic increase can be made by working 2 dc into the same stitch. Distribute these increases along the outer curved areas rather than placing them randomly.
Continue crocheting around the upper portion, increasing whenever the fabric begins pulling inward or refusing to lie smoothly. The goal is to create a broad semicircular top while maintaining the open center of the U.
As the curve develops, measure the entire project. Aim for approximately 30 inches (76 cm) from the lower edge to the highest point if you want proportions similar to the pictured pillow. Finish the outer edge with a neat round of single crochet to stabilize and define the silhouette.
Assembly, Stuffing, and Finishing the Travel Body Pillow
There are two convenient ways to create a stuffed crochet body pillow. You can crochet matching front and back panels and seam them together, or construct a three-dimensional cover with side gussets. For an approachable version, two matching panels are recommended.
Create a second U-shaped panel following the same instructions as the first. Maintaining identical gauge is important because even relatively small differences become noticeable on a project this large.
Place both panels together with their wrong sides facing inward. Using matching yarn, work single crochet through both layers around the outer perimeter. This creates a sturdy decorative seam. Leave a generous opening for stuffing.
Begin filling the lower arms first. Add small portions of polyester fiberfill rather than large handfuls. Push the filling toward the ends and distribute it carefully to prevent hard lumps.
Continue stuffing upward toward the curved section. The pillow should feel supportive without becoming excessively rigid. Overstuffing can distort the basketweave texture and force the seams outward.
When you are satisfied with the shape, complete the remaining single-crochet seam. Fasten off securely and weave the yarn tail through several stitches. Massage the finished pillow gently to distribute the filling and refine the U-shaped silhouette.
FAQ About the Travel Body Pillow Pattern
What is a Travel Body Pillow Pattern?
A Travel Body Pillow Pattern provides instructions for creating a long supportive cushion designed to surround part of the body rather than supporting only the neck.
What crochet skill level is recommended?
Confident beginners or intermediate crocheters should be comfortable with the project. The main advanced-looking texture is created with relatively straightforward post stitches.
What does FPdc mean?
FPdc means front post double crochet. Instead of inserting the hook through the top loops, the stitch is worked around the post of the stitch below from front to back.
What does BPdc mean?
BPdc means back post double crochet. The hook passes around the post from the back, causing the stitch to sit behind the fabric.
How is the basketweave texture created?
Groups of FPdc and BPdc are alternated for several rows and then reversed, producing raised rectangular sections resembling woven strips.
What yarn weight should I use?
Bulky #5 yarn works well. Two strands of medium #4 yarn held together can produce a similarly substantial fabric.
How large is the finished pillow?
A large version can measure approximately 30 inches (76 cm) long, although the pattern is easily adjustable.
Can I make it smaller?
Yes. Reduce the starting width and the number of straight rows while keeping the shaping proportional.
How much yarn will I need?
Approximately 1,800–2,500 yards (1,645–2,285 m) is a reasonable planning range, but actual consumption varies significantly with yarn thickness, gauge, and dimensions.
What hook size should I use?
Approximately 6.0–7.0 mm is a useful starting range, but always match your hook to your yarn and desired fabric density.
Should I crochet tightly?
Use a moderately firm tension. Very loose crochet can allow stuffing to become visible through the stitches.
Can I use cotton yarn?
Yes. Cotton or cotton-blend yarn produces excellent stitch definition, although a large cotton pillow may be heavier than one made from acrylic.
Can I use chenille yarn?
Yes, provided you can maintain consistent tension. However, the basketweave texture may be less visible with very fuzzy yarn.
How do I make both arms identical?
Count every row and record your measurements while making the first side. Use the same stitch and row counts for the second.
Why does my curved section ripple?
Too many increases can cause rippling. Reduce the frequency of increases until the fabric lies more naturally.
Why does the curve pull inward?
This usually indicates too few increases. Add increases gradually along the curved outer section.
Can I add a removable insert?
Yes. A custom fabric liner can be sewn in the same U shape and filled separately, allowing the crochet cover to be removed.
Can I use a different stitch instead of basketweave?
Certainly. Moss stitch, half double crochet, single crochet, waffle stitch, or another dense pattern can be substituted.
How should the pillow be washed?
Follow the care instructions for the specific yarn and stuffing used. A removable inner pillow makes regular cleaning easier.
Is this a child car-safety restraint or positioning device?
No. A handmade pillow should never replace an approved child restraint, booster, seat belt, or other vehicle safety equipment. Avoid positioning bulky pillows beneath or behind restraint straps, and use handmade travel cushions only where they do not interfere with proper restraint fit or safe seating.
Conclusion
The Travel Body Pillow Pattern transforms basic crochet techniques into an impressive oversized cushion with both decorative texture and practical versatility. Its long U-shaped silhouette distinguishes it from a standard neck pillow and provides plenty of space for creative customization.
The defining feature is the basketweave crochet stitch. Alternating groups of front post and back post double crochet creates a rich woven texture that looks sophisticated while following a predictable repeat. Once the rhythm becomes familiar, the long straight sections can be surprisingly relaxing to crochet.
For a project inspired by the proportions in the reference image, aim for approximately 30 inches (76 cm) in length, with lower arms around 12–14 inches (30.5–35.5 cm) wide. These measurements are flexible rather than mandatory. Gauge, body size, intended use, and personal preference should determine the final dimensions.
Take particular care during the shaping stage. Gradual, symmetrical increases produce the smooth upper curve, while consistent stitch counts keep both arms balanced. Before stuffing, place the two finished panels together and correct any significant differences in size.
Color also gives this pattern plenty of personality. Mustard or golden yarn emphasizes the woven texture beautifully, while cream, terracotta, sage, dusty rose, navy, or multicolored yarn can completely change the appearance. The same construction can therefore become anything from a neutral home accessory to a vibrant handmade statement piece.
With careful measuring, consistent FPdc and BPdc basketweave stitches, controlled increases, firm seaming, and evenly distributed stuffing, the Travel Body Pillow Pattern becomes a substantial crochet project that showcases texture and shaping in an eye-catching U-shaped design.
PATTERN HERE
Crochet – Tutorial
FULL PATTERN ACCESS
You will be redirected to another site