
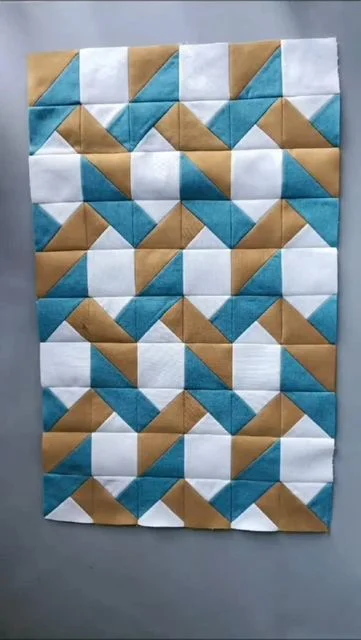
The world of quilting is full of creativity, surprises, and endless possibilities. One of the most fascinating designs that beginner and experienced quilters alike enjoy experimenting with is the Twisted Quilt Block. This unique quilt pattern gives the illusion of movement, almost as if the fabric is swirling across the surface. The effect is striking, yet surprisingly easy to achieve with some thoughtful cutting and piecing.
What makes the twisted block so appealing is its versatility. You can make a single block as a statement piece, combine multiple blocks for a full quilt, or even incorporate it into wall hangings, table runners, or baby quilts. No matter how you use it, the twisted block will instantly catch attention and spark conversations.
This tutorial will walk you through the process step by step. From gathering your materials to cutting, piecing, and personalizing your design, you’ll learn everything needed to create your own twisted quilt block. Let’s dive into the art of quilting and explore how this clever quilt pattern comes to life.
Materials You Will Need
Before you start sewing, let’s make sure you have all the necessary supplies. Quilting projects are always smoother when your materials are prepped and ready. The Twisted Quilt Block doesn’t require anything unusual—just the basics you may already have in your quilting kit.
Here’s a simple list to guide you:
- Cotton quilting fabrics in at least two contrasting colors or prints
- Rotary cutter, cutting mat, and quilting ruler
- Sewing machine with a ¼-inch presser foot
- Thread to match or contrast your fabrics
- Iron and ironing board
- Pins or fabric clips
The beauty of this quilt pattern is that you can play with fabric scraps or use fat quarters. Whether you prefer bold, high-contrast fabrics or subtle tone-on-tone designs, the twisted effect will always shine through. Having your tools organized before starting will make the process smoother and more enjoyable.
Cutting the Fabric
The first step in making your twisted quilt block is cutting your fabric with precision. Accurate cutting ensures that the pieces align perfectly and that the block creates the intended swirling illusion. Don’t rush this step—careful preparation is the key to quilting success.
For a standard 12-inch finished twisted block, you will need:
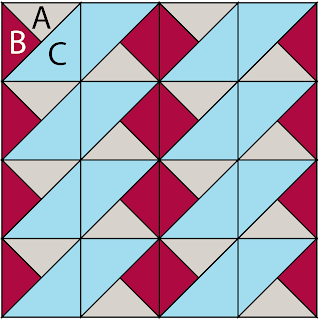
- 4 squares of fabric A (light color) – 6 ½” x 6 ½”
- 4 squares of fabric B (contrasting color) – 6 ½” x 6 ½”
- These squares will be trimmed and rotated during construction to create the “twist.”
Lay your fabrics on a cutting mat and use your quilting ruler to ensure perfect squares. Remember, the more accurate your cuts, the more professional your quilt block will look once assembled. If you are new to quilting, take your time measuring and double-checking before you cut.
Assembling the Block
Now that your fabric is cut, it’s time to bring the quilt block together. This is where the magic of the twisted design starts to appear. Don’t worry—it may look complicated at first, but the steps are easy to follow, even for beginners.
Start by pairing one square of fabric A with one square of fabric B, right sides together. Sew around all four edges with a ¼-inch seam allowance. Once stitched, take your rotary cutter and make two diagonal cuts, corner to corner, forming four triangles. When you open these triangles, you’ll notice that each has two contrasting halves.
Press the seams carefully, and then begin rotating the pieces to create the twisted design. You’ll see the illusion of movement begin to emerge as the fabrics spiral around the block. Arrange the four units in a square, twist them into the desired layout, and sew them together. Just like that, you have created your twisted quilt block!
Pressing and Squaring Up
After piecing the block, pressing is the next important step. Proper pressing not only makes your quilt block look neat but also helps it lie flat and fit better when joining with other blocks. Use a hot iron and press each seam to one side, usually toward the darker fabric to prevent shadowing.
Once pressed, check the size of your block. For a 12-inch block, trim carefully to square it up, ensuring the edges are straight and the corners meet accurately. A square, precise block makes the process of assembling a quilt top much easier later on.
Don’t be discouraged if your first block isn’t perfect. Quilting is a skill that improves with practice, and each block you sew will look sharper than the last. The twisted quilt block is forgiving, and even with small imperfections, the design still looks stunning.
Customization Ideas
The twisted quilt block offers countless opportunities for creativity. One way to personalize your quilt pattern is by experimenting with different fabric choices. Imagine using bright, bold solids for a modern look, or mixing florals and plaids for a playful, scrappy vibe.
You can also play with block size. Larger blocks work well for quick quilts, while smaller blocks add intricacy and detail. Mixing blocks of various sizes within the same quilt can create a dynamic, eye-catching design. This is an excellent way to use leftover fabric scraps in creative ways.
For even more variety, consider alternating twisted blocks with plain squares or traditional quilt blocks. This mix creates visual balance while letting the twisted design stand out. No matter how you customize, your quilt will be a unique piece of art that reflects your style.
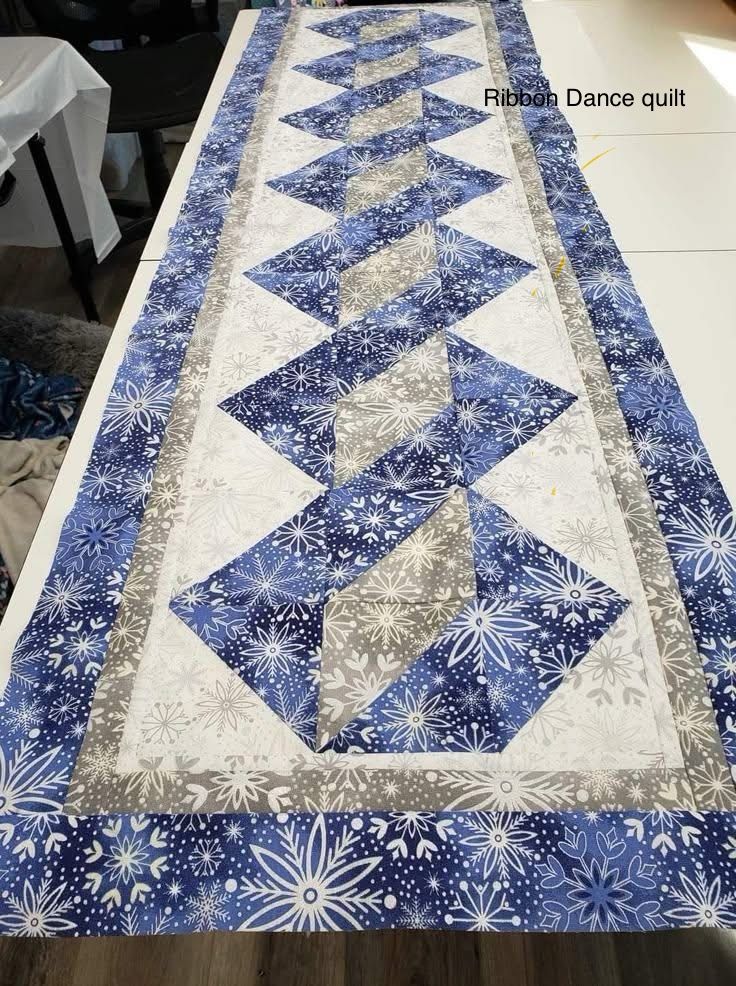
Making a Full Quilt
Once you’ve mastered the single twisted block, why not expand into a full quilt? Repeating the block across a quilt top creates a mesmerizing effect, almost like fabric in motion. The twists seem to ripple across the quilt, adding energy and life to the design.
To plan your quilt, decide on the finished size. A throw quilt might need 20 to 30 blocks, while a bed quilt could require 40 or more. Lay out your blocks before sewing them together to preview how the twists interact. This step allows you to adjust colors and placement for maximum visual impact.
When joining blocks, use the same care with seam allowances and pressing to keep everything aligned. Add borders if desired, quilt as you like—straight-line quilting emphasizes the geometric design, while free-motion quilting can add texture. Finally, bind your quilt for a polished finish.
Sharing Your Work
Quilting is not just about creating something functional—it’s also about community, creativity, and sharing. Once you’ve finished your twisted quilt block or full quilt, don’t keep it hidden away. Show it off to friends, family, and fellow quilters.
Many quilting communities, both online and in person, thrive on inspiration from others’ projects. Sharing your work encourages beginners to try new quilt patterns and sparks fresh ideas among experienced quilters. Whether you post on social media, join a quilting group, or gift your quilt to someone special, your creation will bring joy.
So grab your fabrics, follow this tutorial, and start making your own twisted quilt block today. With each stitch, you’re not just creating a quilt—you’re weaving creativity, tradition, and your personal story into something truly special. Don’t forget to share your finished project and inspire others to explore the beauty of quilting!