
Quilting is a craft that brings together creativity, precision, and a sense of accomplishment. The Verticals Quilt Pattern is a wonderful project for beginners and experienced quilters alike because of its simplicity and elegance. This pattern consists of clean, straight lines that create a modern and sophisticated look, perfect for any décor. In this tutorial, you will learn step-by-step how to create a Verticals Quilt from start to finish. We’ll cover the materials you need, cutting instructions, sewing tips, and ideas for customization.
Why Choose the Verticals Quilt Pattern?
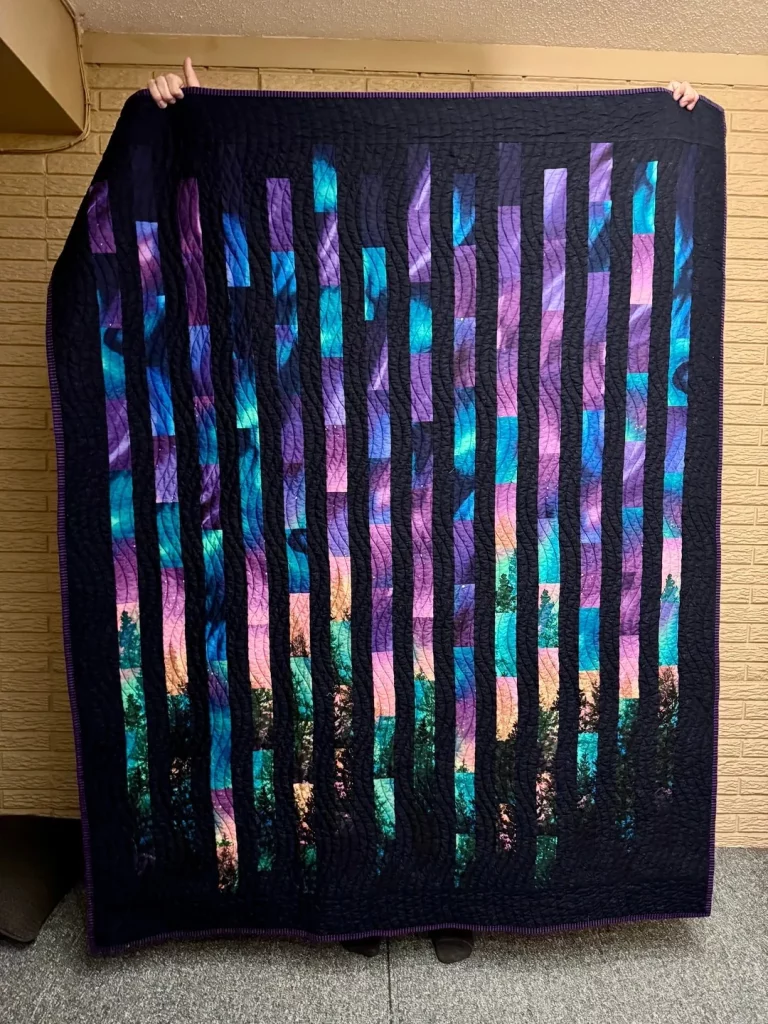
If you’re looking for a beginner-friendly quilt pattern that delivers stunning results, the Verticals Quilt is a great choice. Its design is based on vertical strips arranged in a harmonious layout, which means less complicated piecing and more focus on fabric selection. The beauty of this pattern lies in its simplicity—just straight-line sewing, but with plenty of room for creativity.
Another reason to choose this quilt pattern is its versatility. Whether you want a minimalist look with neutral tones or a bold, vibrant piece filled with color, the Verticals Quilt can be customized to match your personal style. You can even use fabric scraps to create a scrappy version, making it an eco-friendly project. Plus, the vertical lines add a sense of height and elegance, making the finished quilt a true showpiece.
Lastly, the Verticals Quilt is perfect for practicing your quilting skills without feeling overwhelmed. You’ll improve your cutting accuracy, seam alignment, and quilting techniques while creating something practical and beautiful. This makes it an excellent project for beginners who want to build confidence in quilting.
Materials You’ll Need
Before you start your Verticals Quilt project, gather all the necessary materials. Having everything prepared ahead of time will make the process smoother and more enjoyable. Here’s what you’ll need:
- Fabric for quilt top: Select at least 4–6 different fabrics for variety. Fat quarters or yardage will work fine.
- Background fabric: A solid or low-volume print works best.
- Batting: Choose cotton or a cotton blend for a soft finish.
- Backing fabric: Select a coordinating fabric for the quilt’s back.
- Binding fabric: Typically, ½ yard will be enough.
- Rotary cutter and cutting mat
- Quilting ruler
- Pins or clips
- Sewing machine with a quilting needle
- Thread in a coordinating color
- Iron and ironing board
For beginners, pre-cut fabrics like jelly rolls can make this process even easier since they come in 2.5-inch strips, which are perfect for a vertical design. Make sure your fabrics are washed and pressed before you start cutting to ensure accurate measurements and prevent shrinking later.
Cutting Instructions
Now that you have all your materials ready, it’s time to start cutting your fabrics. For this Verticals Quilt pattern, the key is consistent strip sizes and accurate measurements. Here’s a guideline for a lap-size quilt (approximately 50” x 60”):
- Vertical strips: Cut 20 strips measuring 2.5” x 40” from your selected fabrics.
- Background strips: Cut 10 strips measuring 2.5” x 40”.
- Additional pieces: If your strips are shorter than 40”, you can piece two strips together to create the full length.
When cutting, make sure your rotary cutter is sharp and your ruler is aligned with the fabric grain. Accuracy at this stage ensures your quilt pattern will come together smoothly. Once you’ve cut your strips, organize them by color or print so it’s easier to create a balanced design when sewing.
Piecing the Quilt Top
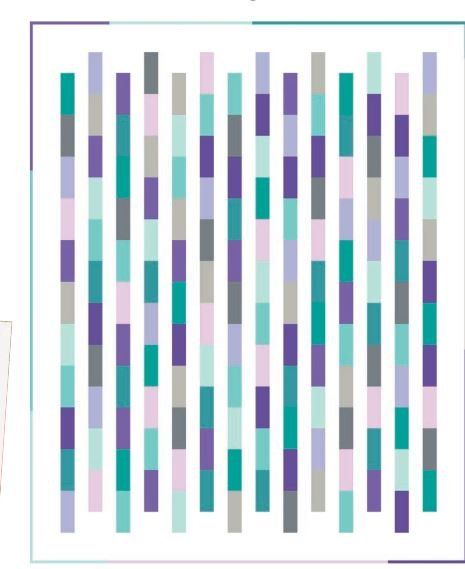
The sewing process for this quilt pattern is straightforward and beginner-friendly. Arrange your strips on a flat surface or design wall to decide on the order of colors. Alternate between patterned fabrics and background strips for a balanced look. You can keep the order random for a scrappy feel or plan a gradient effect for a modern twist.
Once you’re happy with your layout, start sewing the strips together using a ¼-inch seam allowance. Press the seams open or to one side after each addition to keep your quilt top flat. Continue adding strips until you’ve sewn the entire width of the quilt. After sewing, give the quilt top a good press with an iron to remove wrinkles and ensure a neat finish.
If you want to add interest to your Verticals Quilt, consider inserting narrow accent strips or pieced blocks between some of the vertical panels. This small detail can make your quilt stand out while still maintaining its clean and modern look.
Quilting Your Verticals Quilt
With your quilt top complete, it’s time to layer and quilt. Start by creating a quilt sandwich: lay out the backing fabric (wrong side up), place the batting on top, and then position the quilt top (right side up). Smooth out any wrinkles and secure the layers with pins or basting spray.
For quilting, straight-line quilting works beautifully with this pattern. You can stitch-in-the-ditch along the seams or create evenly spaced vertical lines that echo the strips. Use a walking foot for smooth stitching, and take your time to keep the lines straight. If you want to add a creative touch, try diagonal quilting or wavy lines for a modern look.
Once quilting is complete, trim the excess batting and backing around the edges. Then, prepare your binding by cutting 2.5-inch strips and sewing them together end-to-end. Attach the binding to your quilt using your preferred method, either by machine or hand.
Customization Ideas
One of the best things about the Verticals Quilt pattern is how customizable it is. Here are a few ideas to make your quilt truly unique:
- Color Play: Choose a monochromatic palette for a chic and modern look, or go bold with rainbow hues for a vibrant statement piece.
- Fabric Variety: Combine solids with prints, or mix textures like linen and cotton for added dimension.
- Borders and Sashing: Add borders around the quilt to frame the design, or insert narrow sashing between strips for a different effect.
- Size Adjustments: Make a baby quilt, lap quilt, or even a bed-size quilt by adding more strips and rows.
- Scrappy Version: Use leftover fabric scraps to create a zero-waste project that’s full of personality.
These ideas allow you to adapt the Verticals Quilt to fit your home décor or gift-giving needs, making each quilt one-of-a-kind.
Verticals Quilt Pattern – Free Step-by-Step Guide
1. Materials Needed
- 4–6 different fabrics for strips
- Background fabric
- Batting
- Backing fabric
- Binding fabric
- Rotary cutter, cutting mat, quilting ruler
- Thread and sewing machine
2. Cutting Instructions
For a lap-size quilt (approx. 50″ x 60″):
- 20 strips of main fabrics: 2.5” x 40”
- 10 strips of background fabric: 2.5” x 40”
If your fabric isn’t long enough, piece two strips together.
3. Layout & Sewing
- Arrange strips in alternating order (main fabric + background).
- Sew strips together using ¼-inch seam allowance.
- Press seams to one side or open for flatness.
4. Assemble the Quilt Sandwich
- Lay backing fabric (wrong side up), then batting, then quilt top (right side up).
- Smooth layers and baste with pins or spray.
5. Quilting
- Use straight-line quilting along the vertical seams for a modern look.
- Or try wavy/diagonal lines for a creative touch.
6. Binding
- Cut binding strips 2.5” wide, sew them together, and attach around the quilt edges.
7. Customization Ideas
- Mix solids and prints for contrast.
- Use rainbow colors for a vibrant quilt.
- Add borders to enlarge the quilt.
Share Your Verticals Quilt!
Now that you’ve completed your quilt, it’s time to show off your hard work! Take a photo of your finished Verticals Quilt and share it on social media using the hashtag #VerticalsQuilt. Join quilting communities online and connect with others who love creating beautiful quilts. Sharing your work not only inspires others but also helps you celebrate your creative journey.
Quilting is more than just sewing fabric together—it’s about expressing your personality through color and design. The Verticals Quilt pattern is an excellent way to practice your skills, experiment with fabrics, and create something functional and beautiful. So, gather your materials, follow this tutorial, and let your creativity flow. Happy quilting!