The Whirlwind Quilt Block is a dynamic and eye-catching design that brings movement and energy to any Quilt project. With its spinning effect and balanced geometry, this block creates the illusion of motion while remaining surprisingly beginner-friendly. It is a wonderful choice for quilters who want something visually striking without overly complex construction.
This Quilting Pattern has been loved for generations because it combines traditional patchwork elements with a playful layout. The Whirlwind block works beautifully in both classic and modern fabric choices, making it easy to adapt to different styles and occasions. From cozy home décor to full-sized quilts, its versatility is part of its charm.
In this tutorial, you will learn how to create a Whirlwind Quilt Block step by step, using simple techniques and clear instructions. The process is broken down into manageable stages, making it ideal for beginners who want to grow their skills while enjoying the creative journey.
Understanding the Whirlwind Quilt Block Design
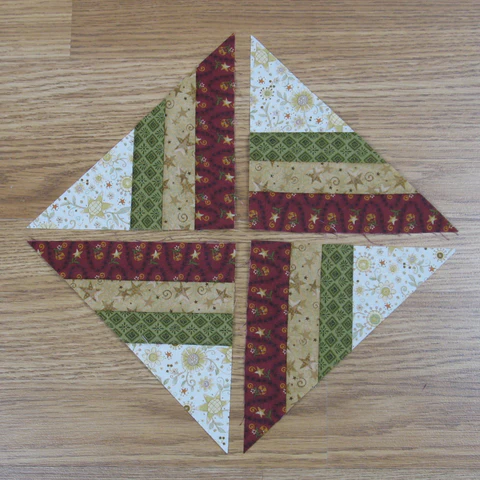
The Whirlwind Quilt Block is typically made from half-square triangles and square units arranged to form a rotating pattern. The careful placement of light and dark fabrics creates the illusion of spinning motion, which gives the block its distinctive name. Understanding this layout is the key to achieving a strong visual impact.
This Quilt block is often built around a central square, with triangle units radiating outward. The repetition of shapes makes it easy to assemble once you understand how the pieces fit together. This structure also allows for efficient chain piecing, which helps save time and maintain consistency.
Before you begin sewing, it is helpful to lay out the pieces on a flat surface or design wall. This step allows you to preview the final look and make adjustments before stitching. Taking a moment to understand the design will boost your confidence and improve accuracy.
Materials and Tools You Will Need
To create this Whirlwind Quilting Pattern, gather your materials ahead of time. You will need quilting cotton fabric in at least two contrasting colors, though three or four colors can add extra depth. A strong contrast between light and dark fabrics will enhance the spinning effect of the block.
Essential tools include a rotary cutter, self-healing cutting mat, quilting ruler, sewing machine, thread, pins or clips, and an iron. A quarter-inch presser foot is highly recommended, as accurate seam allowances are crucial for a clean and precise Quilt block.
Optional tools such as fabric starch, a design board, and a seam ripper can make the process smoother. Having everything within reach before you start helps create a relaxed and enjoyable quilting experience.
Cutting the Fabric Pieces Accurately
Accurate cutting is one of the most important steps in any Quilt project, especially for geometric designs like the Whirlwind block. Begin by pressing all fabrics thoroughly to remove wrinkles. Smooth fabric ensures precise measurements and clean cuts.
Cut squares for the center of the block and additional squares for making half-square triangles. These squares will later be cut diagonally to form triangles. Keeping pieces sorted by color and size will help prevent confusion during assembly.
Take your time during this step and double-check measurements before cutting. Small inaccuracies can affect how the pieces fit together and may impact the final appearance of the Quilting Pattern.
Creating Half-Square Triangle Units
Half-square triangles are the foundation of the Whirlwind Quilt Block. To make them, pair a light fabric square with a dark fabric square, right sides together. Draw a diagonal line from corner to corner, then sew a quarter-inch seam on each side of the line.
After sewing, cut along the drawn line to create two half-square triangle units. Press the seams open or toward the darker fabric, depending on your preference. Consistent pressing helps maintain uniformity across all units.
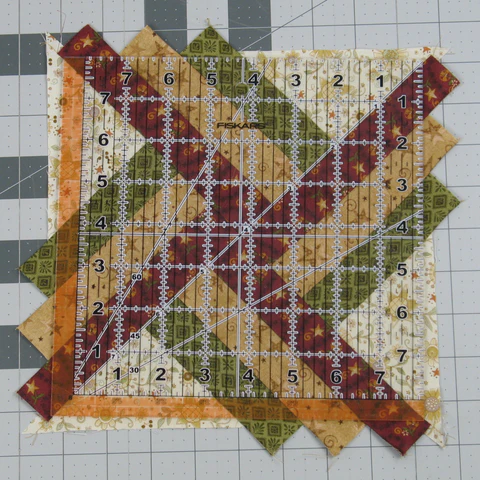
Trim each half-square triangle to the correct size if necessary. Accurate trimming ensures that all pieces align properly when assembling the block, which is essential for sharp corners and smooth transitions.
Assembling the Whirlwind Quilt Block Step by Step
Begin assembling the block by arranging the half-square triangles and center squares according to the Whirlwind layout. Pay close attention to the direction of the triangles, as their orientation creates the spinning effect. This step is crucial for achieving the intended design.
Sew the pieces together in rows, pinning where necessary to keep points aligned. Use a steady pace and maintain a consistent seam allowance throughout. Press seams carefully after each row to keep the block flat.
Once the rows are complete, join them together to form the full block. Press the finished block and admire the movement and balance of the design. At this stage, the Whirlwind pattern truly comes to life.
Turning the Block into a Finished Quilt
A single Whirlwind block can be used as a decorative accent, or you can repeat the block to create a full Quilt. When making multiple blocks, consistency in cutting, sewing, and pressing is key to achieving a polished result.
Arrange the blocks in different layouts to explore how the pattern changes. Rotating blocks or alternating color placement can create entirely new visual effects. This flexibility makes the Whirlwind Quilting Pattern especially fun to work with.
Once the quilt top is assembled, layer it with batting and backing fabric. Secure the layers with pins or spray basting to prepare for quilting.
Quilting and Binding the Project
Quilting enhances the texture and durability of your finished Quilt. Straight-line quilting works beautifully with the geometric nature of the Whirlwind block and is beginner-friendly. Stitching along seams or echoing the block shapes adds subtle detail.
After quilting, trim the excess batting and backing fabric. Attach the binding to finish the edges and give the Quilt a professional look. Binding can be done by machine or by hand, depending on your preference.
Take your time with the finishing steps, as they complete the project and protect your hard work. The final result will be a Quilt you can enjoy and display with pride.
Personalization Ideas and Creative Variations
One of the best aspects of the Whirlwind Quilting Pattern is how easily it can be personalized. Experiment with bold color combinations for a modern look or soft, muted tones for a more traditional style. Seasonal fabrics also work beautifully with this design.
You can adjust the size of the block to create different effects. Smaller blocks offer intricate detail, while larger blocks make a bold statement. Mixing block sizes within one Quilt can add visual interest and uniqueness.
Additional embellishments such as decorative stitching, textured fabrics, or subtle embroidery can give your quilt extra character. These small touches make each project truly one of a kind.
Tips for Beginners and Common Mistakes to Avoid
If you are new to quilting, remember that patience and practice are essential. Take your time with each step and don’t be discouraged by small mistakes. Every Quilt project is a learning experience.
Pay close attention to fabric orientation when assembling the Whirlwind block. Incorrect placement of triangles can disrupt the spinning effect. Laying out pieces before sewing helps prevent this issue.
Finally, enjoy the process and celebrate your progress. Quilting is about creativity, relaxation, and personal expression, not perfection.
Final Thoughts and Invitation to Share
The Whirlwind Quilt Block Quilt Pattern is a wonderful project for beginners who want to explore dynamic designs while building essential skills. Its balance of simplicity and visual impact makes it a rewarding pattern to sew.
Whether you create a single block or a full Quilt, this design offers endless opportunities for creativity and personalization. Each fabric choice and layout decision adds to the story of your handmade piece.
If you enjoyed this tutorial, I invite you to share your finished Quilt with friends, family, or online quilting communities. Your work may inspire others to try this beautiful Quilting Pattern and begin their own quilting journey.