
Creating a crochet cross is a beautiful and meaningful project that combines simplicity with elegance. This pattern is perfect for beginners who want to practice basic stitches, as well as for experienced crocheters looking for a quick and thoughtful handmade piece. Whether you use it as a decoration, a gift, or part of a larger project, this crochet cross motif is versatile and timeless.
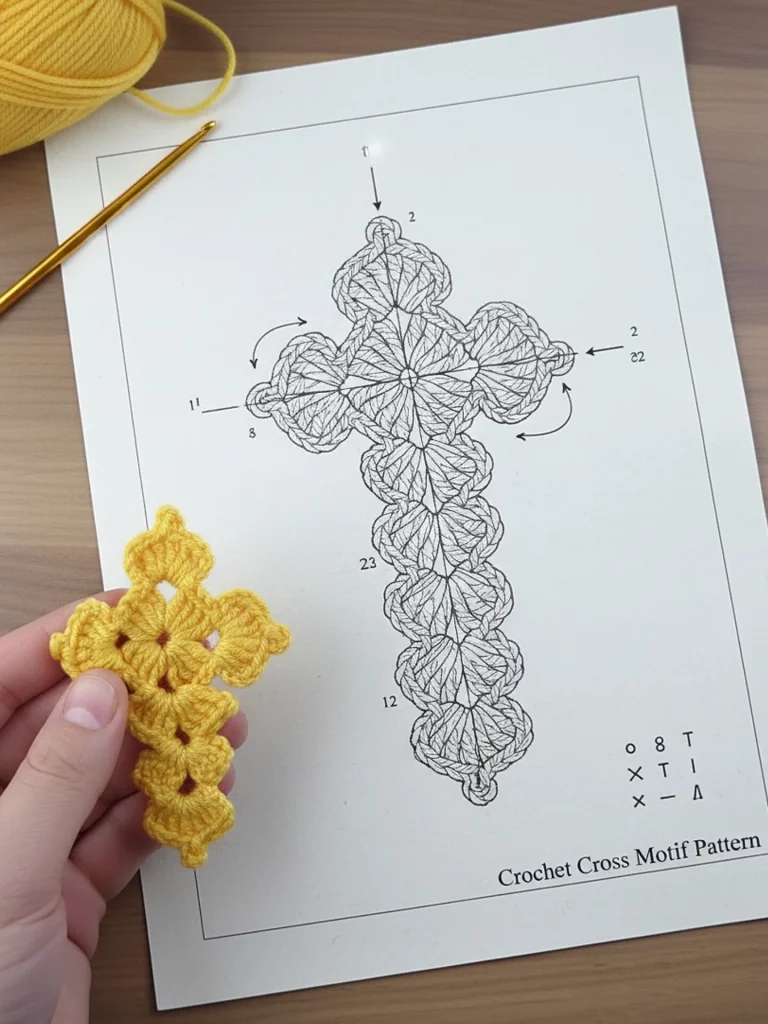
In this tutorial, you will learn everything you need to know to create your own crochet cross, including the materials required, stitch explanations, and a clear step-by-step guide. The design features a floral-inspired center and textured arms that give the cross a delicate and detailed appearance.
By following this guide, you’ll be able to recreate the pattern shown and even customize it with your own colors and yarn choices.
Materials Needed
Before starting your crochet cross, gather the following materials to ensure a smooth and enjoyable process. Using the right tools will help you achieve the best results and maintain consistency in your stitches.
You will need medium-weight yarn (such as cotton or acrylic). Cotton yarn is highly recommended for this project because it provides good stitch definition and a clean finish. Choose any color you like, but lighter colors tend to highlight the stitch details more clearly.
A crochet hook suitable for your yarn is essential. Typically, a 3.0 mm to 4.0 mm hook works well for medium-weight yarn. You will also need scissors for cutting the yarn and a yarn needle to weave in the ends neatly once your project is complete.
Optional materials include stitch markers to help track your rounds and blocking tools if you want to shape your finished cross for a more polished look.
Abbreviations and Basic Stitches
To follow this pattern easily, it’s important to understand the basic crochet abbreviations used throughout the instructions. These are standard terms commonly found in crochet patterns.
ch = chain
sl st = slip stitch
sc = single crochet
dc = double crochet
tr = treble crochet
st = stitch
If you are new to crochet, take a moment to practice these stitches before starting. The chain stitch creates the foundation, while single, double, and treble crochet stitches build the structure and texture of the cross.
Maintaining even tension throughout your work is key to achieving a balanced and symmetrical shape.
Step 1: Creating the Center Ring
Start by making a magic ring, or alternatively chain 4 and join with a slip stitch to form a loop. This ring will serve as the center of your cross.
Chain 3, which counts as your first double crochet. Work 11 more double crochets into the ring. This will give you a total of 12 stitches forming a circular base.
Join with a slip stitch to the top of the initial chain 3. Pull the ring tight if you used a magic ring. This center circle will be the foundation from which the arms of the cross will extend.
Step 2: Forming the First Arm
Chain 2, then work 3 double crochets into the same stitch. Chain 2 again to create a small space.
Skip the next stitch, and in the following stitch, work 4 double crochets. This creates a petal-like shape that forms part of the cross arm.
Continue this pattern around the circle, creating four evenly spaced clusters. These clusters will mark the four directions of the cross: top, bottom, left, and right.
Join with a slip stitch at the end of the round.
Step 3: Extending the Arms
To begin shaping the arms of the cross, slip stitch into the next chain space. Chain 3, then work 2 more double crochets in the same space.
Chain 2, then add 3 more double crochets into the same space. This creates a shell-like structure that adds dimension.
Now chain 3 and move to the next cluster. Repeat this process to form each arm of the cross. As you continue, you will notice the cross shape becoming more defined.
Make sure each arm is consistent in size and stitch count to keep the design symmetrical.
Step 4: Lengthening the Vertical Arm
To create the longer vertical section of the cross, continue working additional rounds only on the bottom arm.
Chain 3, turn your work slightly, and build another shell pattern using double crochets and chain spaces. Repeat this step for 2 to 3 more rows, depending on how long you want the cross to be.
Each row should follow the same structure to maintain a uniform look. This extended section gives the cross its classic elongated shape.
Finish the last row with a slip stitch and fasten off your yarn.
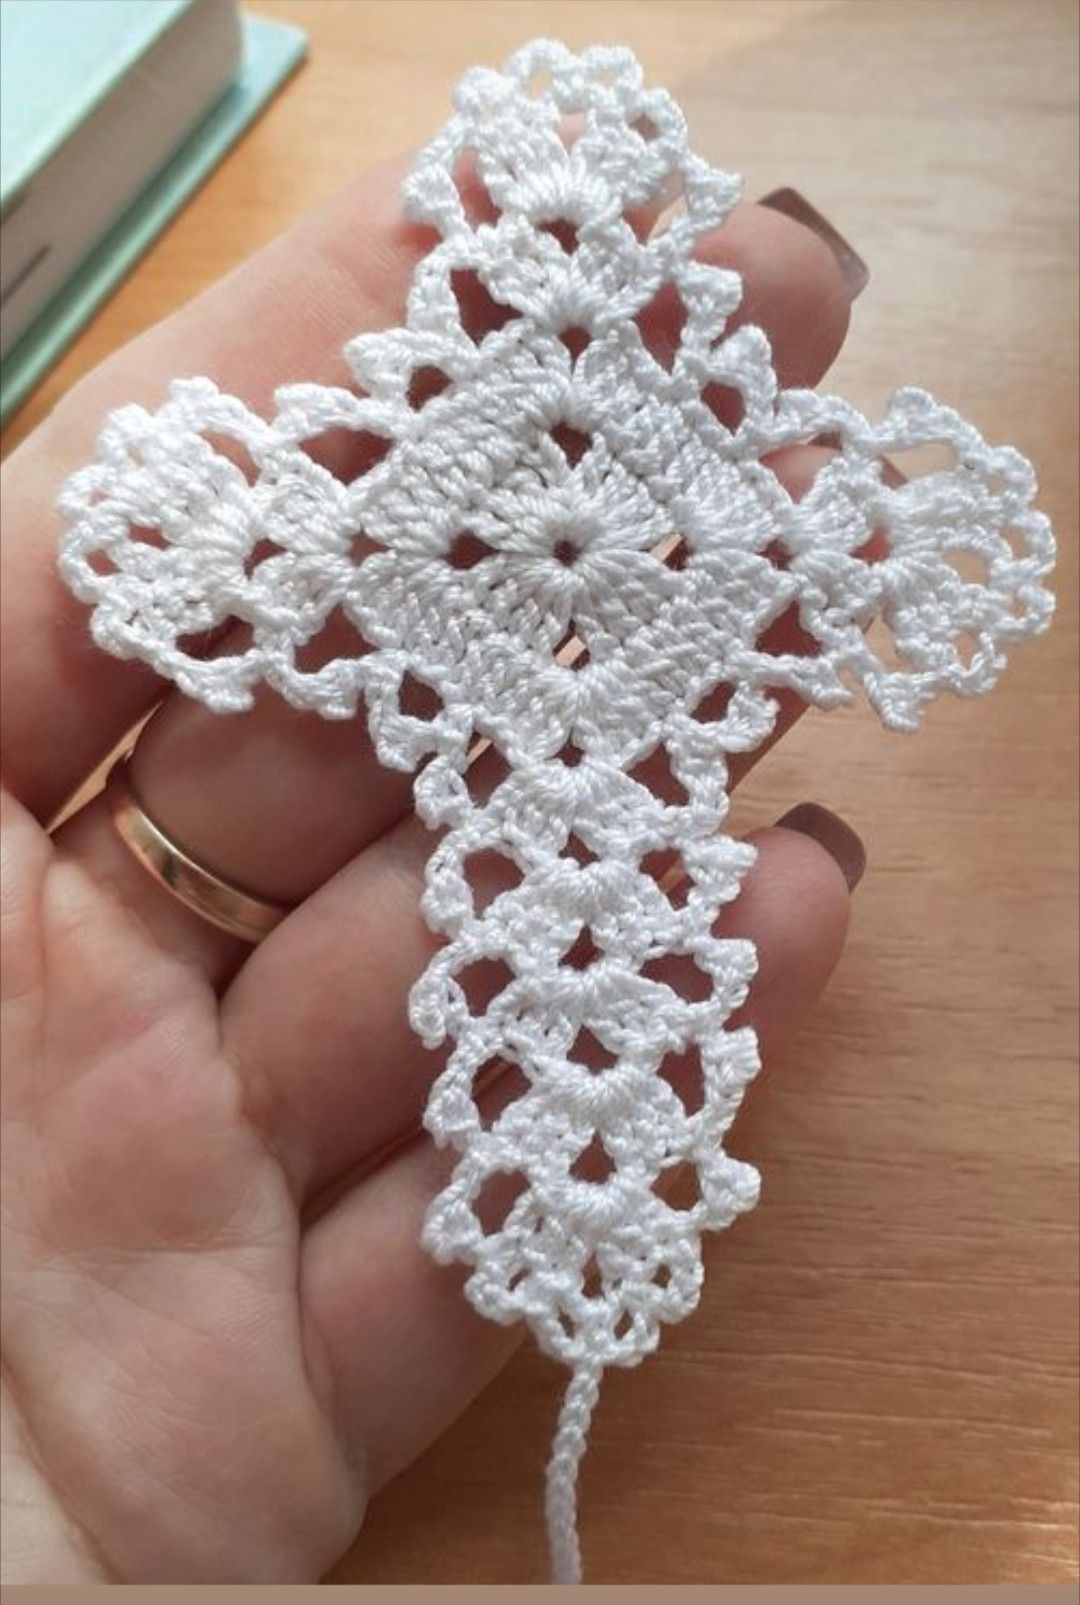
Step 5: Adding Decorative Edges
To enhance the appearance of your crochet cross, you can add a decorative edging around the entire piece.
Attach your yarn to any corner and begin working single crochets evenly around the edges. In the corners and tips, you can add picot stitches (chain 3, slip stitch into the same stitch) for a delicate decorative effect.
This step is optional but highly recommended if you want a more polished and intricate finish.
Once you complete the edging, fasten off and weave in all loose ends using your yarn needle.
Final Touches and Blocking
After finishing your crochet cross, you may want to block it to improve its shape and definition. Lightly dampen the piece and pin it into shape on a flat surface.
Allow it to dry completely before removing the pins. This will help the stitches settle and give your cross a crisp, professional appearance.
Blocking is especially useful if your edges curl or if you want the cross to lay perfectly flat.
Customization Ideas
One of the best aspects of this crochet cross pattern is how easy it is to customize. You can experiment with different yarn types, such as metallic or variegated yarn, to create unique effects.
Try making smaller versions for earrings or keychains, or larger ones to use as wall decor. You can also add beads or embroidery details for a more personalized touch.
Another creative idea is to incorporate the cross into larger crochet projects like blankets, bookmarks, or table runners.
Conclusion
This crochet cross pattern is a simple yet meaningful project that can be completed in a short amount of time. With just a few basic stitches and some creativity, you can create a beautiful handmade piece that holds personal or decorative value.
Whether you are making it for yourself, as a gift, or to sell, this pattern offers endless possibilities for customization and expression.
Now that you’ve learned the step-by-step process, gather your materials and start crocheting your own unique cross design today.
PATTERN HERE
CROCHET PATTERNS
FULL PATTERN ACCESS
You will be redirected to another site