
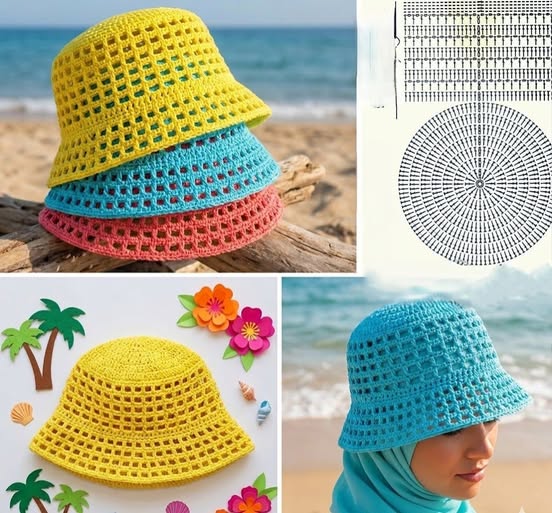
A crochet bucket hat is one of the most stylish and practical projects you can make. It’s beginner-friendly, quick to complete, and perfect for sunny days or adding a handmade touch to your outfit. This easy bucket hat pattern uses basic stitches and simple shaping, making it ideal if you want something relaxing and fun to crochet.
In this tutorial, you’ll learn how to create a classic bucket hat from the top down, including the crown, sides, and brim. The design is simple but can be customized with colors, stripes, or textures to match your personal style.
By the end of this guide, you’ll have a comfortable and trendy crochet bucket hat ready to wear or gift.
Materials Needed
To make your crochet bucket hat, you’ll need a few basic supplies. Choosing the right materials will help your hat keep its shape and feel comfortable.
Use medium-weight yarn (Category 4), such as cotton or a cotton blend. Cotton is highly recommended because it provides structure and breathability, which is perfect for hats. Acrylic can also be used for a softer, warmer version.
You will need a 4.0 mm to 5.0 mm crochet hook, depending on your tension. Other tools include scissors, a yarn needle for weaving in ends, and stitch markers to keep track of rounds.
Optional materials include a measuring tape and blocking tools if you want a more structured finish.
Abbreviations and Stitches
Here are the basic crochet terms used in this pattern. These stitches are simple and great for beginners.
ch = chain
sl st = slip stitch
sc = single crochet
hdc = half double crochet
dc = double crochet
inc = increase (2 stitches in the same stitch)
st = stitch
You can make the entire hat using single crochet for a tighter look or half double crochet for a softer, more flexible texture.
Step 1: Creating the Crown
Start with a magic ring, or chain 4 and join to form a loop. This will be the top of your hat.
Round 1: Chain 2 and work 10–12 half double crochets into the ring. Join with a slip stitch.
Round 2: Chain 2, then work 2 hdc in each stitch around (increase in every stitch). Join with a slip stitch.
Round 3: Chain 2, 1 hdc in the first stitch, 2 hdc in the next stitch. Repeat around.
Round 4: Chain 2, 1 hdc in next 2 stitches, 2 hdc in next stitch. Repeat around.
Continue increasing in this pattern until the circle reaches about 15–17 cm (6–6.5 inches) in diameter for an adult size.
Step 2: Building the Sides
Once the crown is the correct size, stop increasing and begin working even rounds to form the sides of the hat.
Chain 2 and work 1 hdc in each stitch around. Do not increase.
Repeat this round for about 8–10 rounds, or until the hat reaches the desired depth (usually covering the top of the ears).
This section will naturally start to curve downward, forming the bucket shape.
Step 3: Creating the Brim
To form the brim, you will begin increasing again to make it flare outward.
Round 1 of brim: Chain 2, 1 hdc in first stitch, 2 hdc in next stitch. Repeat around.
Round 2: Chain 2, 1 hdc in each stitch around (no increases).
Repeat these two rounds 2–3 times, depending on how wide you want the brim.
For a wider brim, add more increase rounds. For a subtle brim, keep it minimal.
Step 4: Finishing the Edge
For a clean and structured finish, work one final round of single crochet around the brim.
You can also add a slip stitch round for a tighter edge or use a crab stitch (reverse single crochet) for a decorative border.
Fasten off and cut the yarn, leaving a small tail.
Step 5: Weaving in Ends and Shaping
Use a yarn needle to weave in all loose ends securely. Make sure the ends are hidden inside the stitches for a neat look.
If needed, lightly block the hat to shape it. You can place it over a bowl or round object to help it hold its structure while drying.
Customization Ideas
This easy bucket hat pattern is perfect for personalization. You can change colors every few rounds to create stripes or use multicolor yarn for a unique effect.
Try adding a decorative band, फूल appliqués, or even small crochet motifs to make your hat stand out.
You can also adjust the size easily by increasing or decreasing the crown diameter and the number of side rounds.
Conclusion
The crochet bucket hat is a simple yet fashionable project that works for all skill levels. With basic stitches and a repetitive pattern, it’s relaxing to make and easy to customize.
Whether you’re making it for yourself, as a gift, or to sell, this pattern is a great addition to your crochet collection.
Now grab your yarn and hook, and start creating your own stylish crochet bucket hat today.

PATTERN HERE
CROCHET PATTERNS
FULL PATTERN ACCESS
You will be redirected to another site