A bandana hat with a visor is a practical and stylish accessory that combines the comfort of a headscarf with the sun protection of a cap. This easy sewing project is perfect for beginners and can be completed in just a few hours using basic sewing tools and a small amount of fabric.
The design shown in this pattern features a fitted head covering with a curved visor and a tie-back closure. It works especially well with lightweight stretch fabrics, making it comfortable for everyday wear, outdoor activities, gardening, travel, or casual fashion.
In this tutorial, you’ll learn the materials needed, fabric recommendations, cutting instructions, and step-by-step sewing process to create your own vintage-inspired bandana hat with visor.
Materials Needed
Before starting, gather the following supplies:
- ½ yard (45 cm) of stretch cotton jersey or knit fabric
- Lightweight fusible interfacing (optional)
- Matching polyester thread
- Sewing machine
- Fabric scissors or rotary cutter
- Measuring tape
- Sewing pins or clips
- Fabric marking pencil or chalk
- Iron and ironing board
- Paper for creating the pattern
- Ruler or quilting ruler
Fabric Recommendations
This pattern is designed specifically for stretch fabrics. Suitable options include:
- Cotton jersey
- Knit fabric
- Bamboo knit
- Stretch cotton blends
- Lightweight athletic knit
- Rayon spandex blends
Avoid heavy woven fabrics unless adjustments are made, as the hat may fit too tightly.
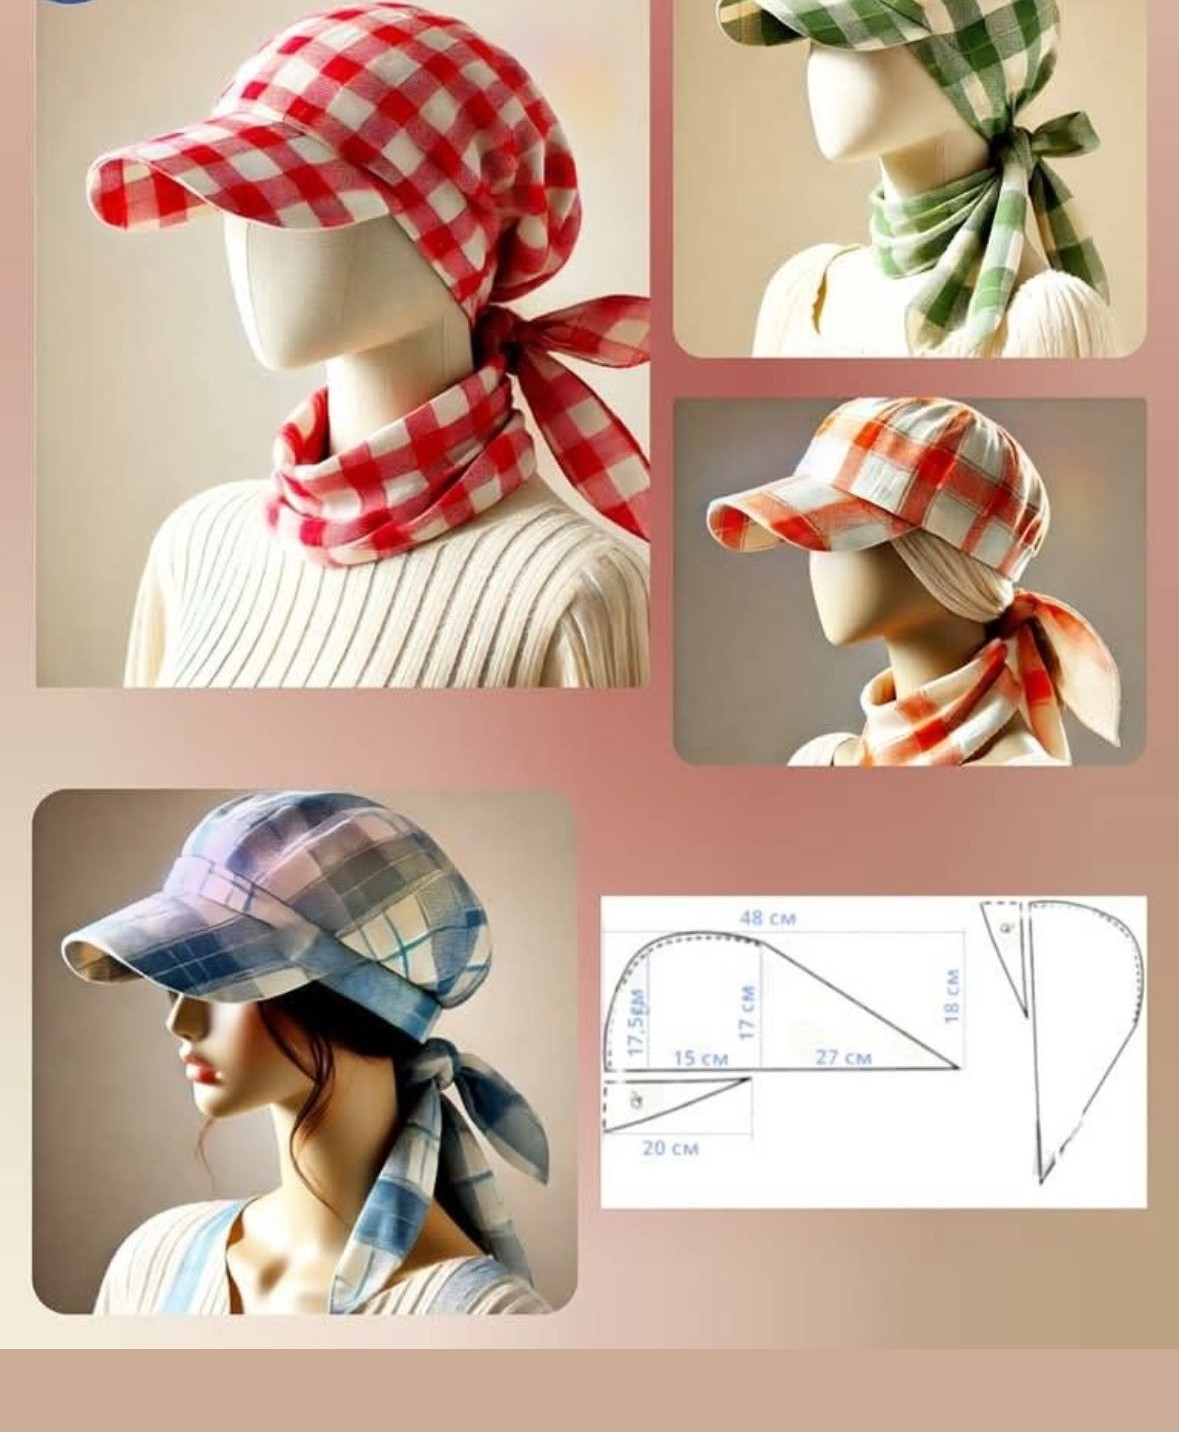
Pattern Pieces
The project requires two main pattern pieces:
Main Bandana Piece
Approximate dimensions:
- Total length: 48 cm (19″)
- Height at front: 17.5 cm (6.9″)
- Height at center: 17 cm (6.7″)
- Height at back point: 18 cm (7.1″)
Cut:
- 2 mirrored pieces from fabric
Visor Piece
Approximate dimensions:
- Length: 20 cm (7.9″)
Cut:
- 2 fabric pieces
- 1 interfacing piece (optional for stability)
Preparing the Pattern
Draw the pattern pieces on paper using the measurements provided.
Carefully cut out the paper templates and place them on your folded fabric. Make sure the stretch direction runs around the head for maximum comfort.
Pin the templates securely and cut all required pieces.
Transfer any important markings before removing the pattern.
Step 1: Cut the Fabric
Using your pattern templates:
- Cut two mirrored bandana pieces.
- Cut two visor pieces.
- Cut one interfacing visor piece if desired.
- Mark seam allowances around all pieces.
Organize the pieces before sewing to ensure everything is correctly oriented.
Step 2: Prepare the Visor
Place the two visor pieces right sides together.
Sew around the curved edge using a ¼-inch seam allowance.
Trim excess fabric from the seam and clip small notches along the curve.
Turn the visor right side out.
Press carefully with an iron to create a smooth curve.
Topstitch around the outer curved edge for a professional finish.
If using interfacing, fuse it to one visor piece before sewing.

Step 3: Sew the Main Bandana Sections
Place the two bandana pieces right sides together.
Pin along the curved top edge.
Sew the curved seam slowly, following the shape carefully.
Finish the seam using a zigzag stitch or serger if available.
Press the seam flat.
Turn the piece right side out and inspect for smoothness.
Step 4: Attach the Visor
Locate the center front of the bandana.
Match the center of the visor with the center front edge.
Pin the visor in place.
Sew carefully across the front edge, securing the visor to the bandana.
Press the seam upward toward the hat.
Topstitch if desired for extra durability.
Step 5: Create the Front Band
Fold the front edge over the visor toward the inside.
Press neatly.
Sew close to the folded edge, enclosing the visor seam.
This step gives the hat a clean, professional appearance and improves comfort.
Step 6: Finish the Back Ties
Fold and press the raw edges of the tie sections.
Turn under approximately ¼ inch.
Stitch along both sides of each tie.
Continue until the tie ends are fully finished.
The ties should remain soft and flexible for comfortable knotting.
Step 7: Finish All Raw Edges
Inspect the entire hat.
Finish any exposed seams using:
- Zigzag stitch
- Stretch stitch
- Serger
This prevents fraying and extends the life of the hat.
Give the entire project a final pressing.
Step 8: Try On and Adjust
Place the bandana on your head.
Tie the back securely.
Check the fit around:
- Forehead
- Crown
- Ears
- Neck
Because stretch fabrics vary, small adjustments may be needed for a perfect fit.
Customization Ideas
One of the best features of this pattern is its versatility.
Try these creative variations:
Floral Prints
Perfect for spring and summer outfits.
Denim Look
Use lightweight stretch denim for a casual style.
Patchwork Design
Combine multiple coordinating fabrics for a unique handmade appearance.
Embroidery Details
Add embroidered flowers, initials, or decorative stitching.
Lace Accents
Attach lace trim along the back ties for a vintage-inspired look.
Reversible Version
Create a fully reversible hat using two coordinating fabrics.
Tips for Success
- Use stretch needles when sewing knit fabrics.
- Test stitch settings on fabric scraps first.
- Press seams frequently for a cleaner finish.
- Do not pull the fabric while sewing.
- Use clips instead of pins for delicate knits.
- Topstitch slowly around curved sections.
Care Instructions
To keep your bandana hat looking its best:
- Machine wash on a gentle cycle.
- Use cold water.
- Avoid bleach.
- Air dry when possible.
- Iron on low heat if needed.
Proper care will help maintain the shape of the visor and preserve fabric elasticity.
Final Thoughts
This Easy Bandana Hat with Visor Pattern is a beginner-friendly sewing project that combines fashion and function. With only a few pattern pieces and simple sewing techniques, you can create a comfortable accessory that provides shade, style, and practicality.
Whether you choose a classic plaid fabric, a bright floral print, or a modern solid color, this versatile hat can become a favorite handmade accessory. Once you’ve completed your first version, you’ll likely want to make several more in different colors and fabrics for every season.